Credits
The first thing I want to mention is that this post is a direct implementation of the course that was published by FreeCodeCamp and created by Derek Morgan.
I am adding to it to attempt to do the exercise in two different ways that are not the subject of the course. Derek’s original course was ‘Learn Terraform (and AWS) by Building a Dev Environment.’ My objectives are to duplicate his work in the console first, then in CloudFormation, and finally, using Terraform as his course teaches.
Objectives
My main objectives with this exercise are to:
- Practice my AWS Console skills to help me prepare for my Sysops Associate exam labs
- Develop and improve my CloudFormation skills
- Learn the basics of Terraform
- Potentially have a new development environment I can deploy to aid in future AWS projects from the outcome of this exercise
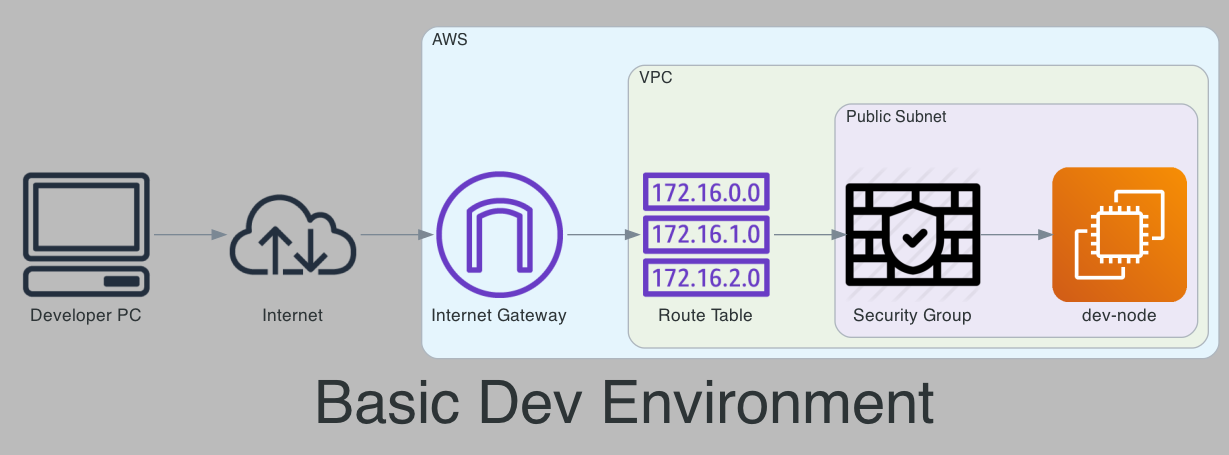
Basic Setup
The first step that the course takes is to create an API-enabled user for VSCode. Like the course, I will call mine VSCode and provide it with the same permissions (administrator access). I also installed the AWS extension (and configured it) for VSCode and Terraform.
Create VPC and Subnets
VPC
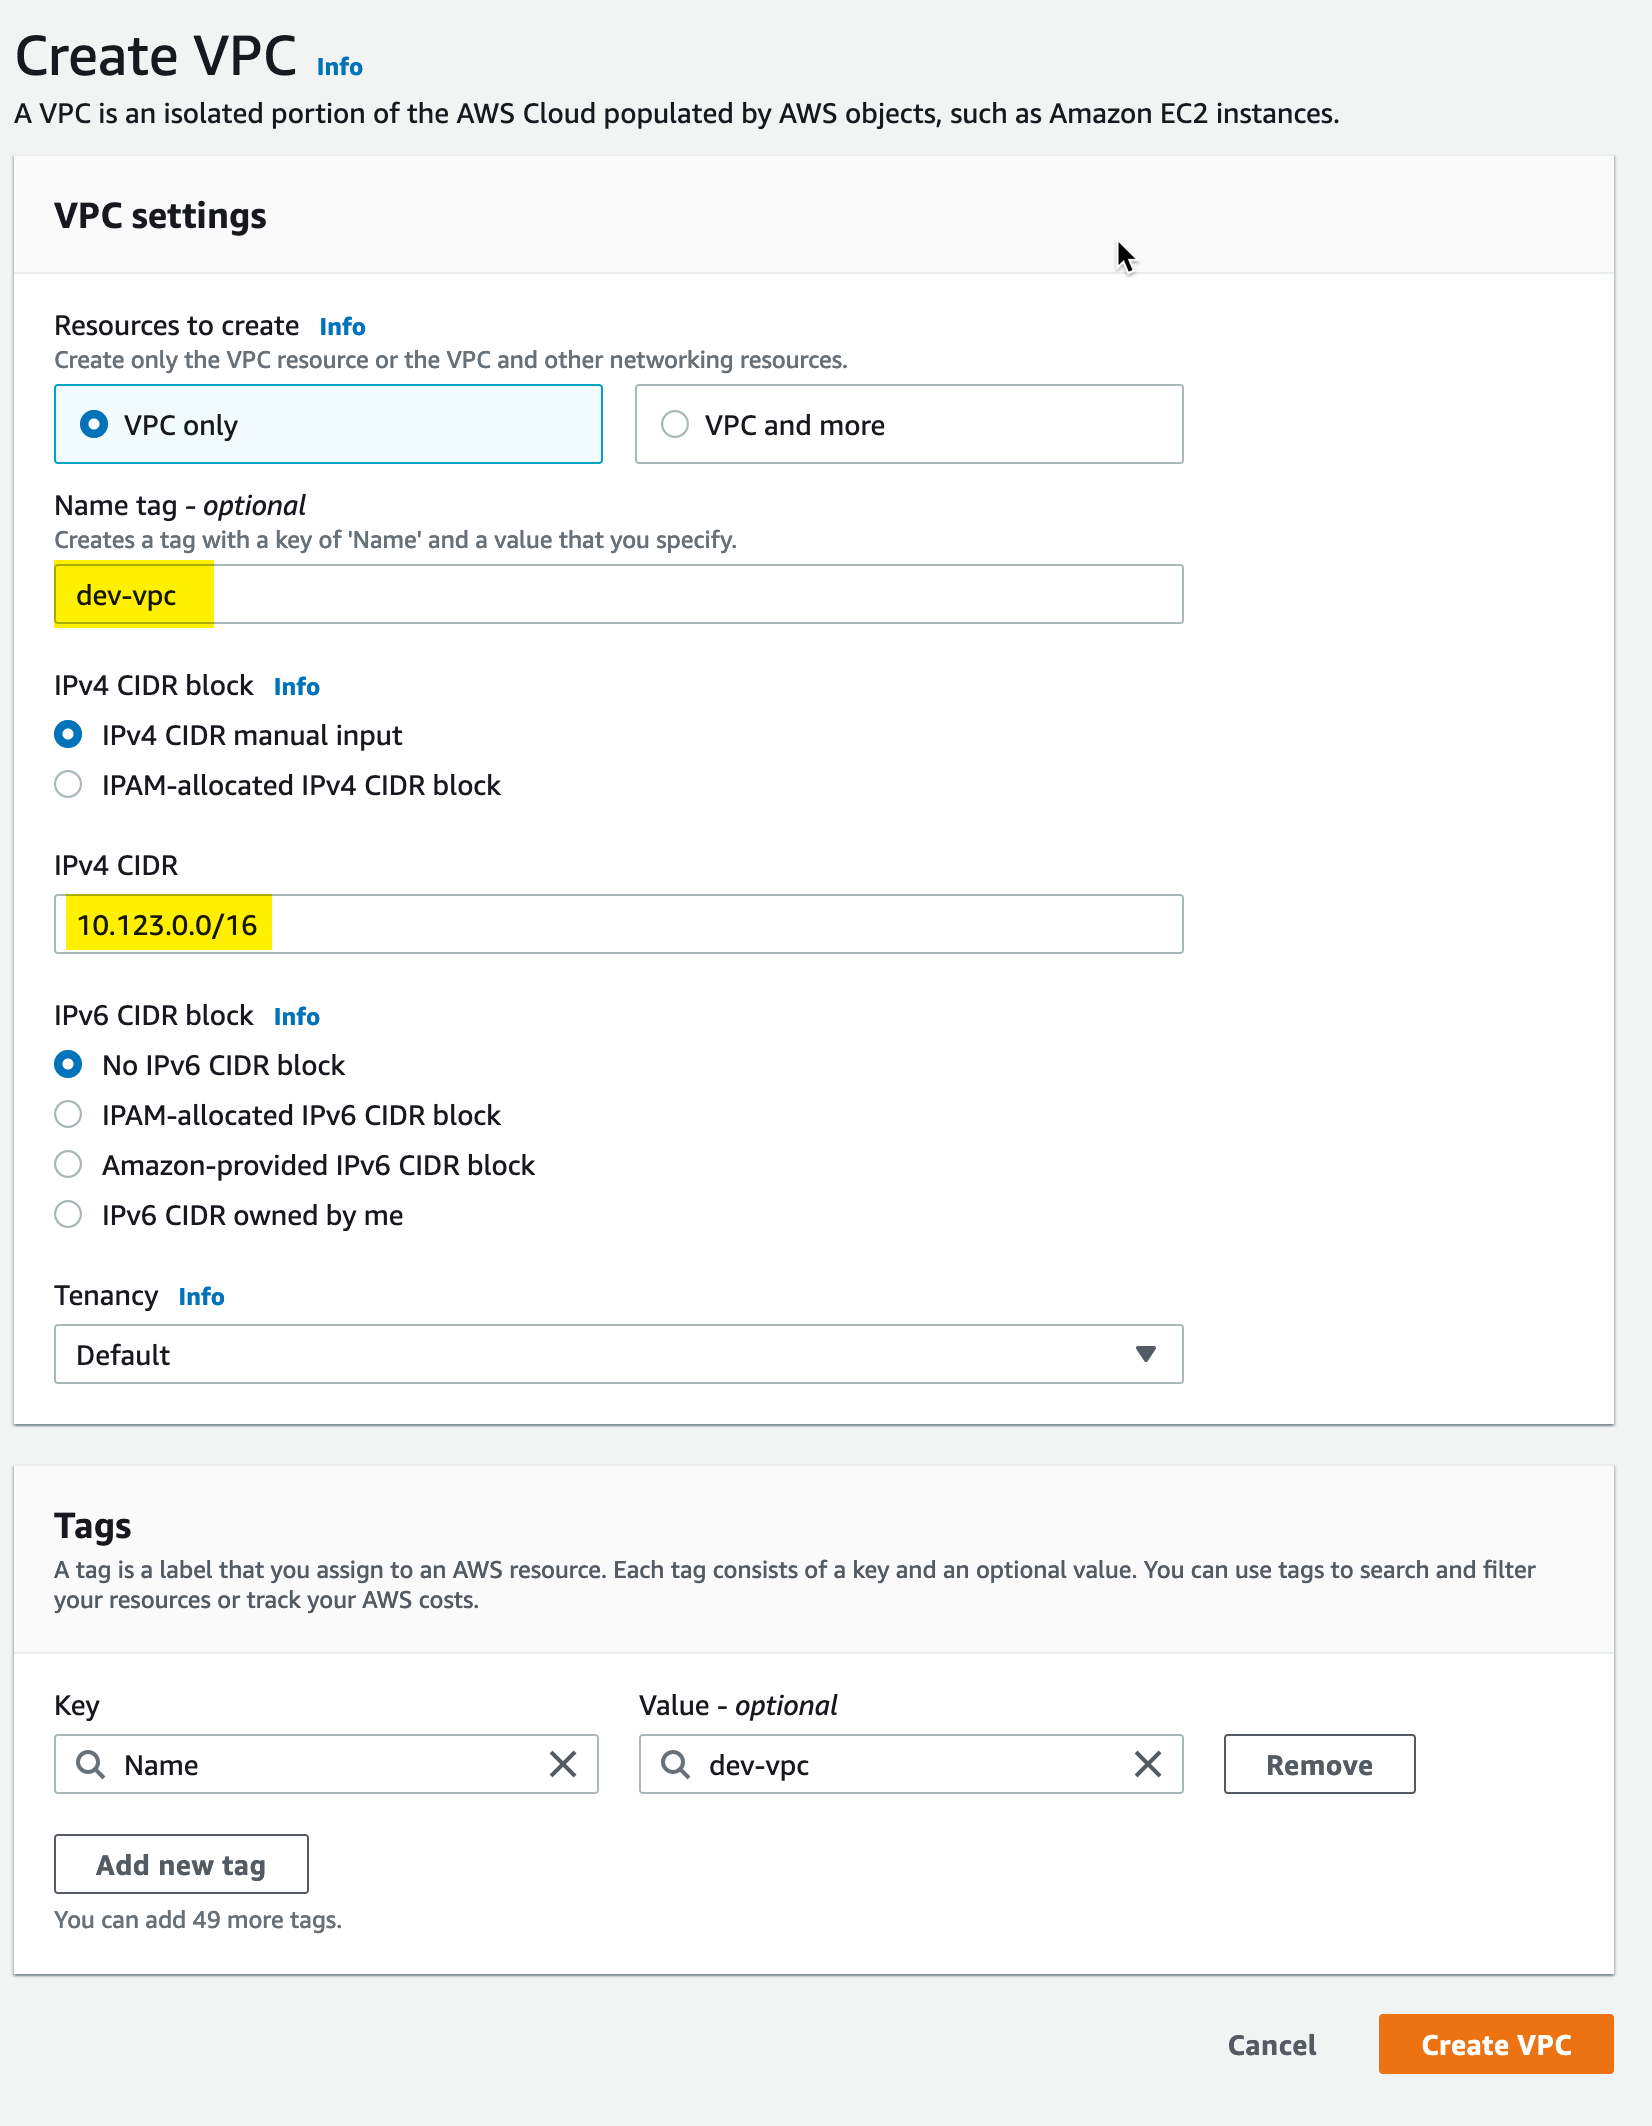
The first step is to create the VPC. In the console, this is done under the VPC section by adding a new VPC. In this case, we are creating a VPC with IPv4 addresses in the 10.123.0.0/16 range. The tutorial calls the vpc dev; in my implementation, I have used the name dev-vpc.
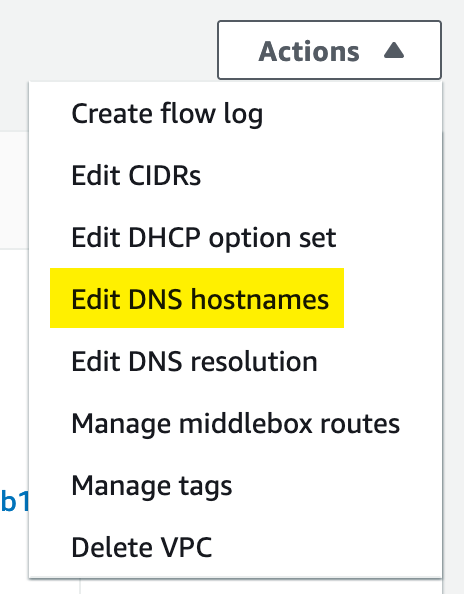
In addition, we need to ensure that VPC Hostnames are enabled for the resources in this VPC. This option is off by default. So we select Edit DNS Hostnames from the actions menu:
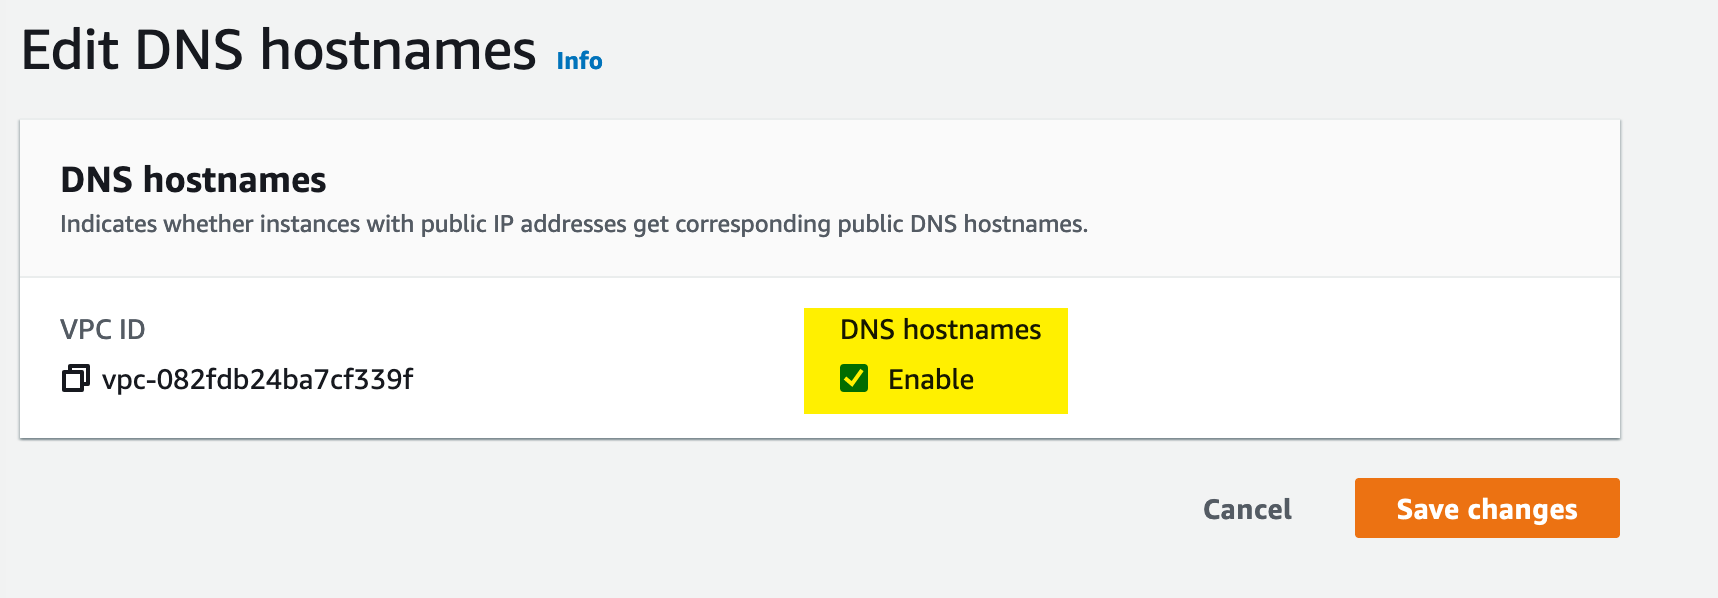
Then we tick the checkbox to enable DNS Hostnames and save that selection:
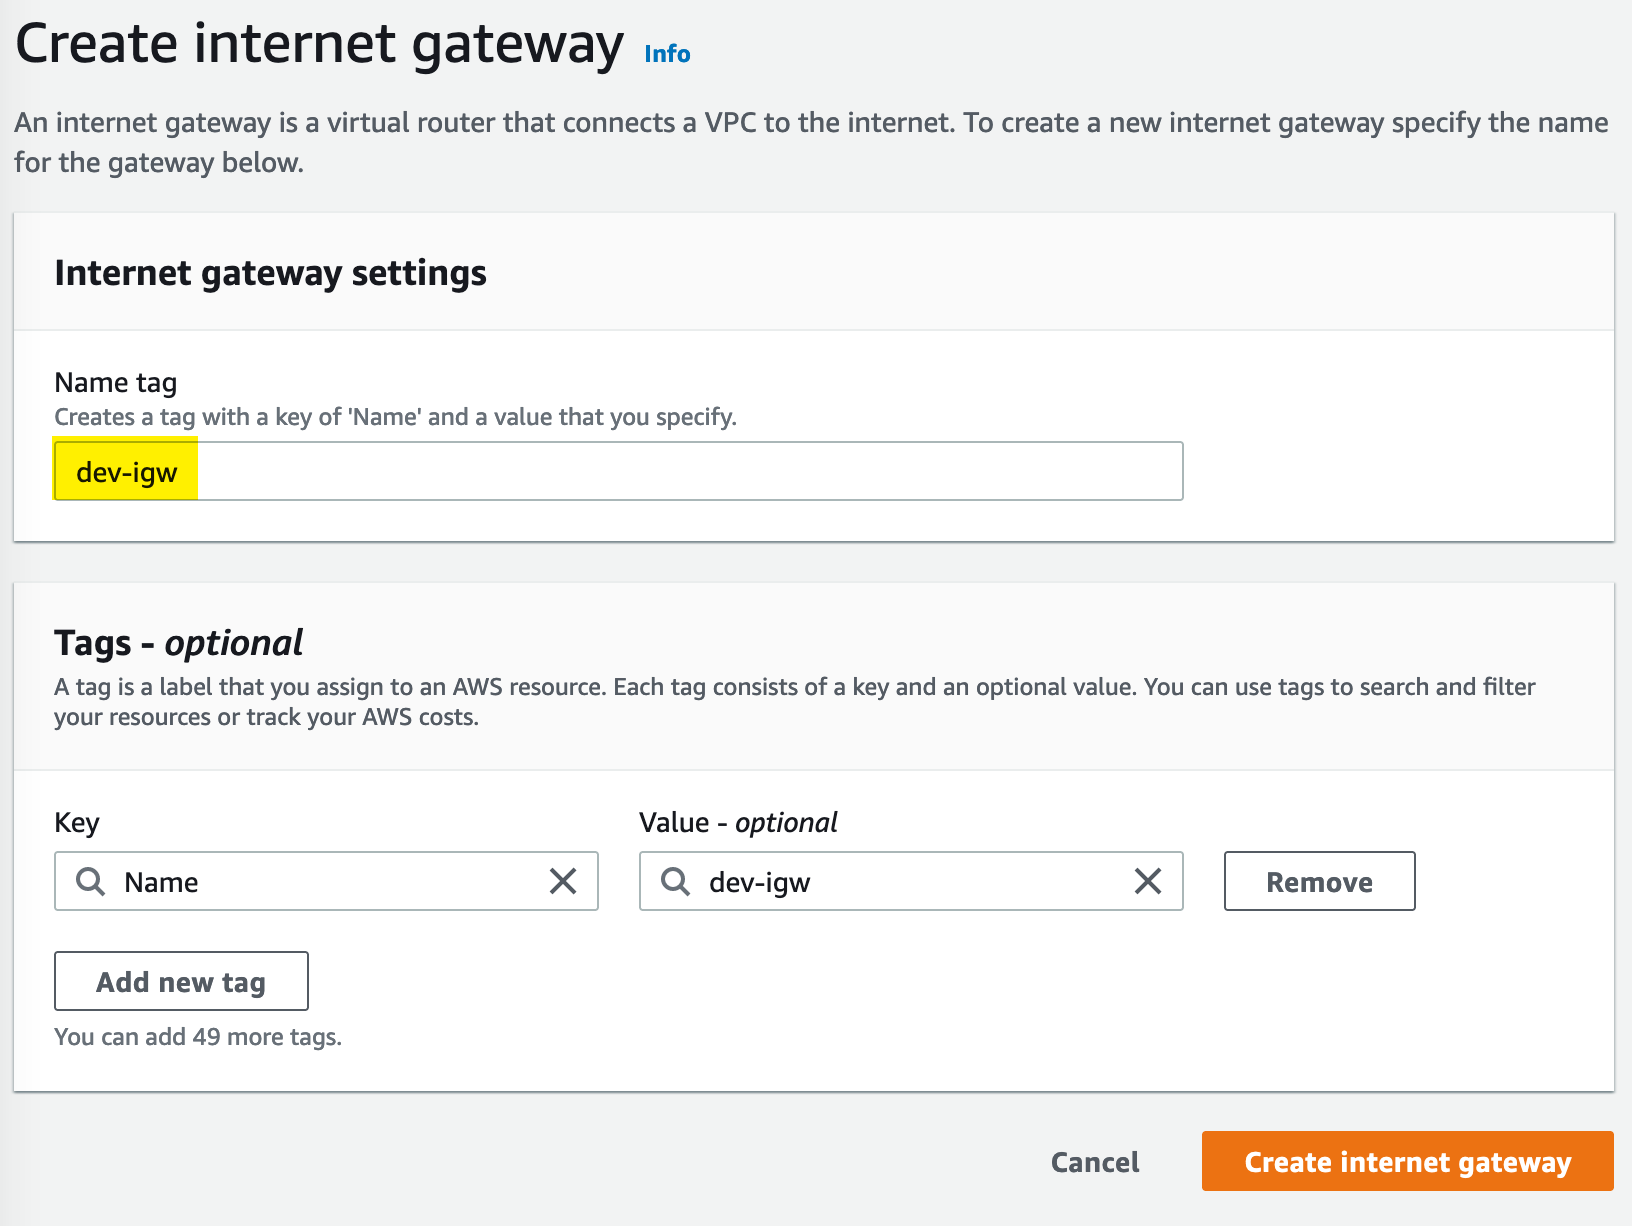
Internet Gateway
We need to attach an internet gateway to our VPC to allow internet access:
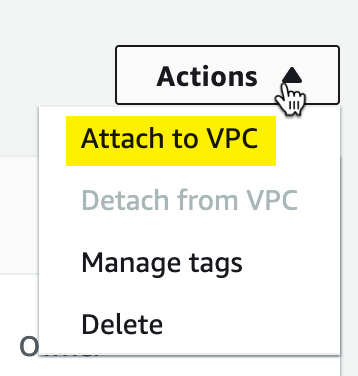
Internet Gateways do not automatically attach to a VPC, so we need to attach our VPC by choosing Attach from the Action menu.
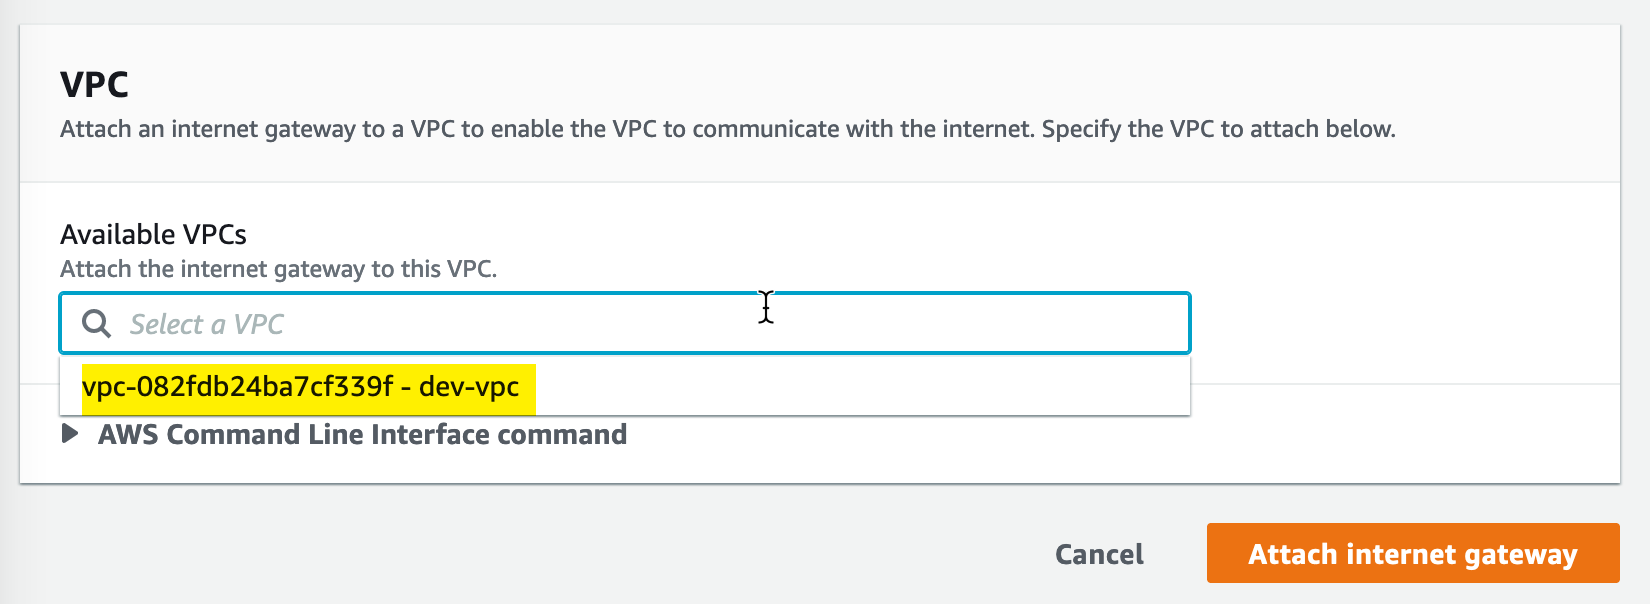
From here, we simply need to select the VPC to which to attach the Internet Gateway:
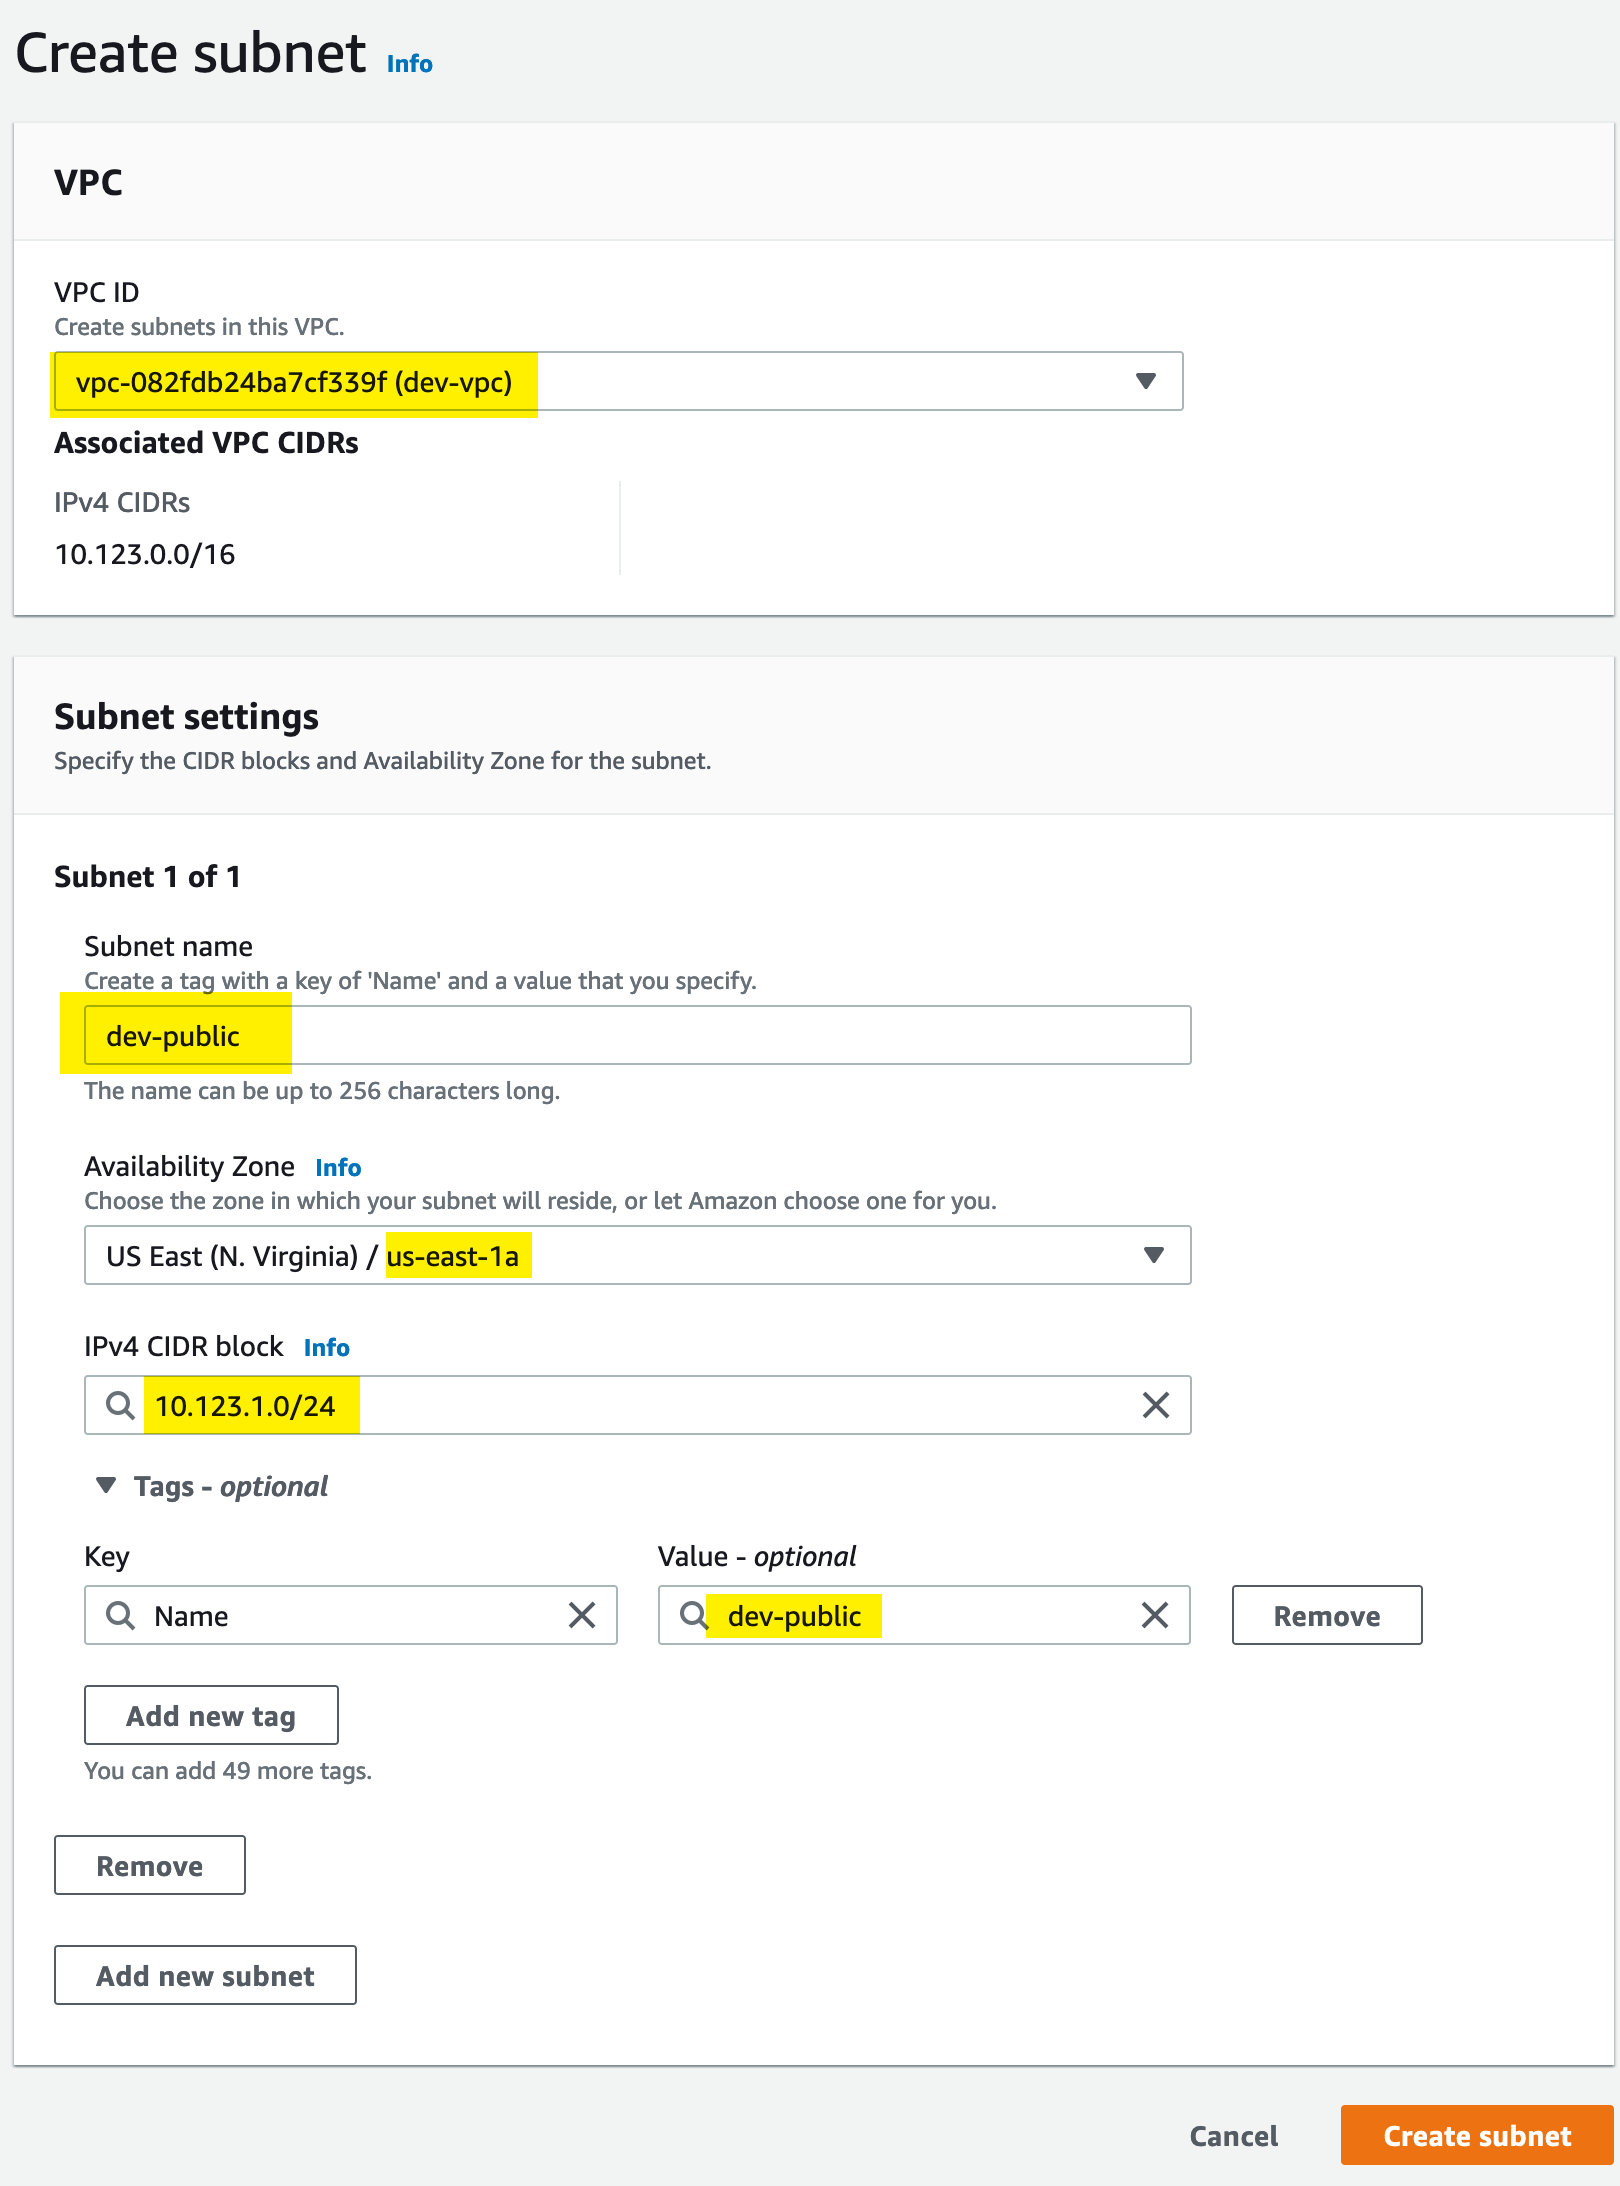
Subnets
Now we will create a public subnet, within our dev-vpc VPC, for our resources. This subnet will be named dev-public and reside in the us-east-1a availability zone. We will give it the CIDR range of 10.123.1.0/24:
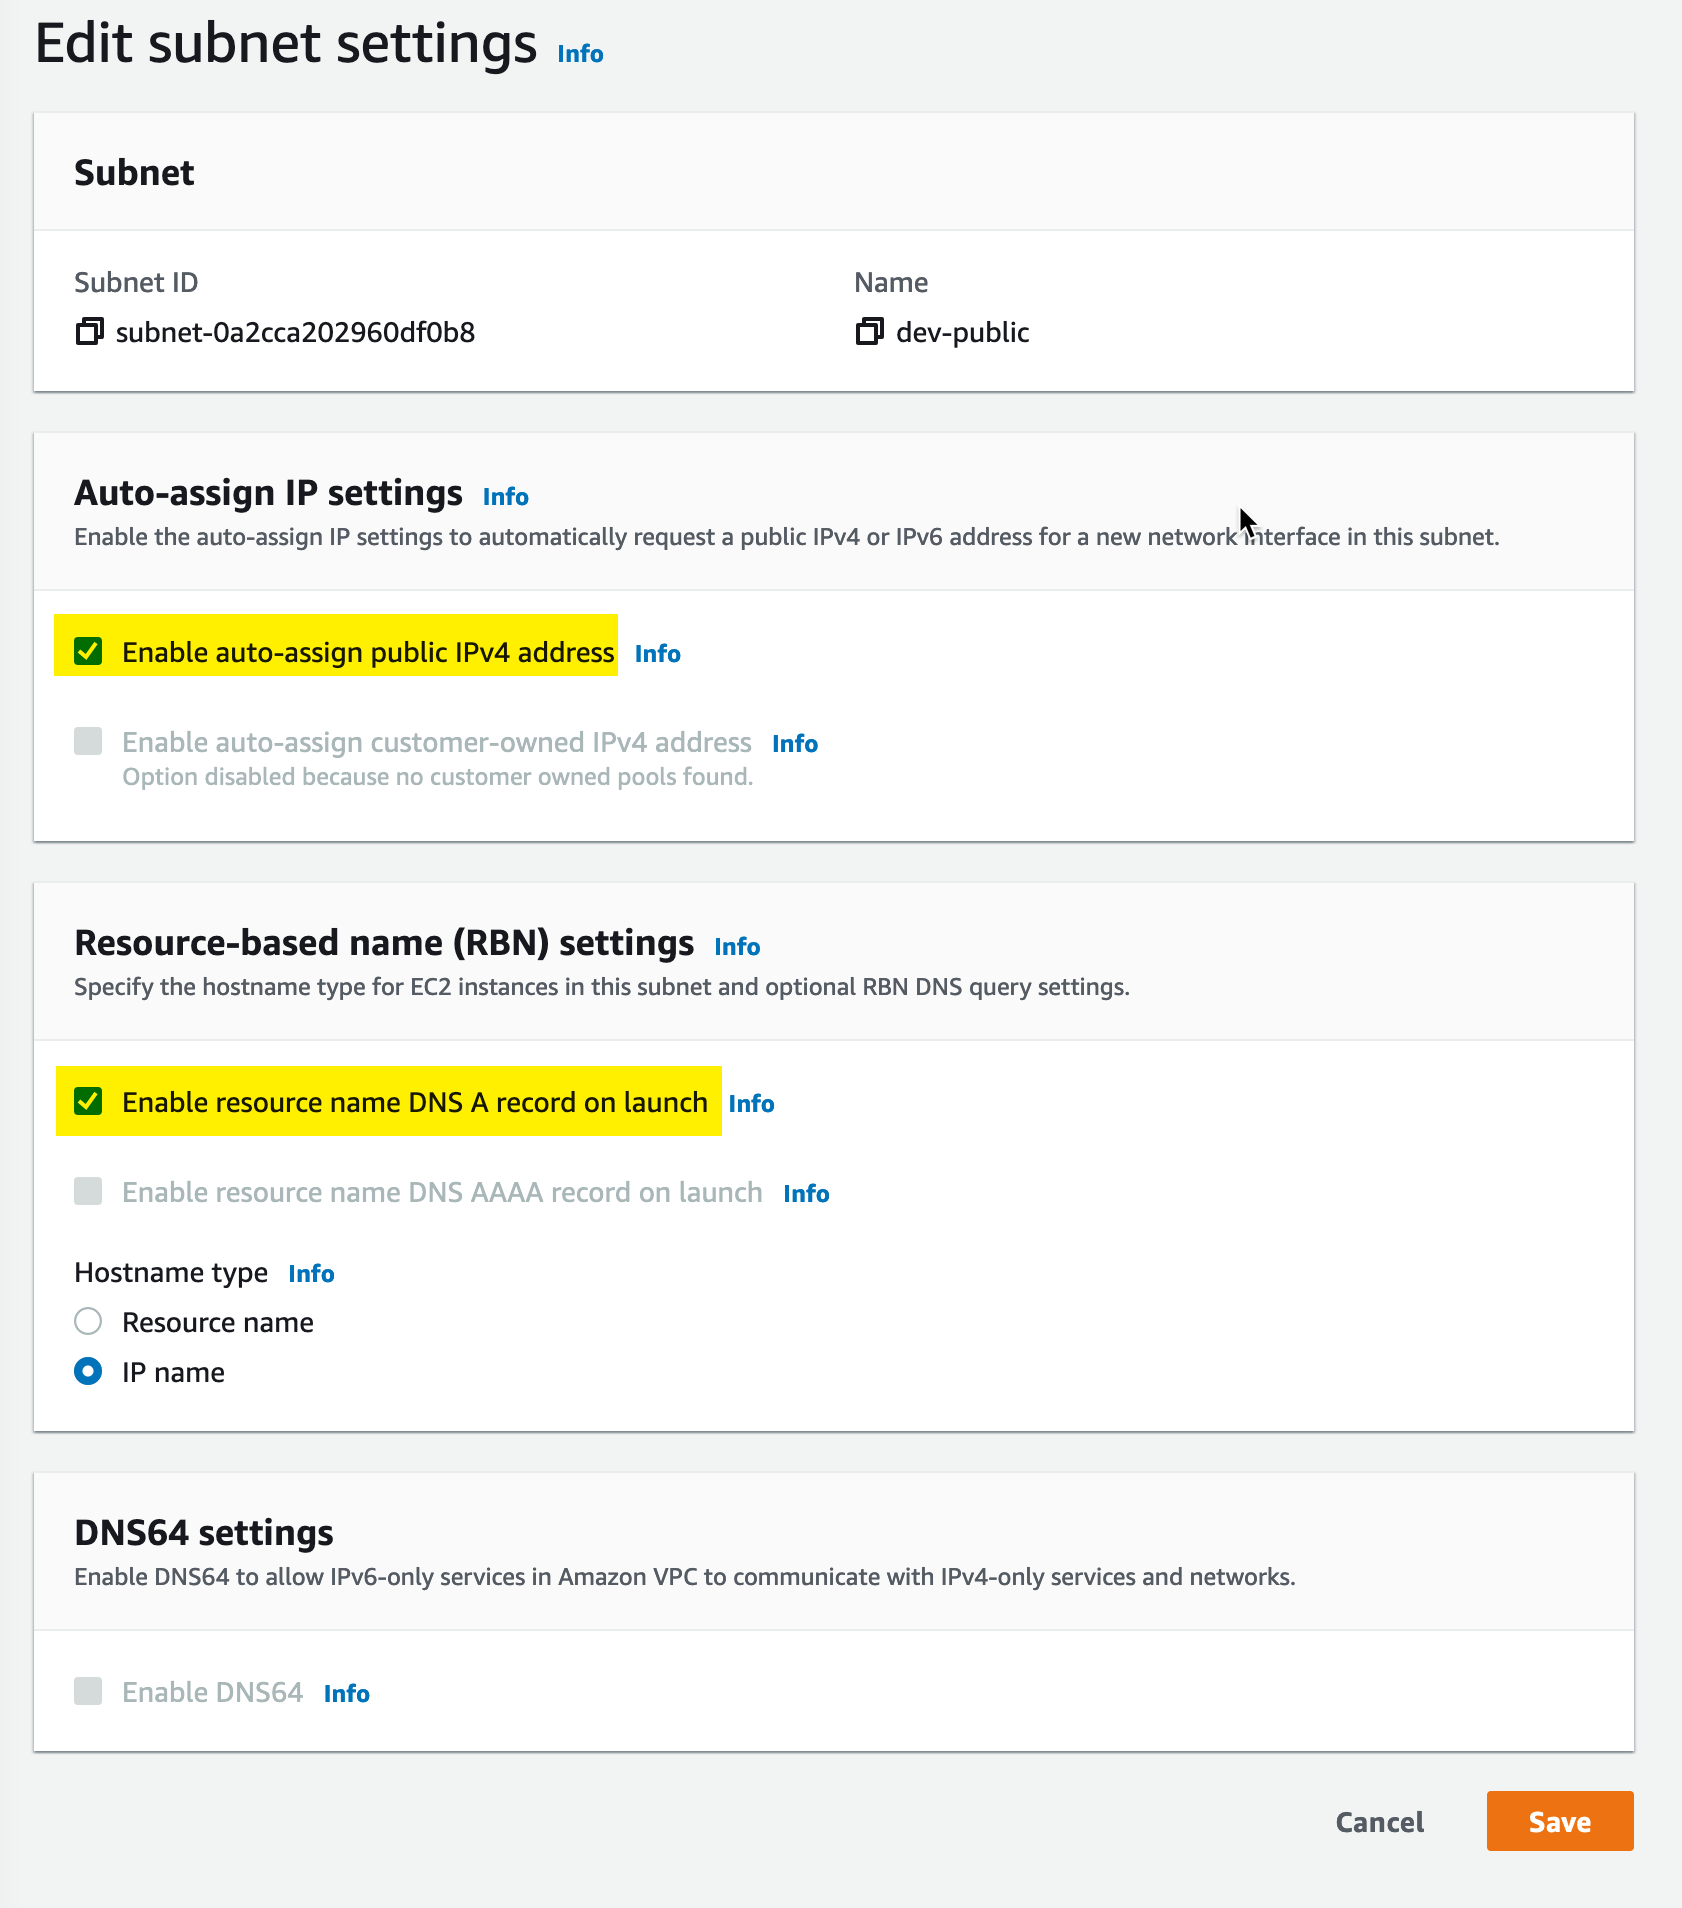
By default, subnets do not assign public IP addresses to resources, but we need to enable them, so first we edit the subnet settings:
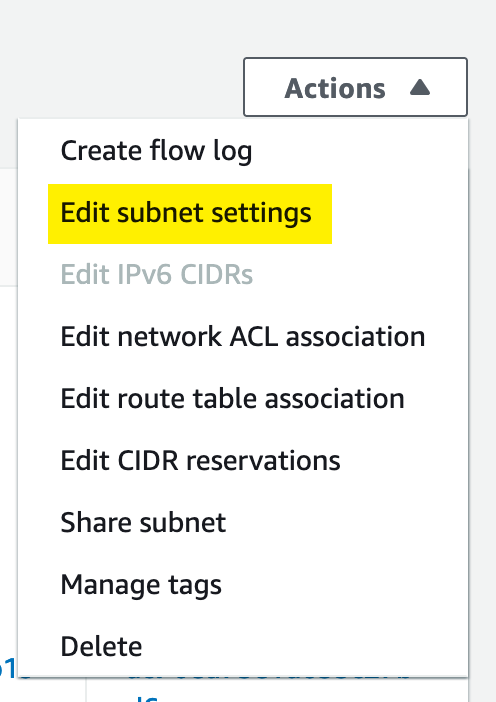
Then we make sure we tick the “Enable auto-assign public IPv4 address” checkbox. In my case, I also checked the box to enable DNS A record on launch.
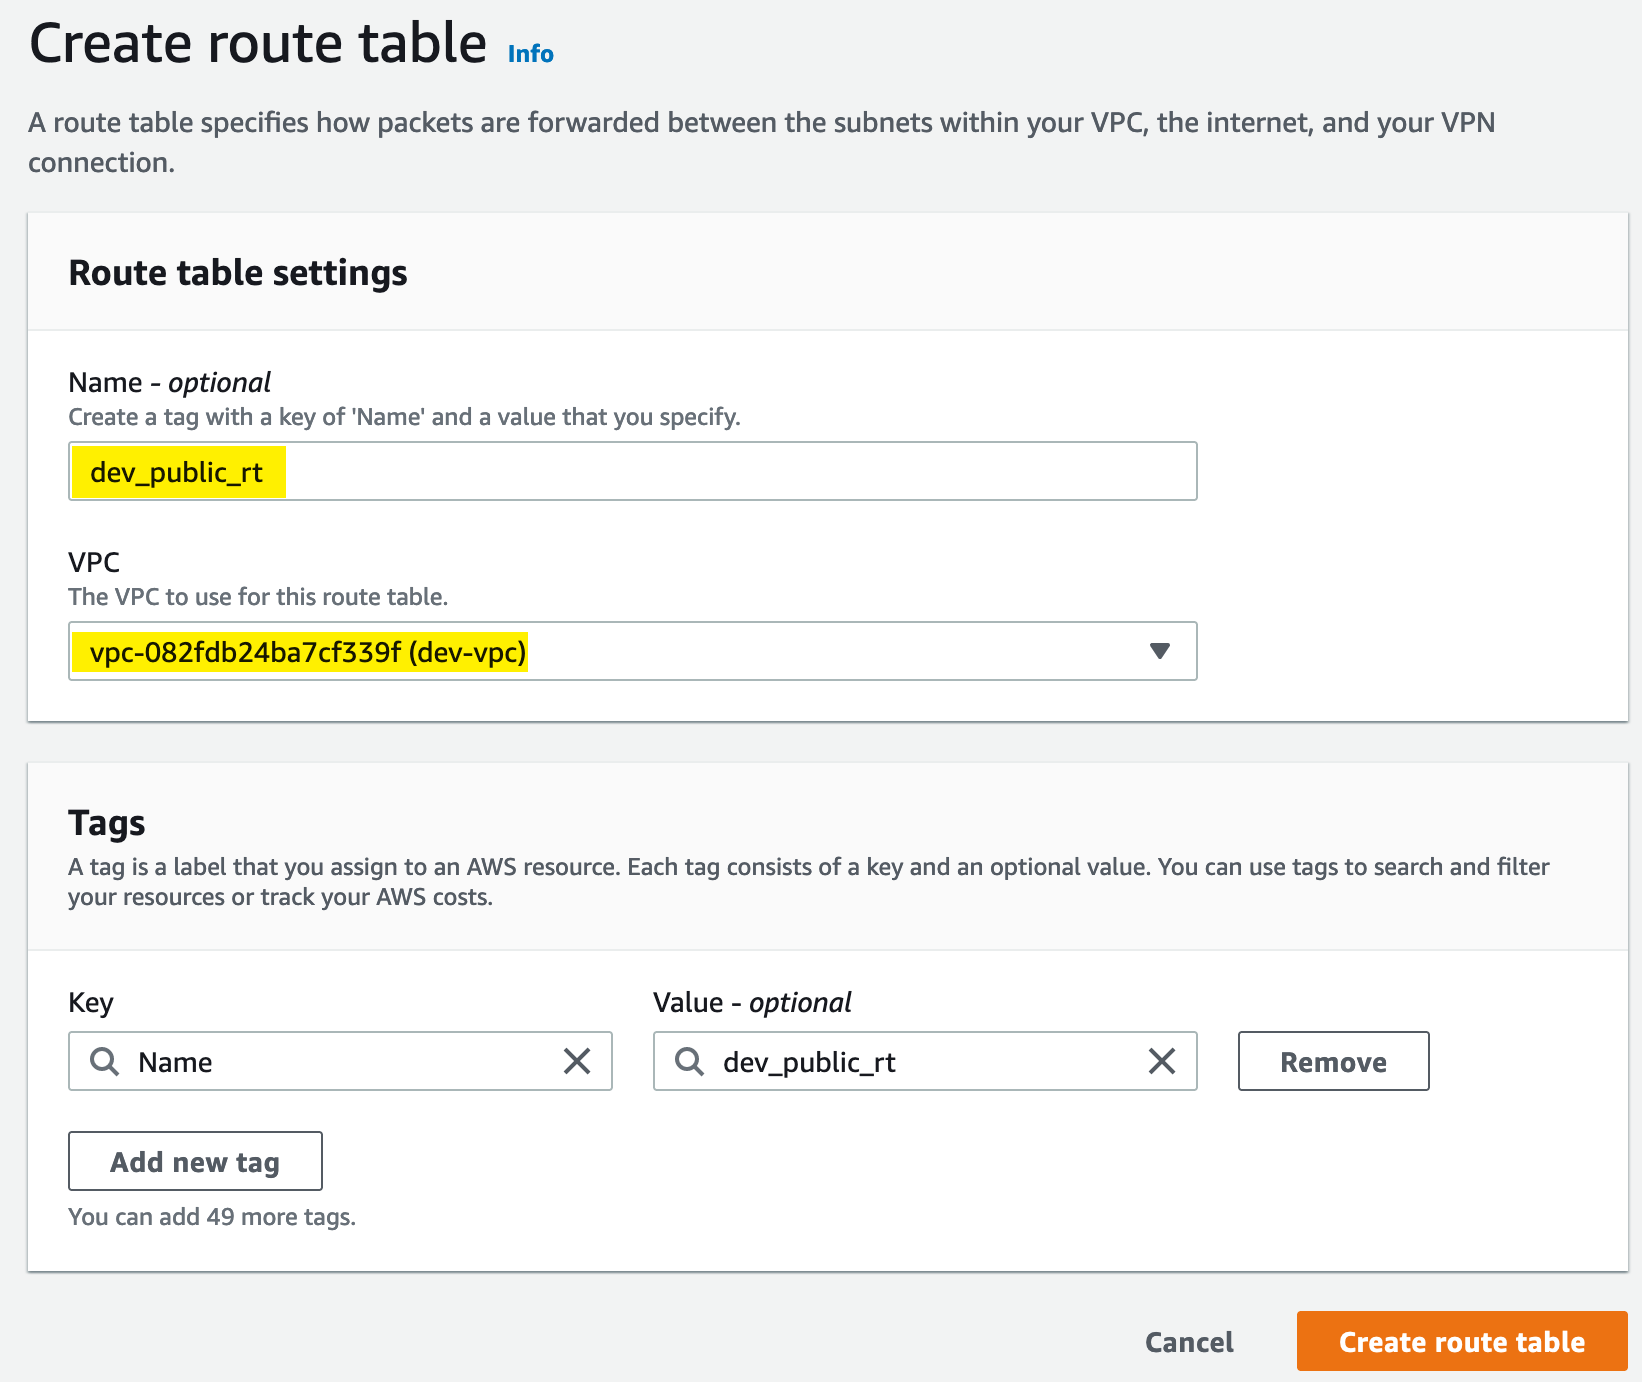
Route Table
We need to create a route table to allow our subnet to reach the internet gateway:
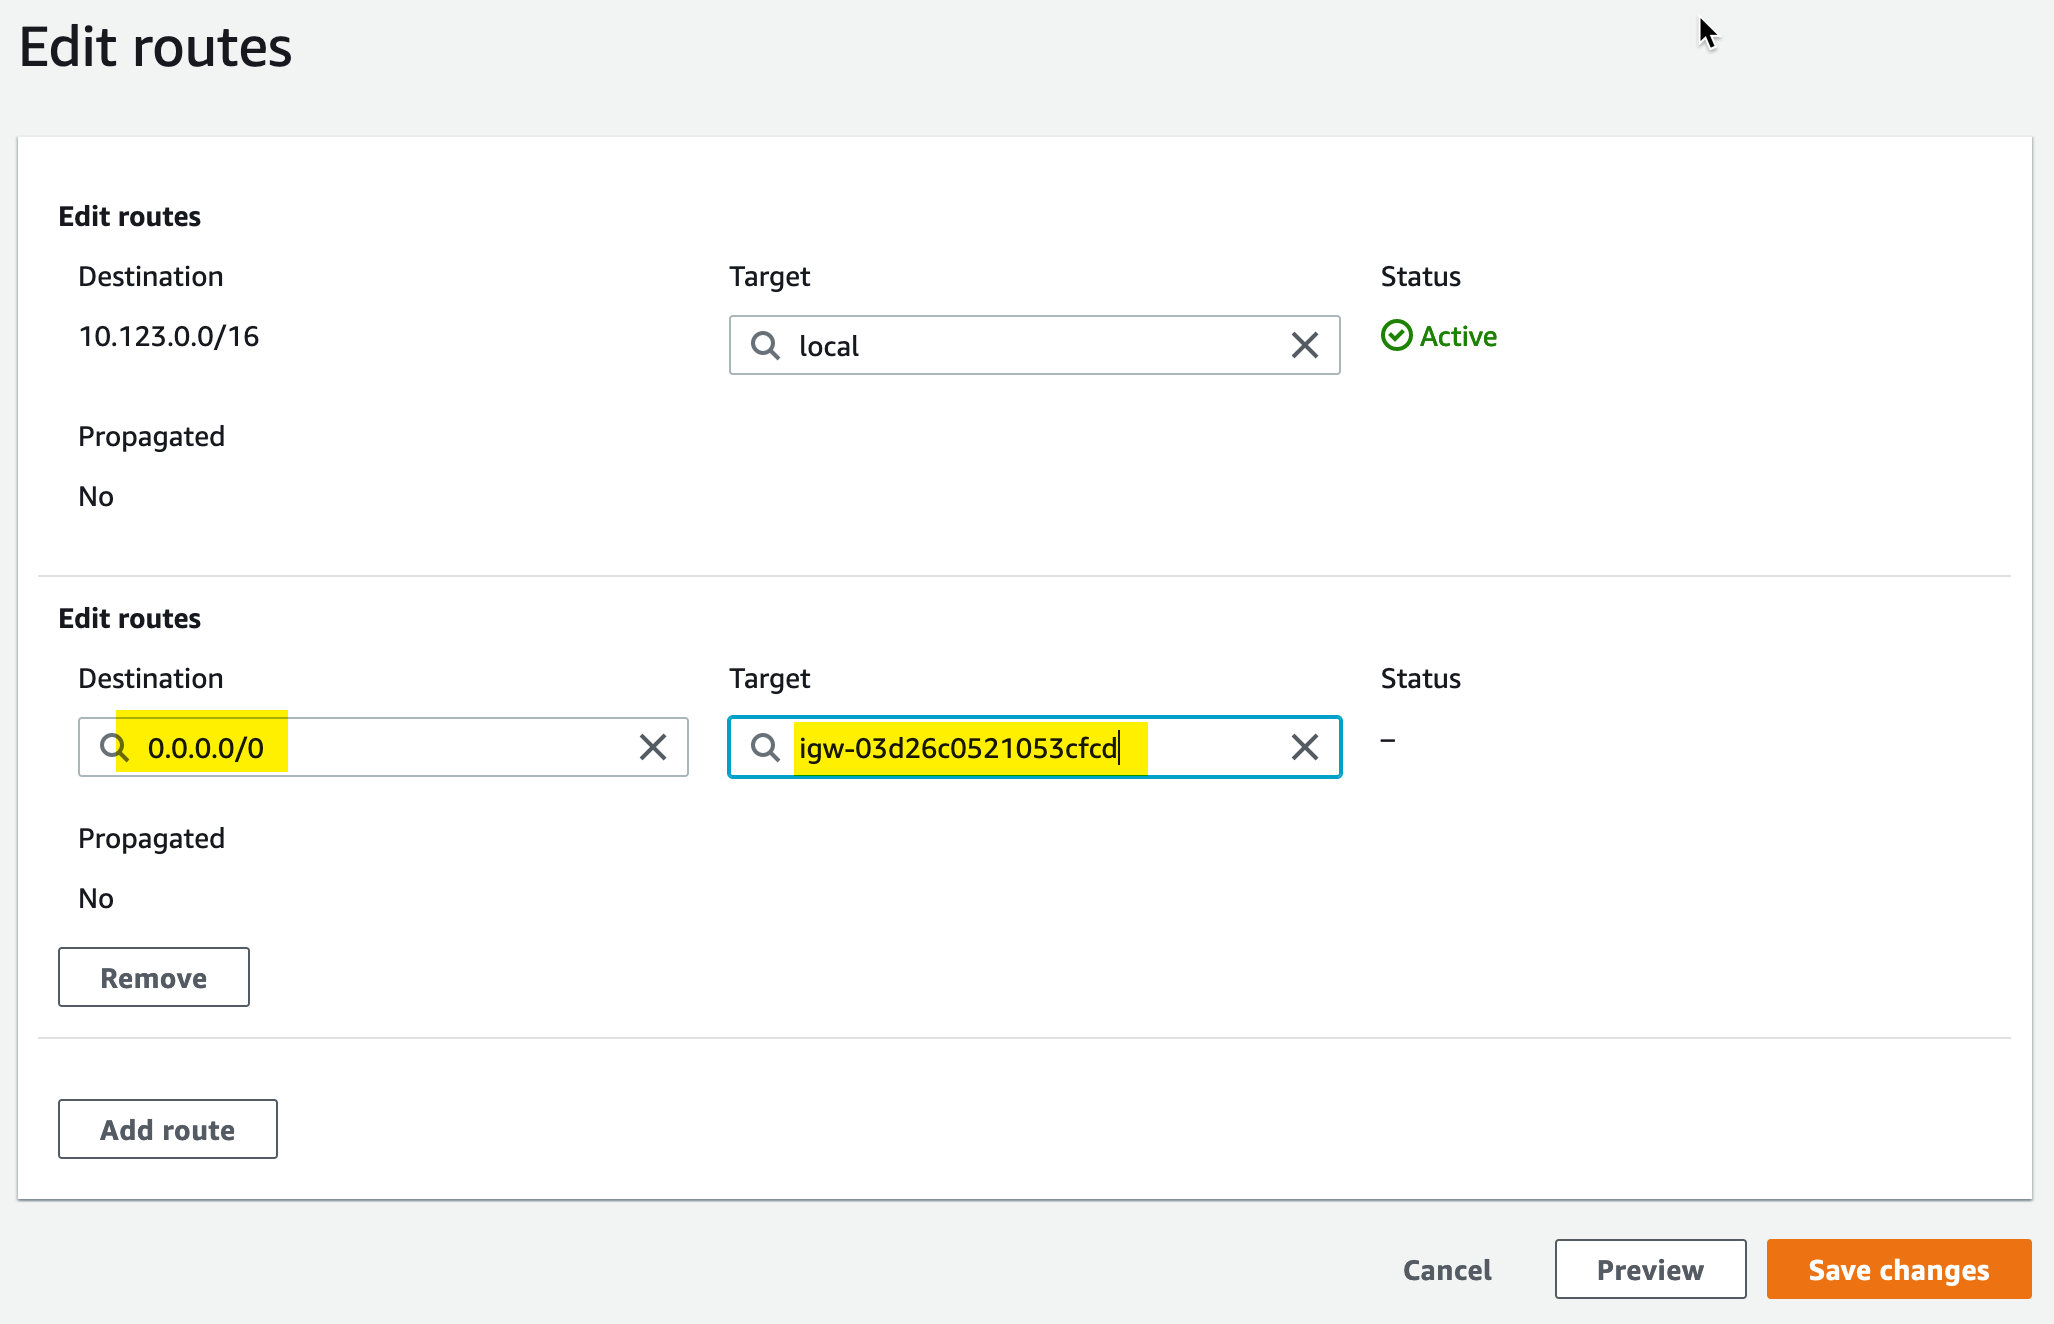
To add routes to the new table, we need to select Edit Routes:
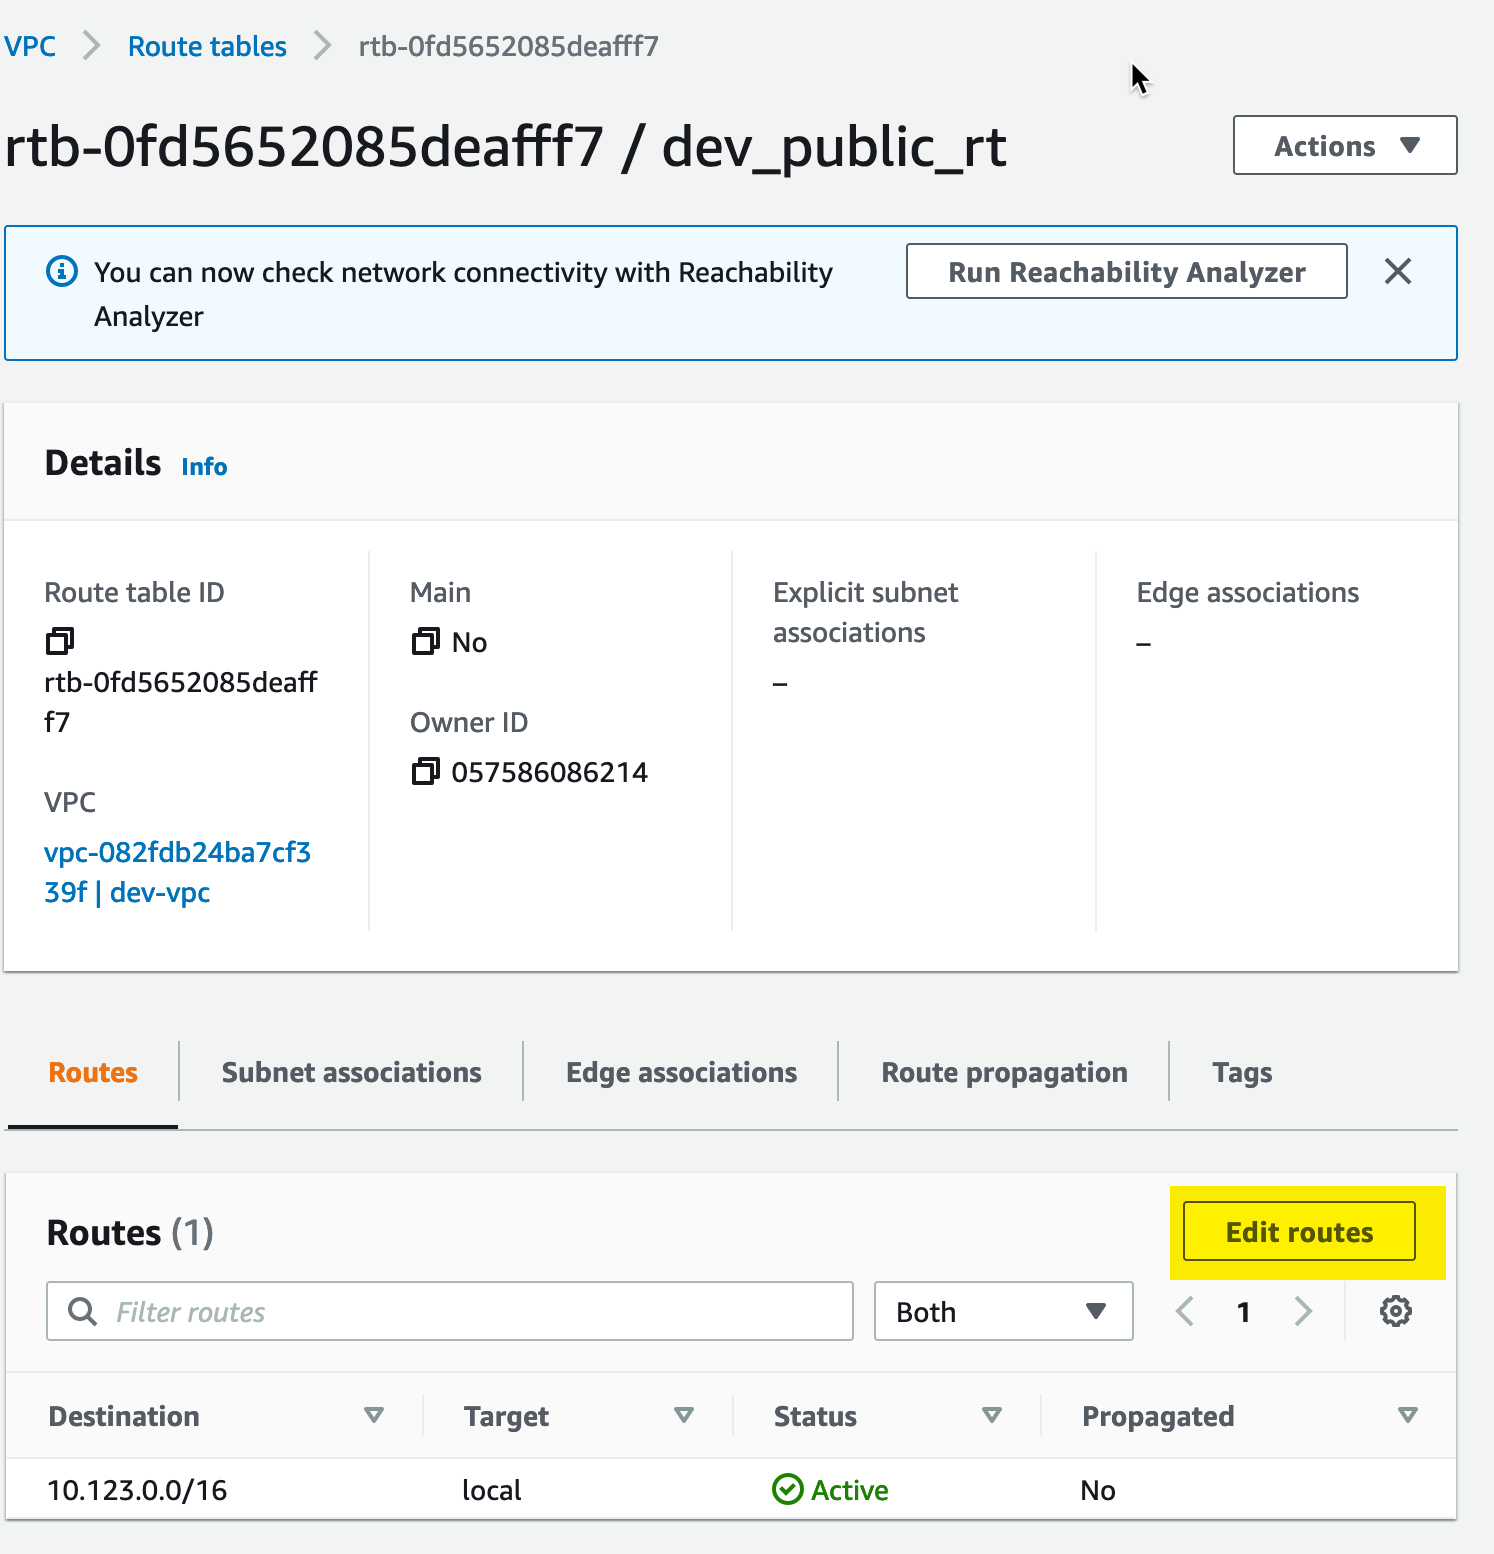
From there, we need to add a default route to the route table; this will establish a route for anything outside of or VPC CIDR block to be directed toward the internet gateway (and from there to the internet):
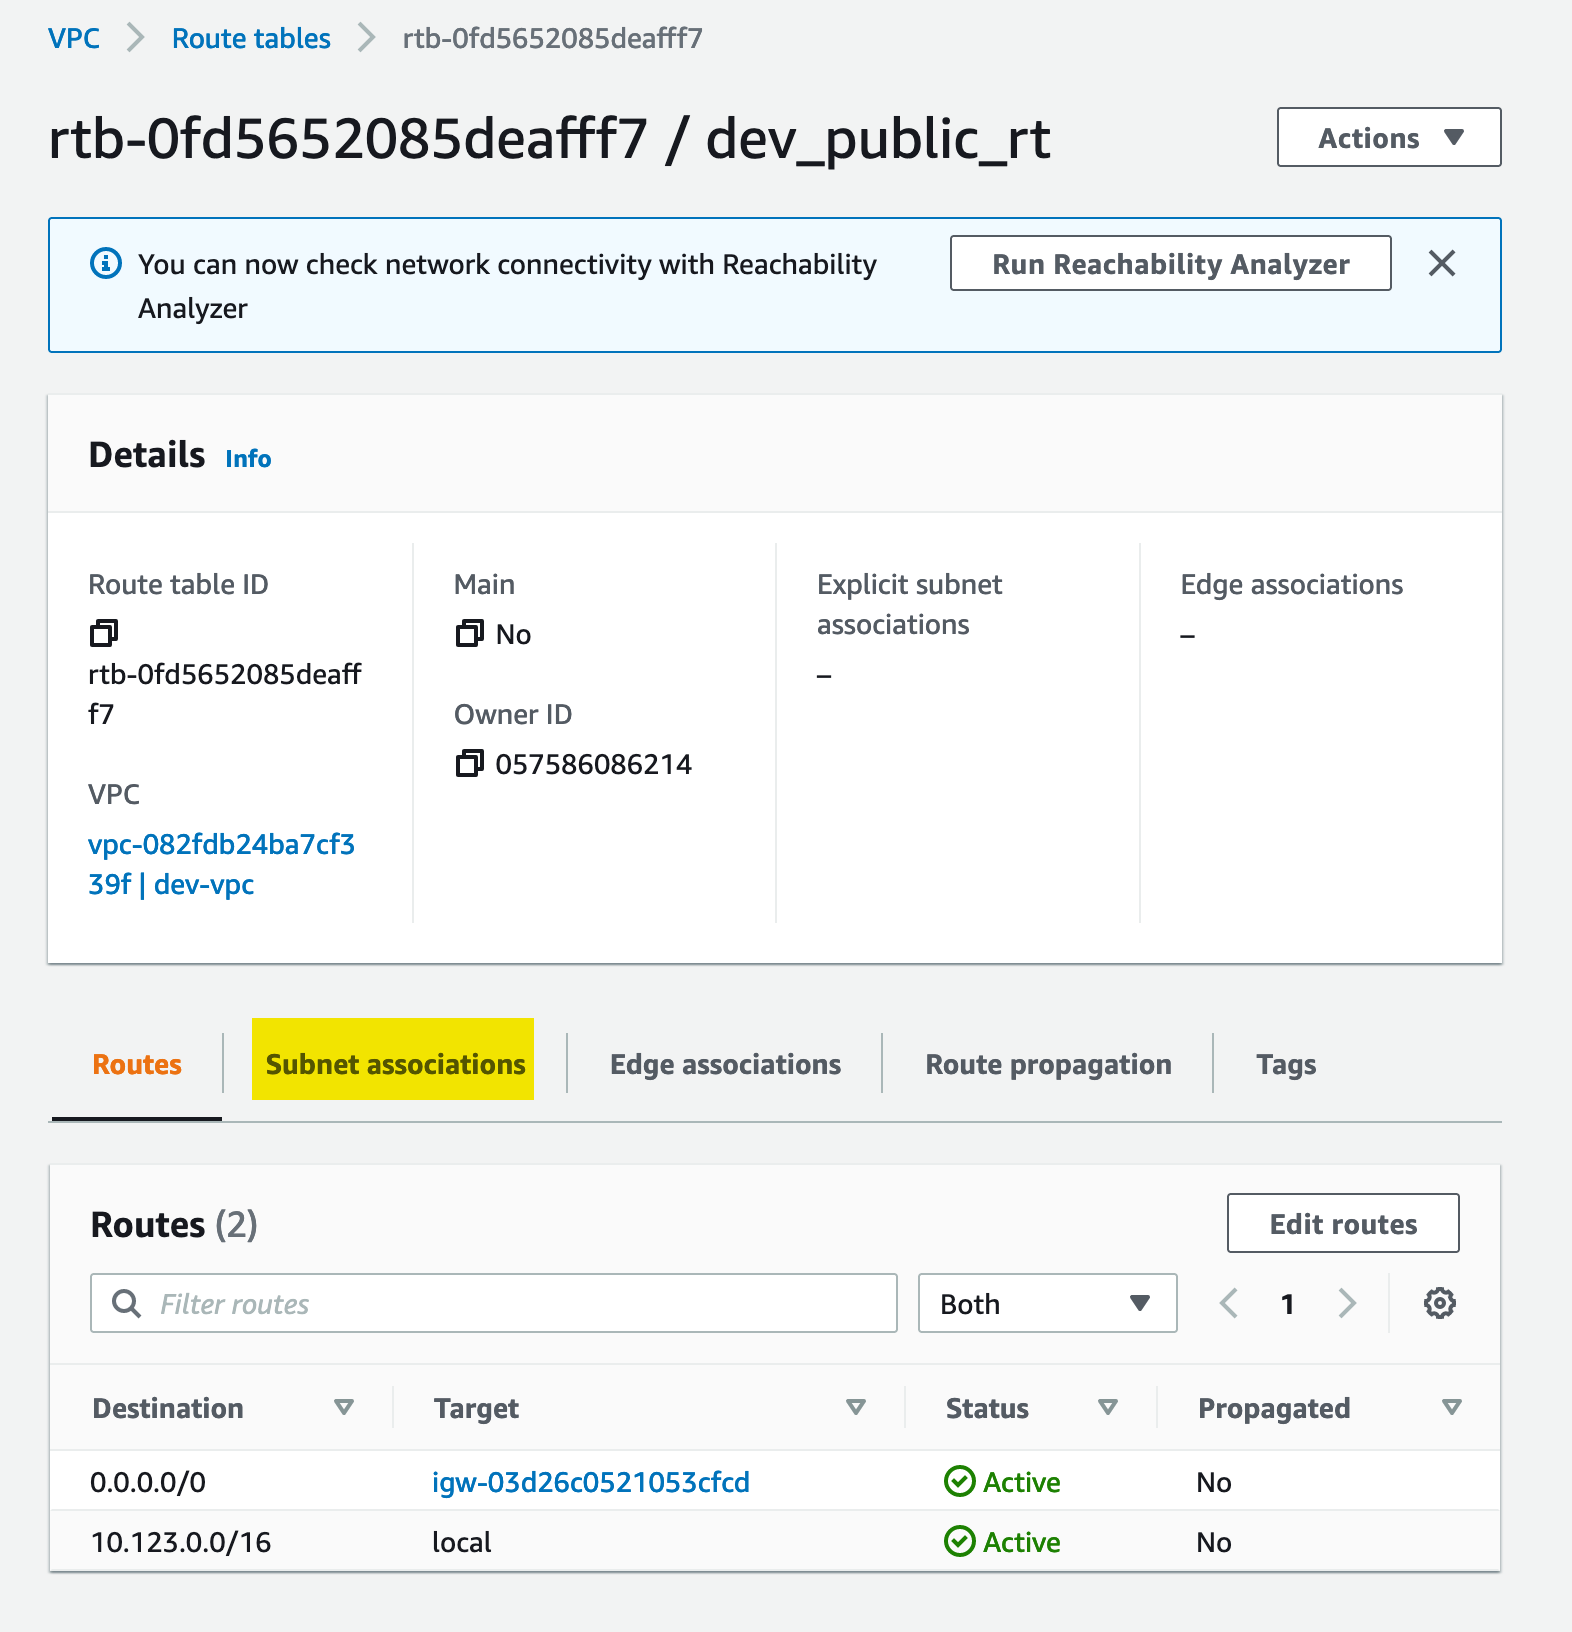
For our subnet to use the new route table, it must be associated with it - to start this process, we need to look under the Subnet Associations tab:
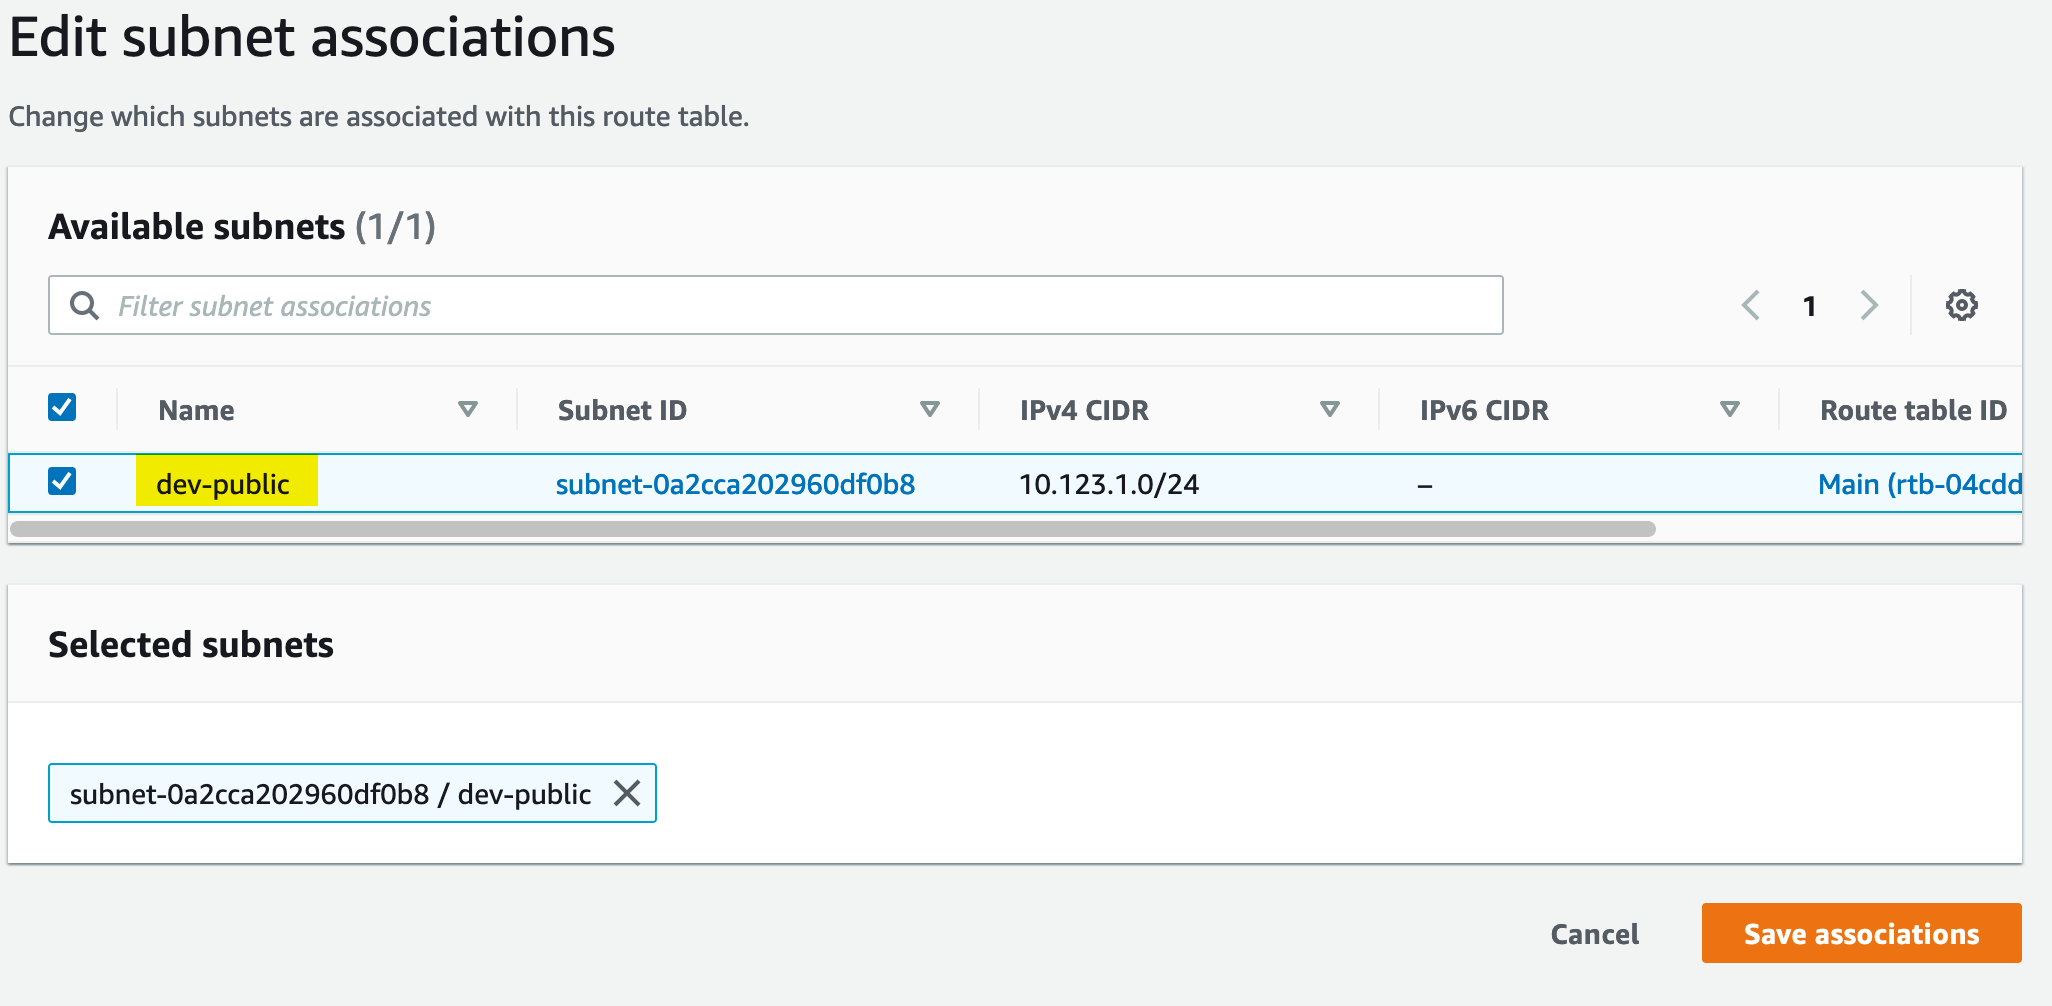
From here, we can associate the subnet with the route table:
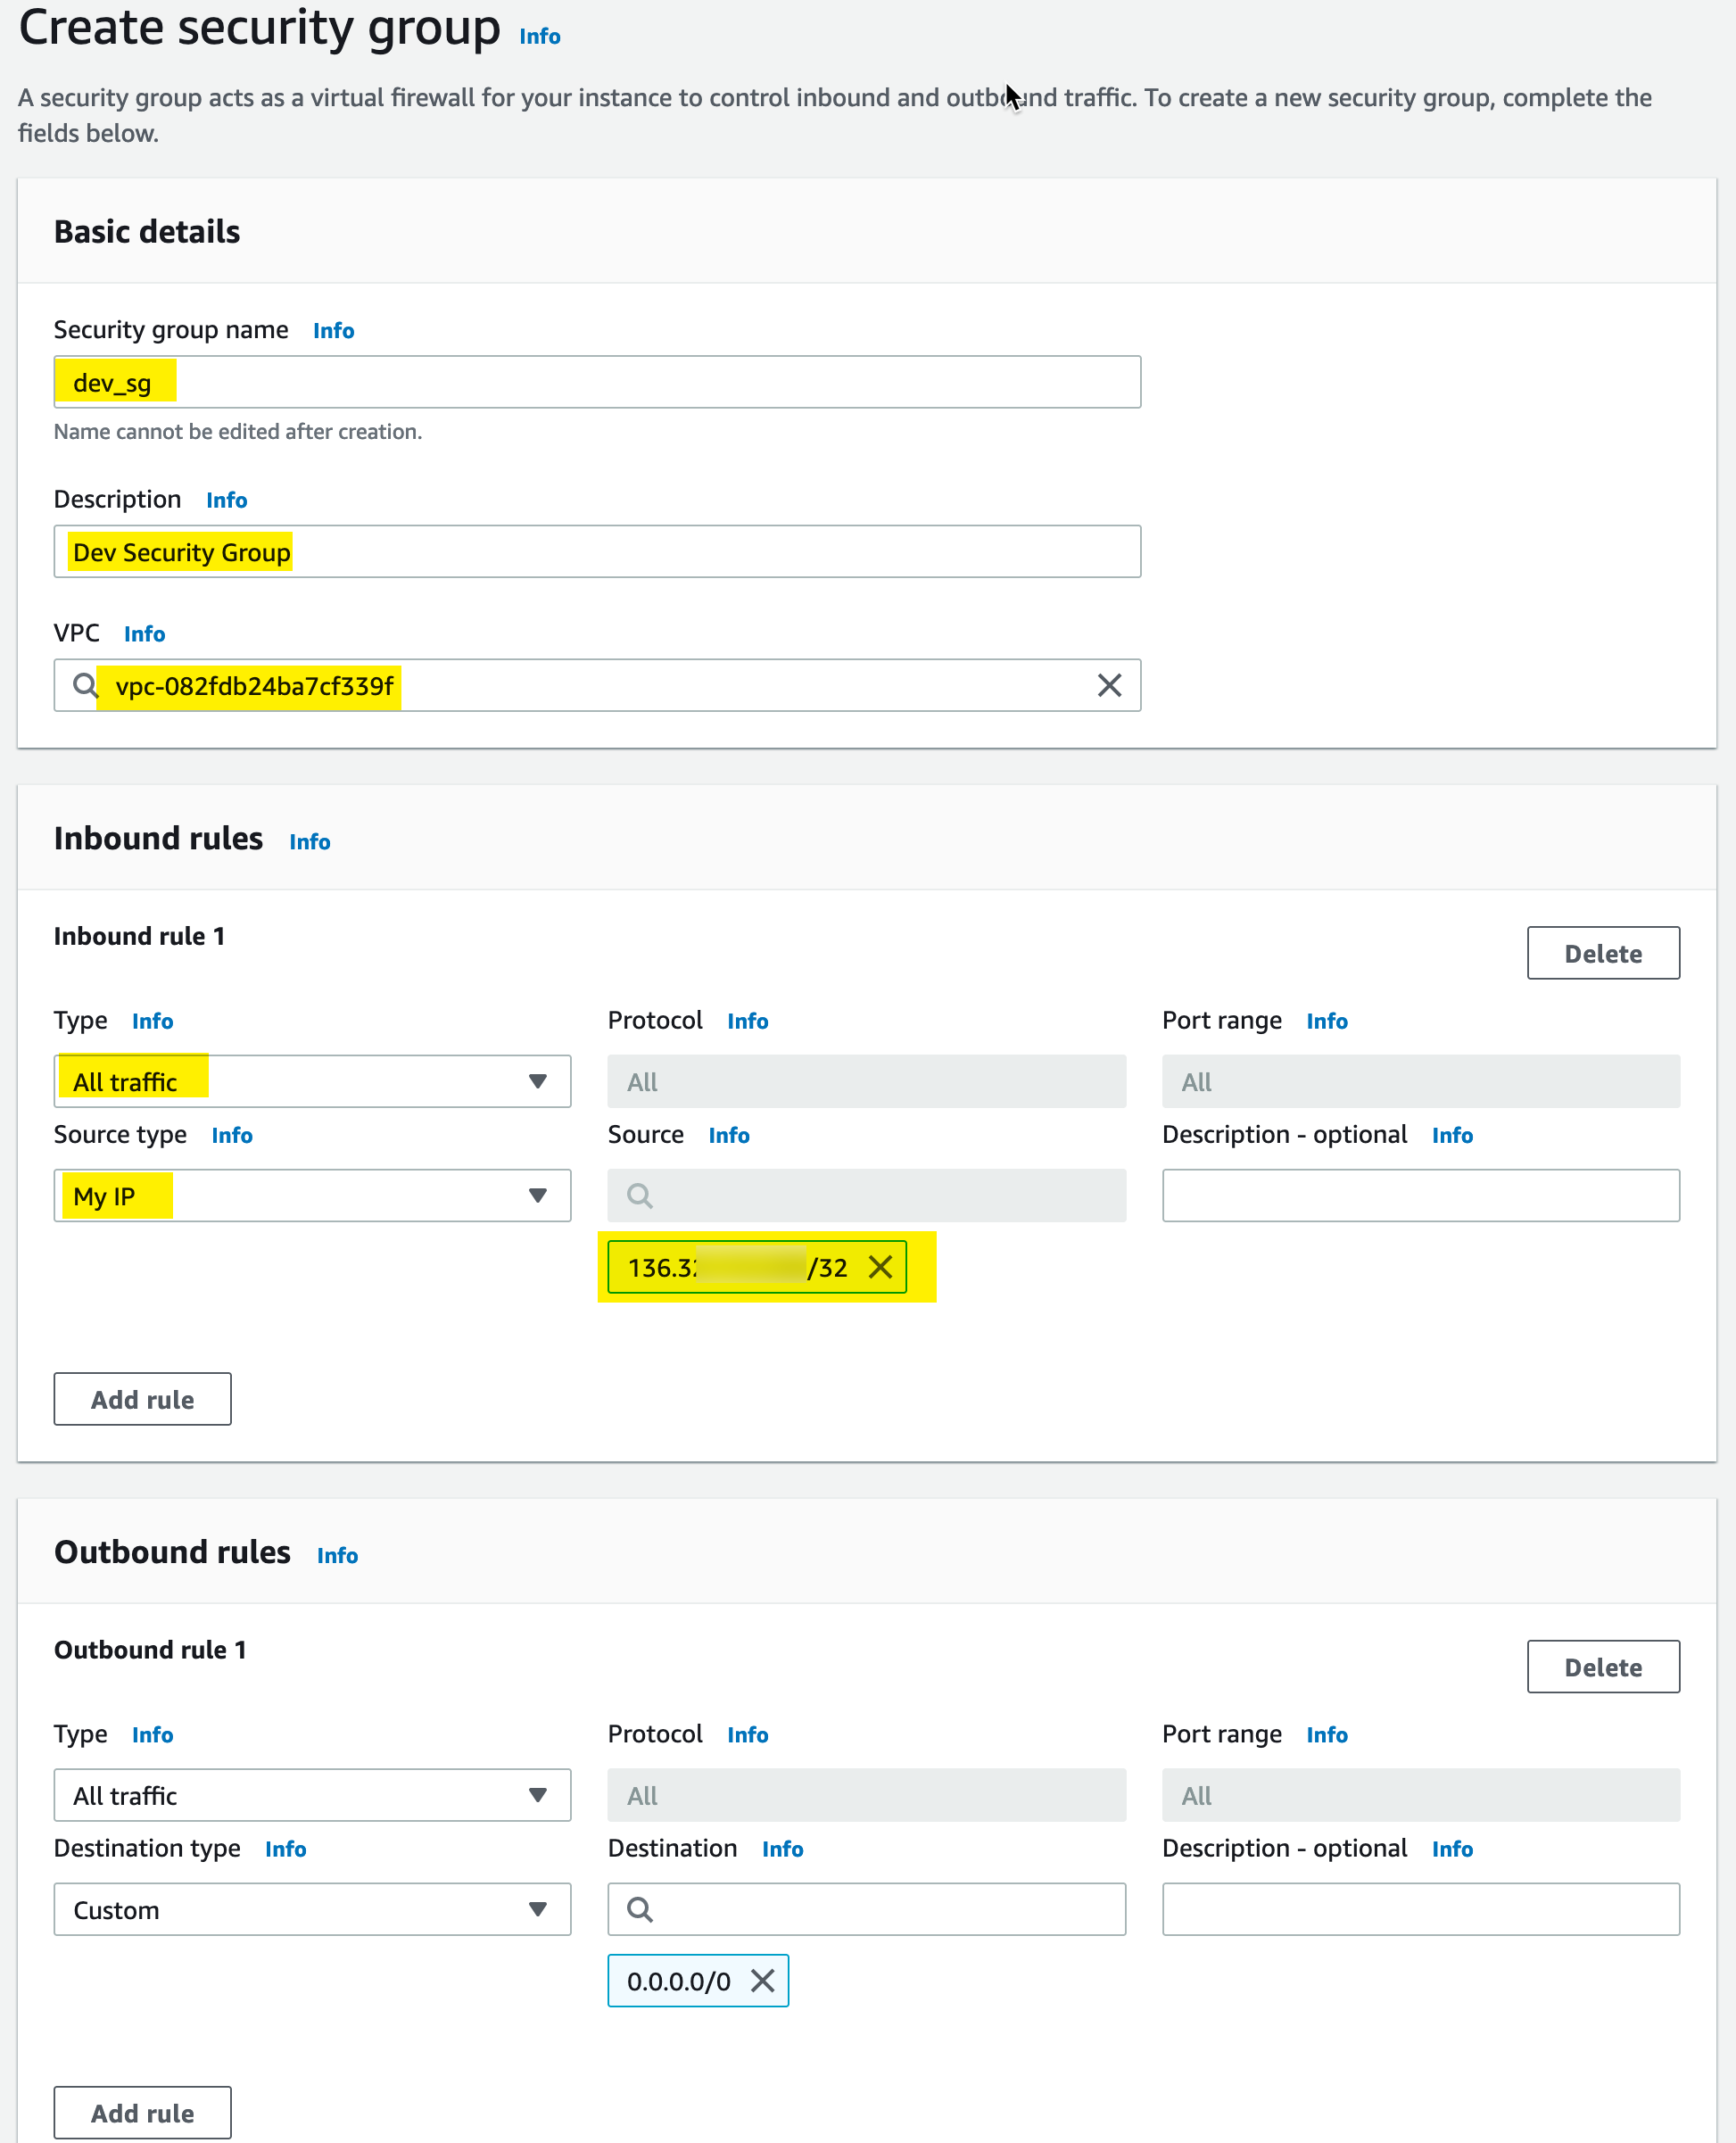
Security Group
To create the security group, we want to provide all inbound and outbound access to our resources. But we only want to do that from our IP address. So we do that as follows:
Key Pair
Now we will need a Key Pair to authenticate with our instances. To create the Key Pair, you can create it directly in the console or upload a public key to AWS. I chose to do this. To create the key locally, use the following command:
➜  ~ ssh-keygen -t ed25519
Generating public/private ed25519 key pair.
Enter file in which to save the key (/Users/jeff/.ssh/id_ed25519): /Users/jeff/.ssh/vscode_dev
Enter passphrase (empty for no passphrase):
Enter same passphrase again:
Your identification has been saved in /Users/jeff/.ssh/vscode_dev
Your public key has been saved in /Users/jeff/.ssh/vscode_dev.pub
The key fingerprint is:
SHA256:hVBFnHfKV3hEoiz0Wxn8QHX9HehrCYy1JOB6qdKLMSg
The keys randomart image is:
+--[ED25519 256]--+
|      .oo++. o==*|
|      .. +o=.o===|
|       .. Oo*oo=+|
|      . .o =o+. +|
|     . oS   o.o  |
|  . . o      +   |
|E. + o      .    |
|.   = .          |
|   . .           |
+----[SHA256]-----+
Note the fingerprint in the above output: hVBFnHfKV3hEoiz0Wxn8QHX9HehrCYy1JOB6qdKLMSg. This fingerprint should match what AWS displays when we upload the public key.
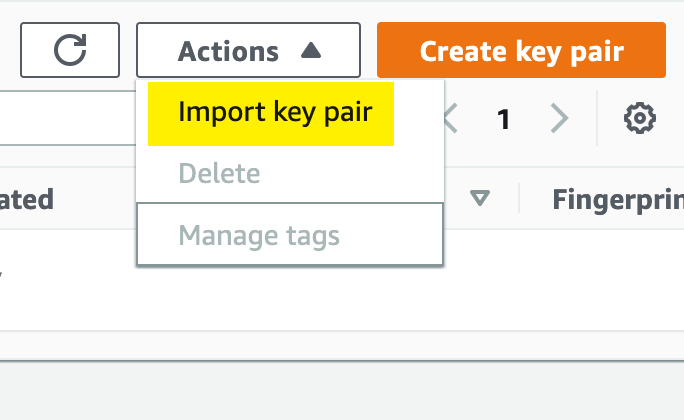
Then we go to the AWS EC2 console and select Key Pairs; then we do an import:
From there, we need to provide our public key information - you can either paste it in or upload the file. I uploaded the file:
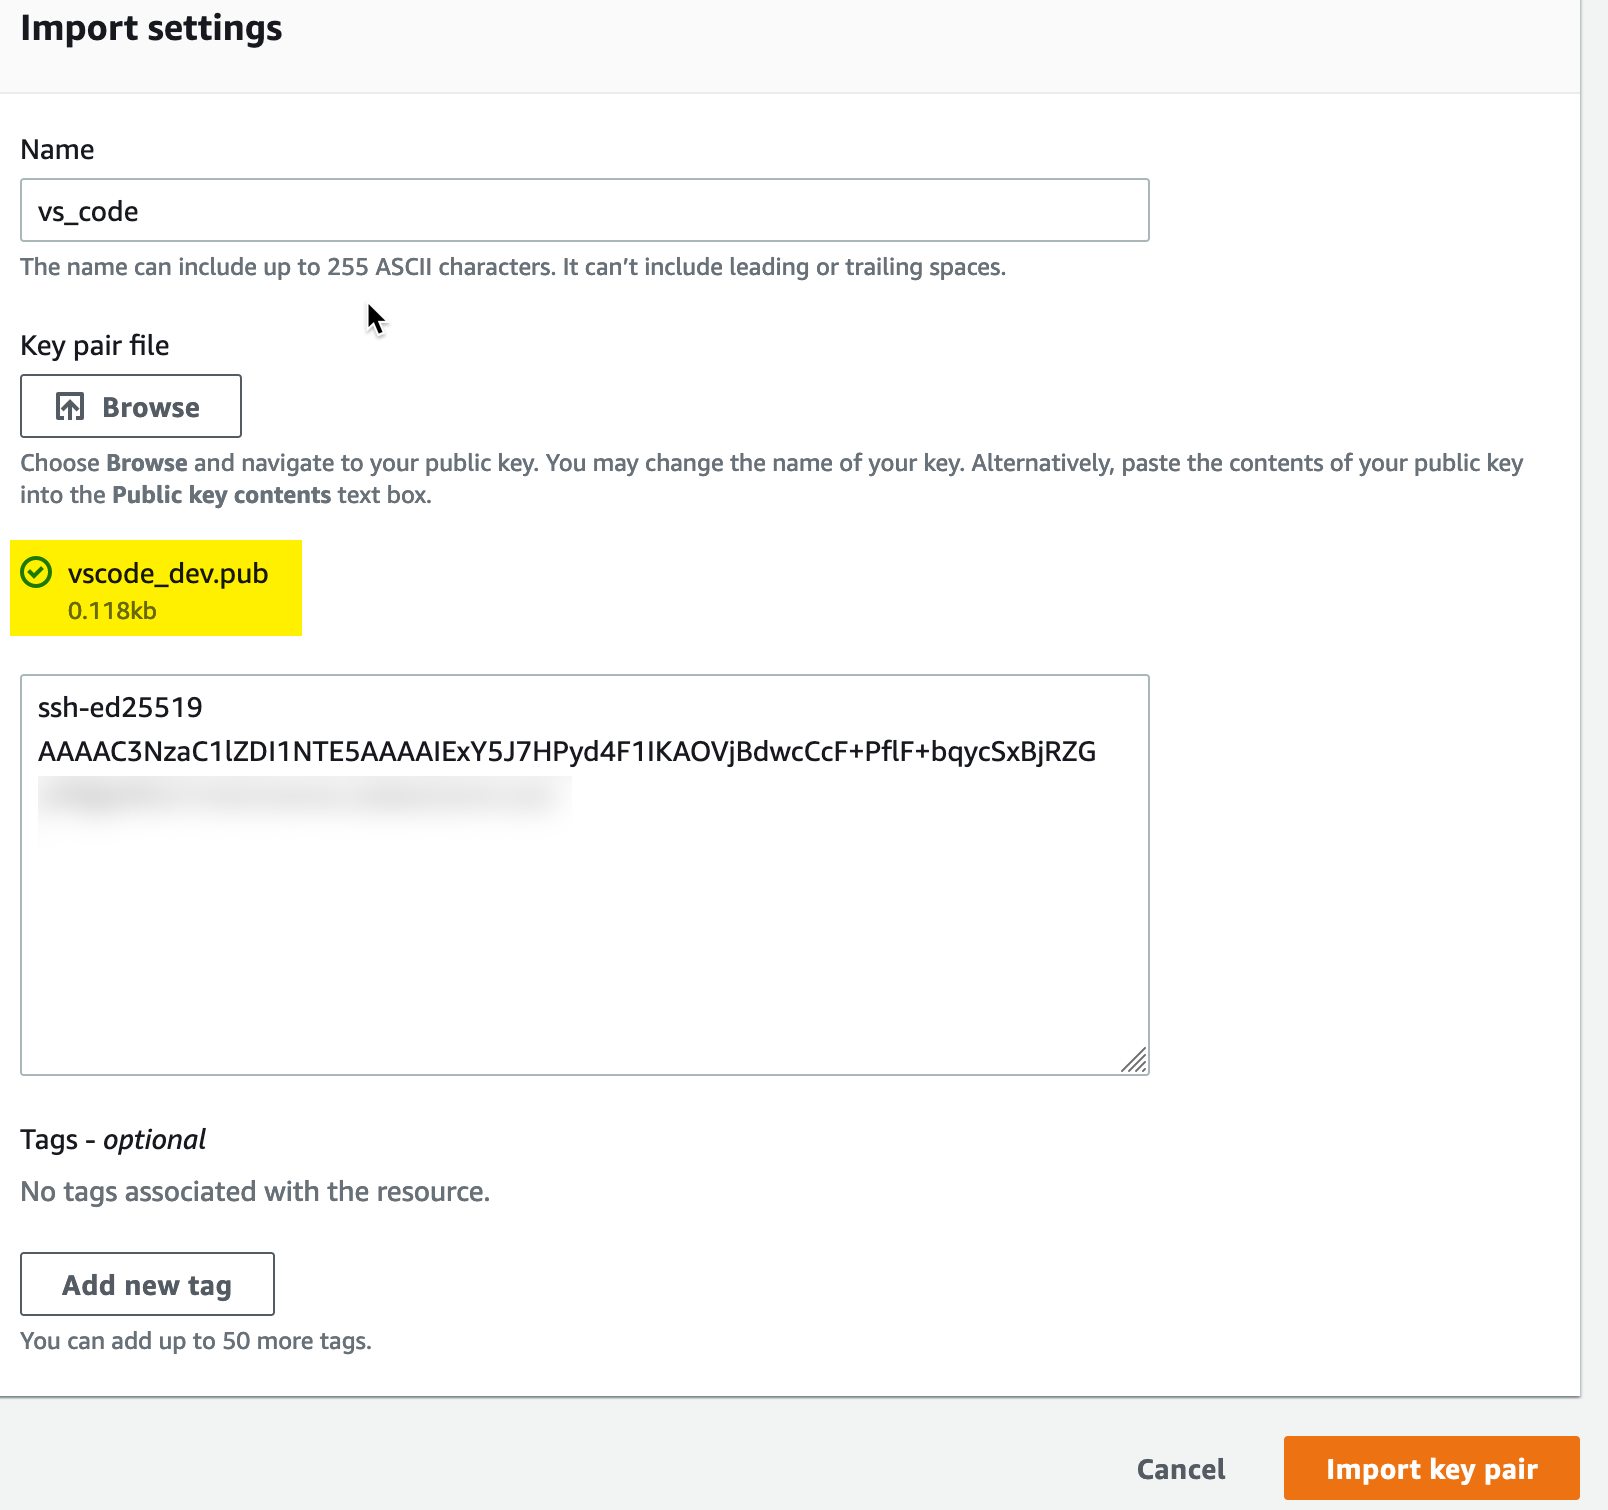
(Note: I blurred out part of this because it contained personally identifiable information - not for key security. A public key can be freely shared without concern)
Now verify the key against the fingerprint from earlier - if you didn’t keep it, you could re-generate the fingerprint. Note that the fingerprints match:


EC2 Instance
Name, AMI and Instance Type
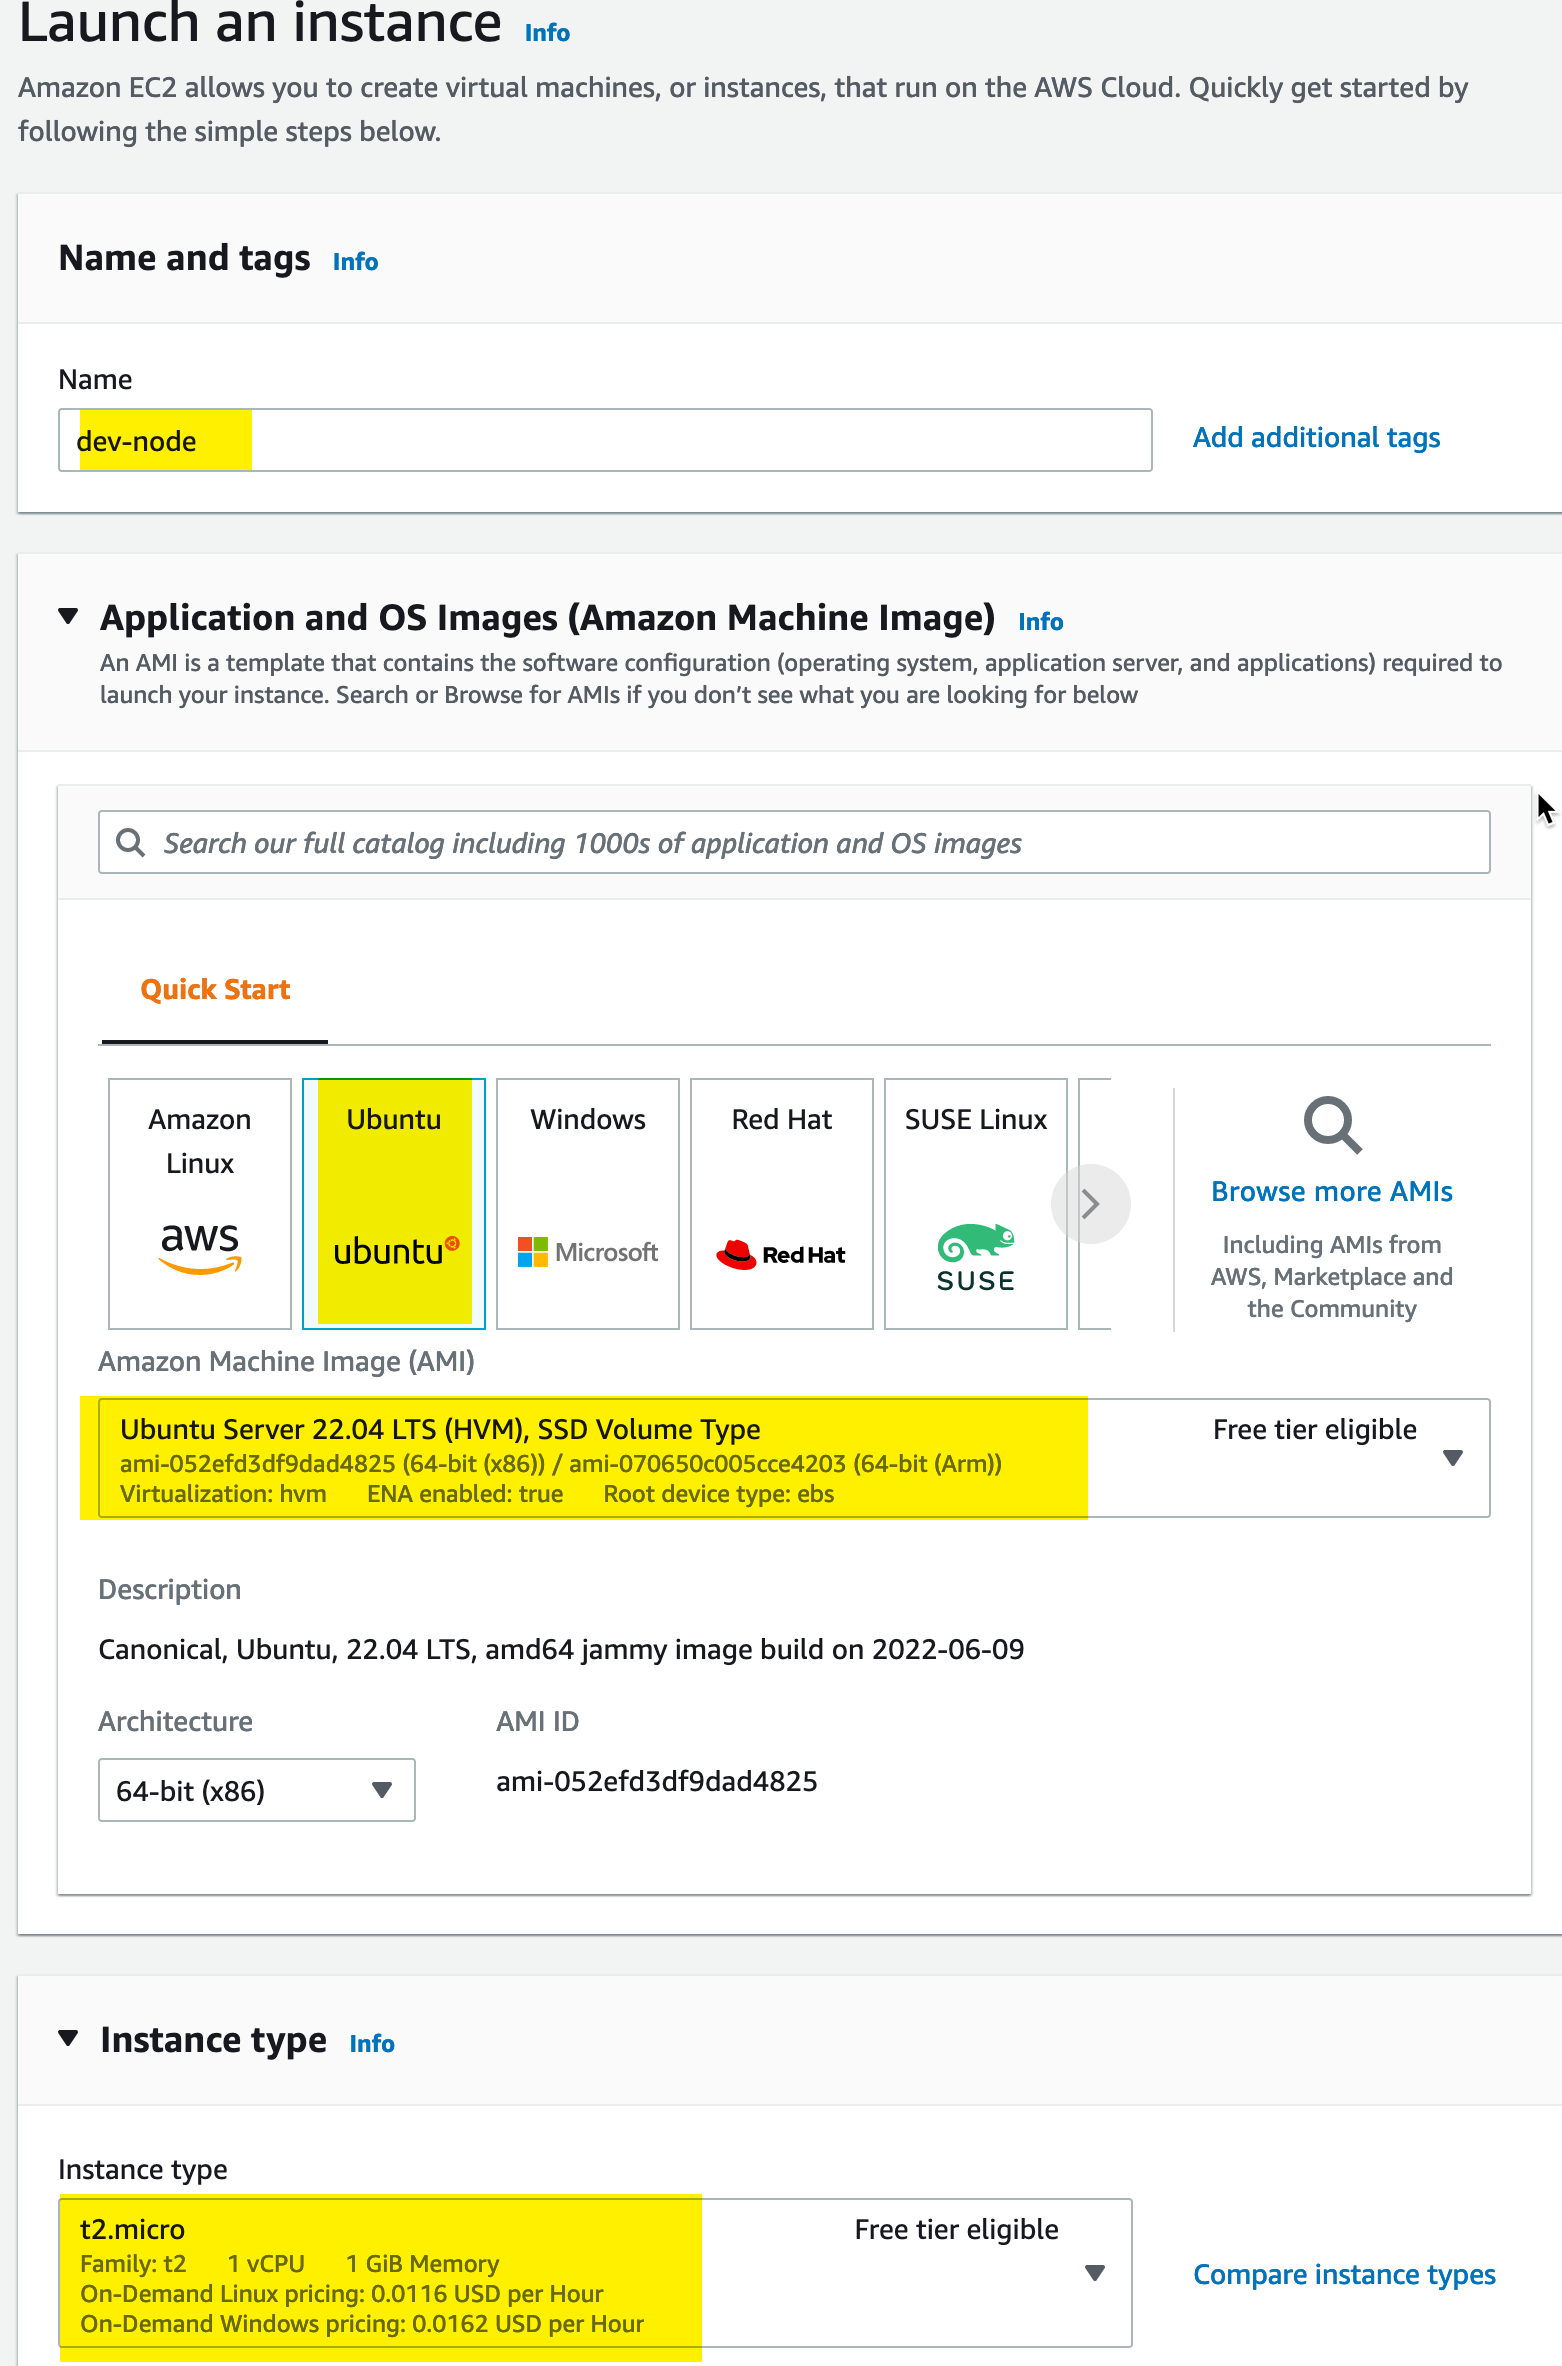
We will name the instance dev-node. We are using Ubuntu 22.04 LTS Server and will be applying this on a t2.micro:
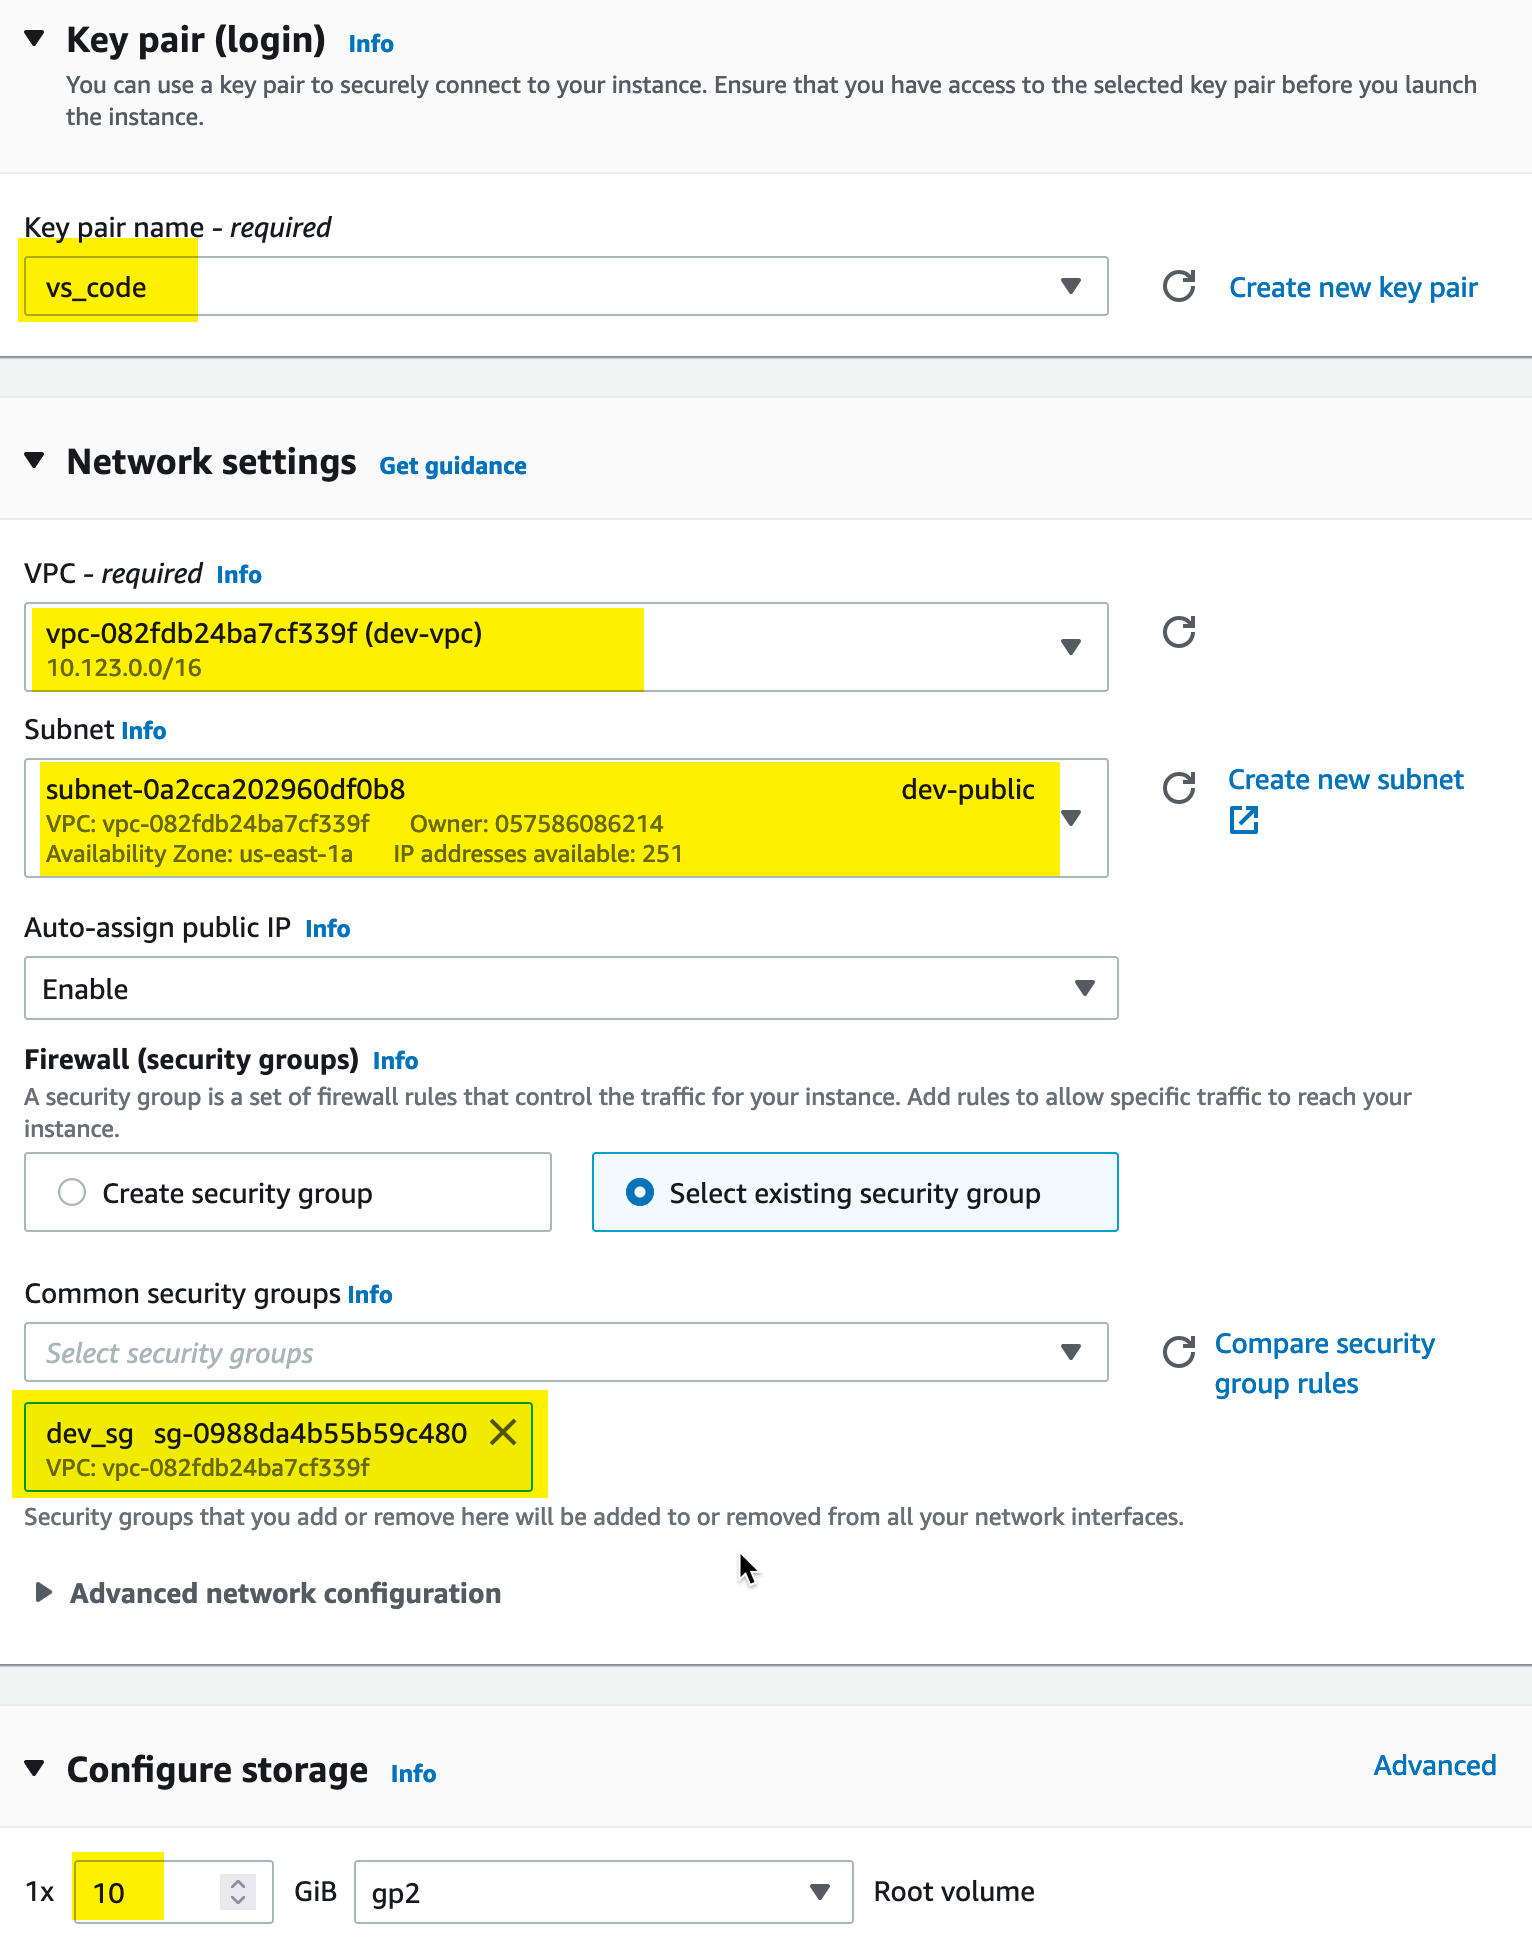
We need to set the instance to use the Key Pair we just created and our custom VPC and subnet. Additionally, we are upgrading the disk to 10GB from the default 8GB:
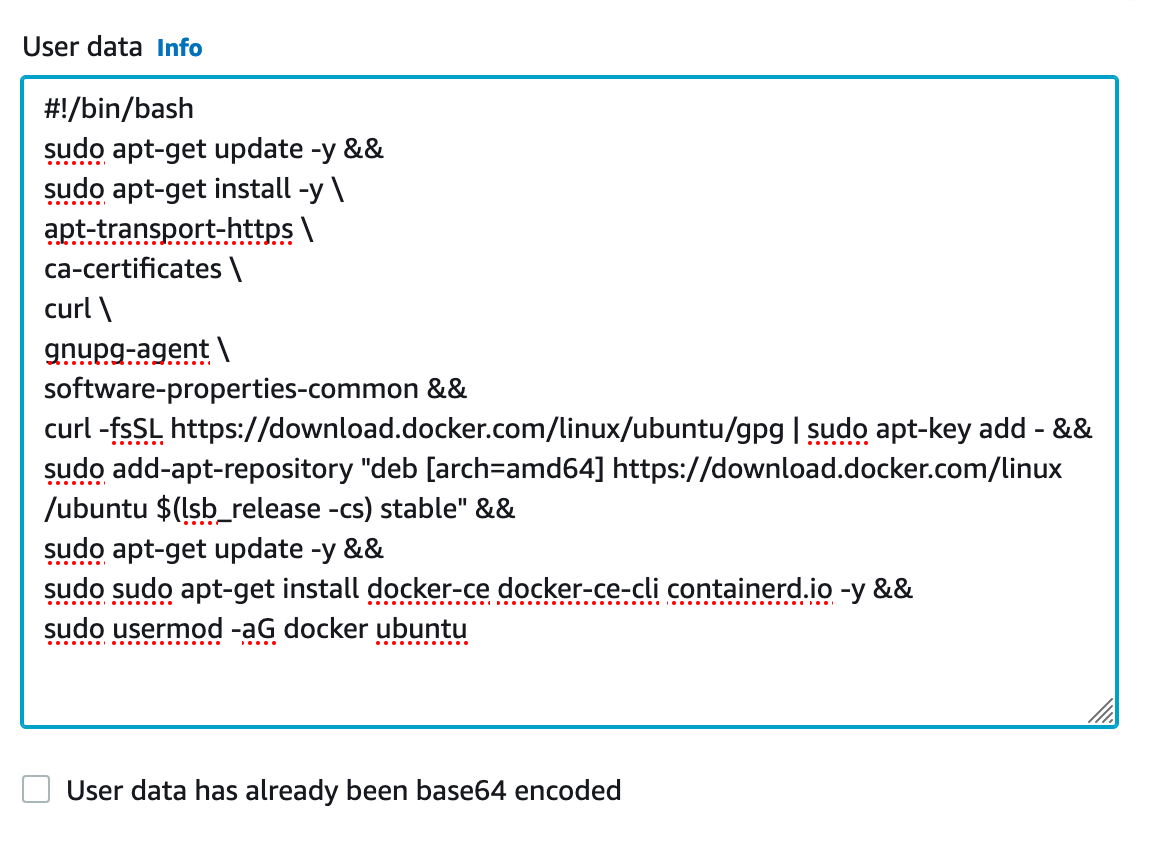
Finally, under the advanced details section, we will add some Userdata to configure the instance with software updates and docker automatically:
Now we launch the instance!
We can SSH into the instance now and note that Docker is installed:
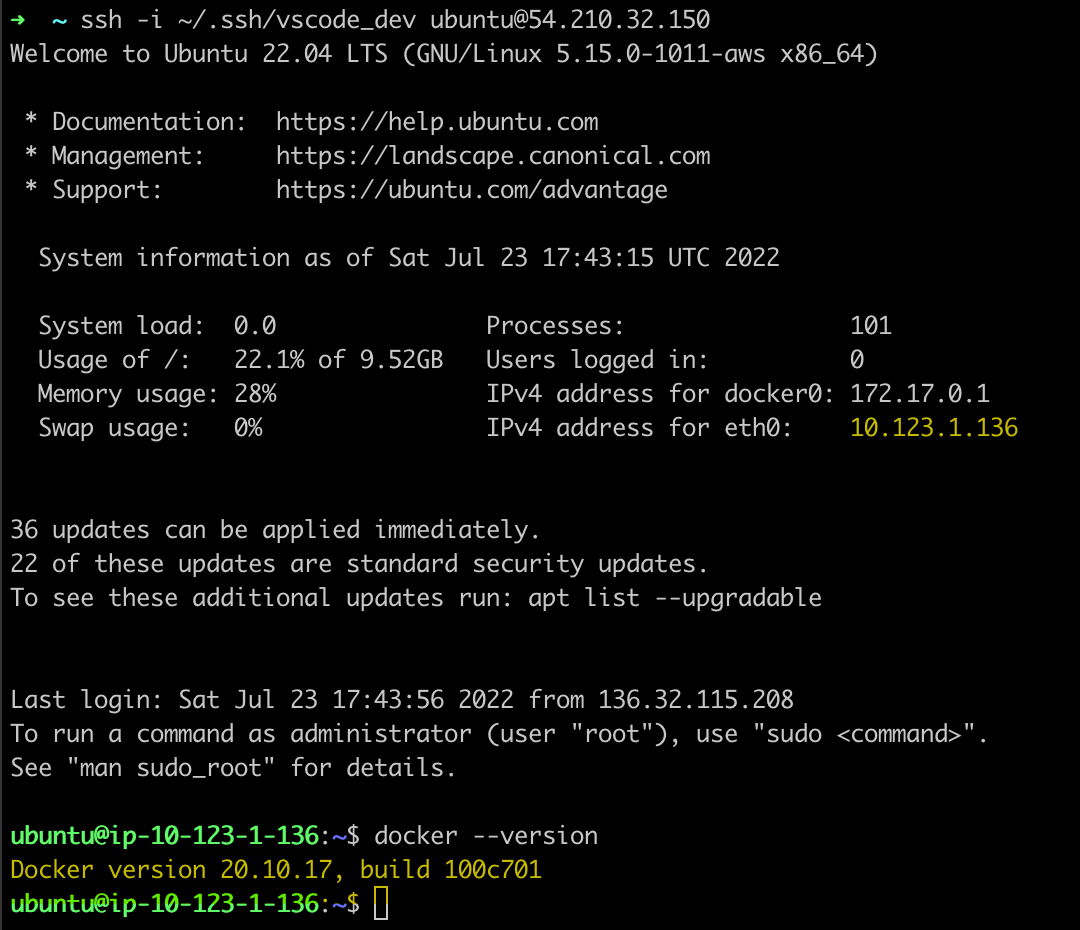
Note the private IP is in the subnet of our VPC and Subnet and that docker is installed and working from the UserData configuration.
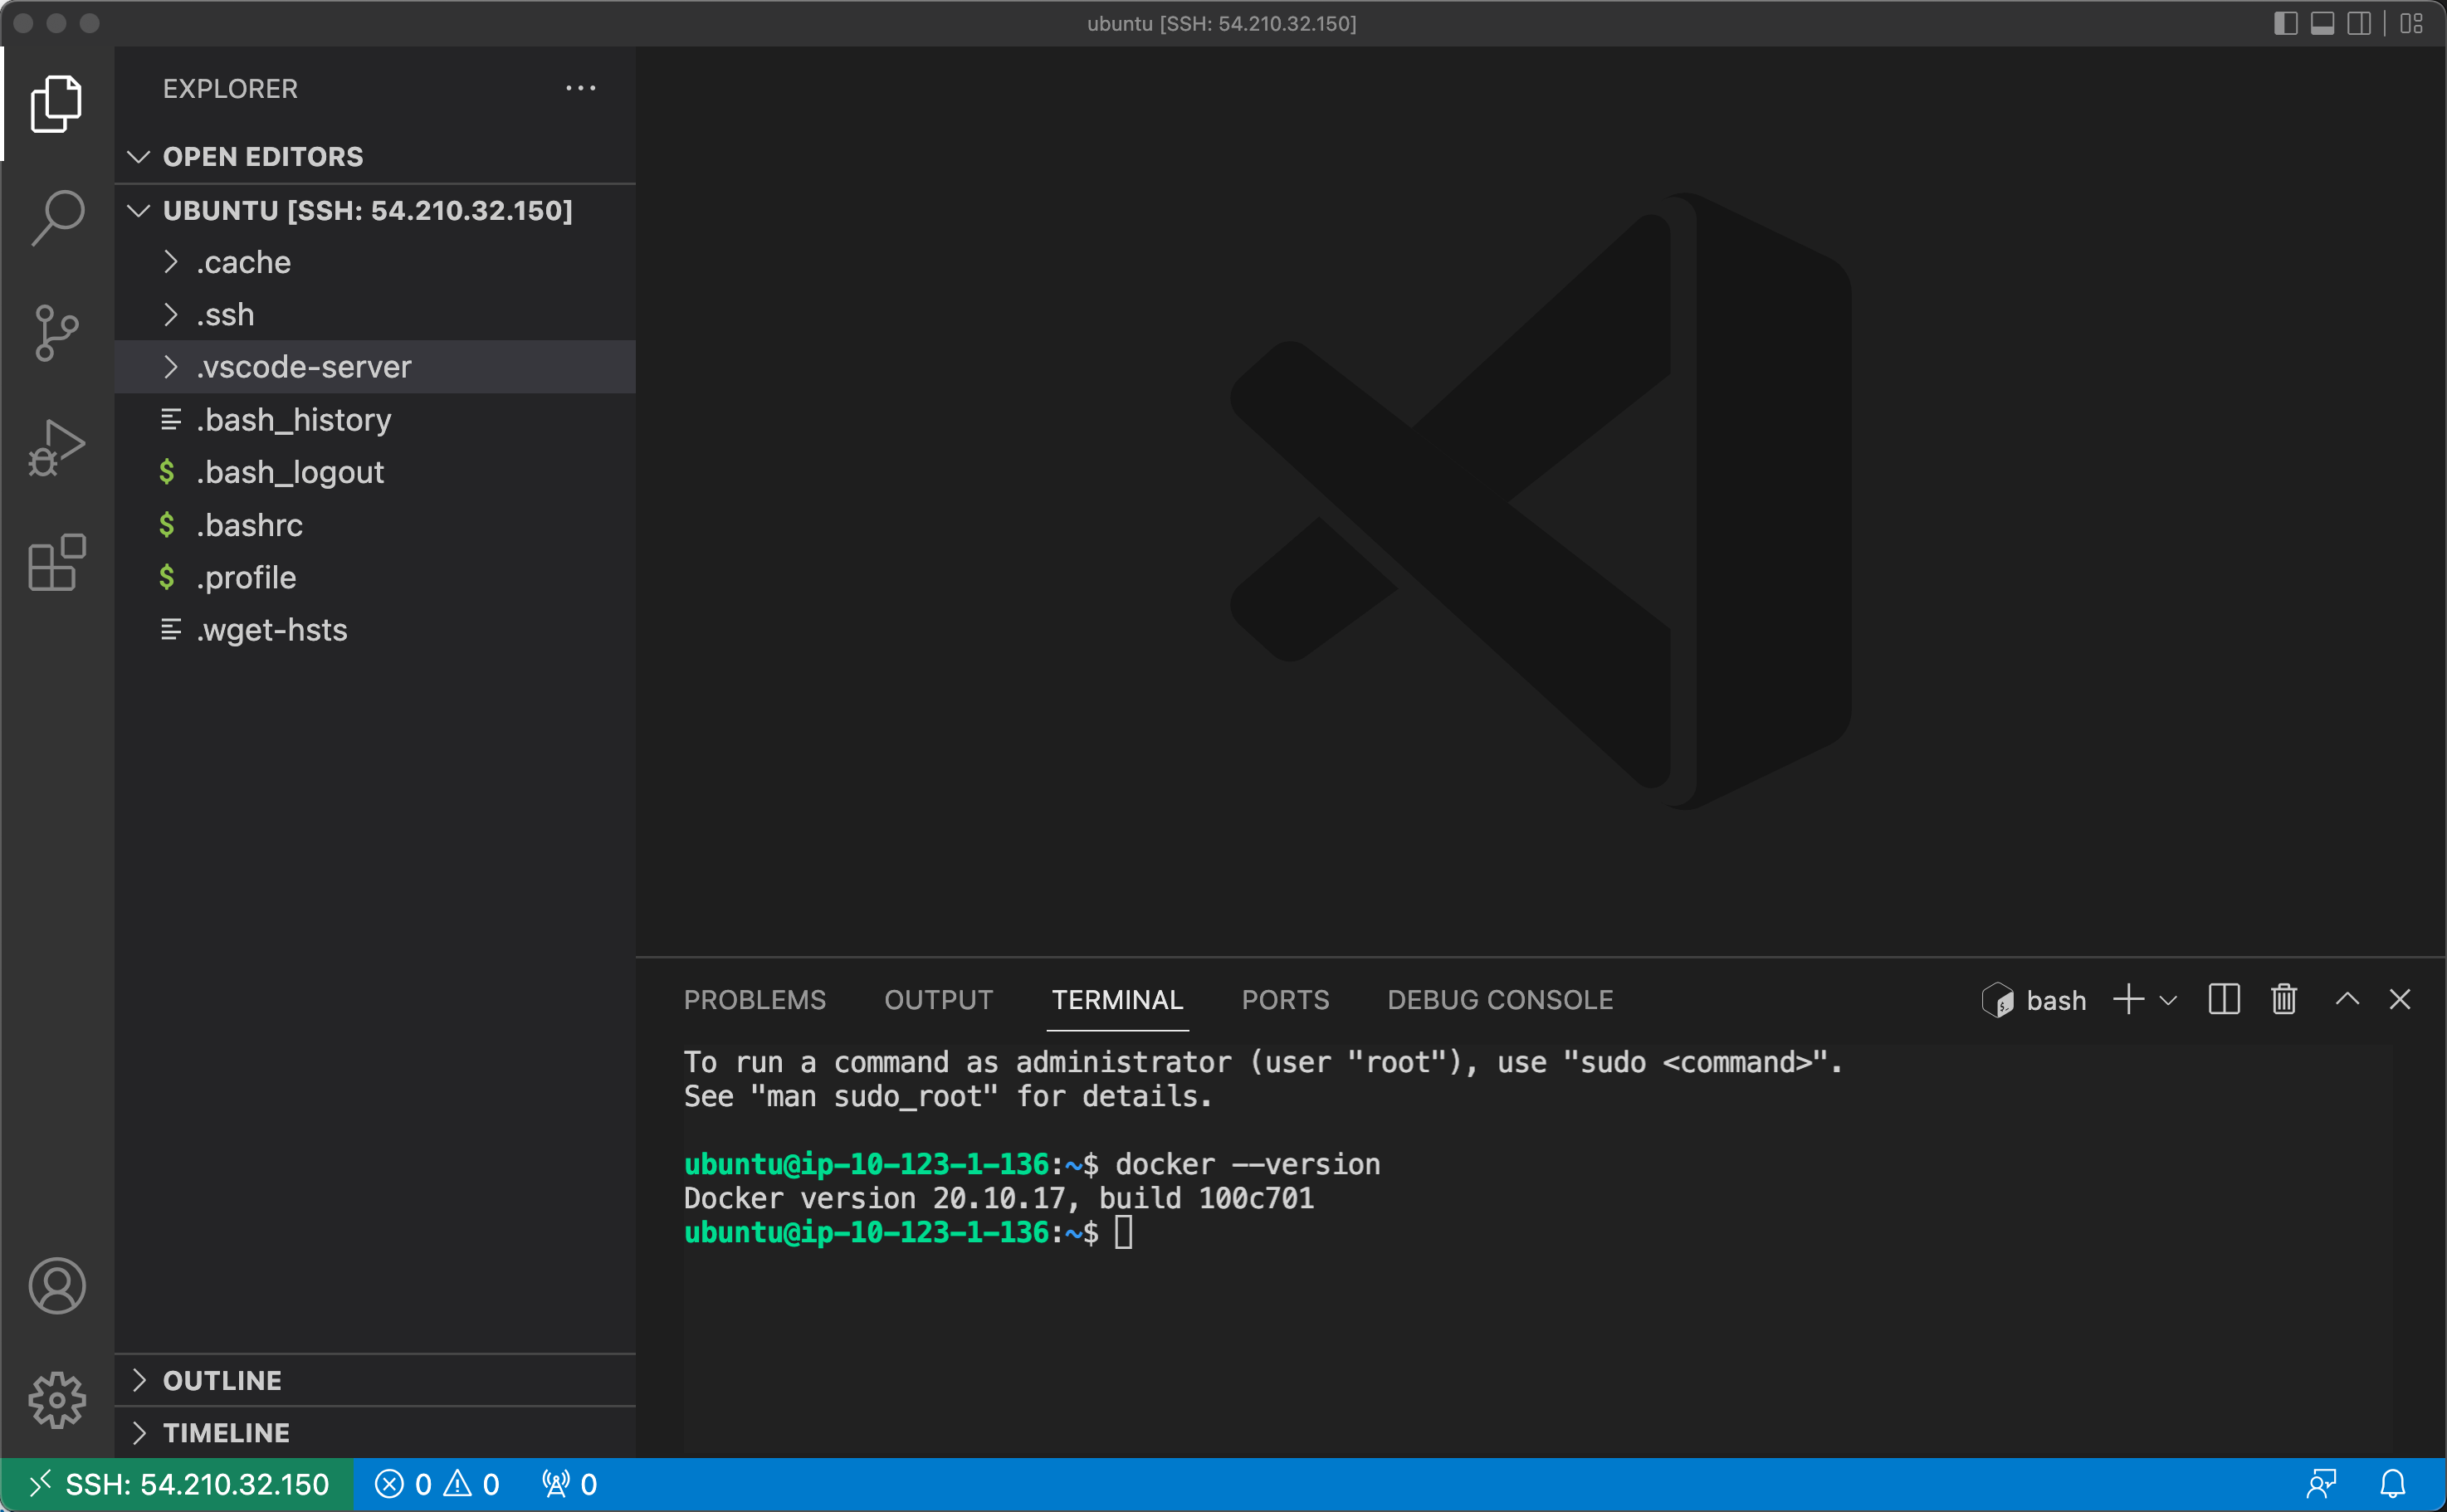
After manually adding the IP address to the ~/.ssh/config file, we can use the SSH extension in VSCode to connect to the instance and work with VSCode using the instance and VSCode server rather than the local VSCode environment.
This completes the manual, console-based version; next up is a CloudFormation template version.
CloudFormation
So For Cloudformation I simply repeated the configuration above in template format. There were a few learnings along the way that surprised me:
- Systems Manager Parameter Store only provides AMIs for the most recent Amazon Linux Variant. So if you want to use another version of Linux, you have to devise your own solution. I found such a solution on StackOverflow where user kichik provided Cloudformation Templates that:
- Created a Lambda Role
- Created a Lambda Function that uses the describe-images endpoint of the EC2 API to find the latest image for a given criteria
- Created a custom resource to provide this image id back to the rest of the template
- There seems to be an issue/bug with the new version of the Ubuntu Server if IPV6 is not enabled. So I had to add Acquire::ForceIPv4=true in several places to allow the UserData script to work correctly.
- Sometimes my Internet Gateway Route would be slow to deploy, so I had to add a DependsOn to the EC2 instance creation to make it wait long enough to have an internet connection reliably.
Here is the stack that I came up with:
AWSTemplateFormatVersion: '2010-09-09'
Description: |
  Creates a development environment like the one that Derek Morgan creates in his tutorial, shared by FreeCodeCamp
  in this youtube video (https://www.youtube.com/watch?v=iRaai1IBlB0&t=2s).  His tutorial is about Terraform but
  I wanted to try to do the same thing in the Console, CloudFormation, and Terraform.
Outputs:
  EC2InstanceIP:
    Description: Public IP Address Associated with the EC2 Instance
    Value: !GetAtt DevNode.PublicIp
Parameters:
  LocalCIDR:
    Type: String
    Description: Enter your local IP CIDR range (i.e. 55.55.55.55/32)
    Default: '0.0.0.0/0'
Resources:
  # The lines until the next comment are credited to use kichik (https://stackoverflow.com/users/492773/kichik)
  # from this Stack Overflow answer: https://stackoverflow.com/questions/55479945/cloudformation-always-use-latest-ami
  # These lines allow you to lookup a non-amazon linux AMI by creating a function that uses the boto3 sdk to
  # query the describe-images endpoint for the required image.  This matches the functionality of the Terraform
  # project this is based on with its ability to do this -- all be it much more easily.   The addition of this
  # part of the code requires the addition of --capabilities CAPABILITY_IAM to your command line deploy of this template
  # -- Start Stack Overflow Sourced Find AMI code
  DescribeImagesRole:
    Type: AWS::IAM::Role
    Properties:
      AssumeRolePolicyDocument:
        Version: '2012-10-17'
        Statement:
          - Action: sts:AssumeRole
            Effect: Allow
            Principal:
              Service: lambda.amazonaws.com
      ManagedPolicyArns:
        - arn:aws:iam::aws:policy/service-role/AWSLambdaBasicExecutionRole
      Policies:
        - PolicyName: DescribeImages
          PolicyDocument:
            Version: '2012-10-17'
            Statement:
              - Action: ec2:DescribeImages
                Effect: Allow
                Resource: "*"
  GetLatestAMI:
    Type: AWS::Lambda::Function
    Properties:
      Runtime: python3.9
      Handler: index.handler
      Role: !Sub ${DescribeImagesRole.Arn}
      Timeout: 60
      Code:
        ZipFile: |
          import boto3
          import cfnresponse
          import json
          import traceback
          def handler(event, context):
            try:
              response = boto3.client('ec2').describe_images(
                Owners=[event['ResourceProperties']['Owner']],
                Filters=[
                  {'Name': 'name', 'Values': [event['ResourceProperties']['Name']]},
                  {'Name': 'architecture', 'Values': [event['ResourceProperties']['Architecture']]},
                  {'Name': 'root-device-type', 'Values': ['ebs']},
                ],
              )

              amis = sorted(response['Images'], key=lambda x: x['CreationDate'], reverse=True)
              id = amis[0]['ImageId']

              cfnresponse.send(event, context, cfnresponse.SUCCESS, {}, id)
            except:
              traceback.print_last()
              cfnresponse.send(event, context, cfnresponse.FAIL, {}, "ok")
  UbuntuAmi:
    Type: Custom::FindAMI
    Properties:
      ServiceToken: !Sub ${GetLatestAMI.Arn}
      Owner: "099720109477"
      Name: "ubuntu/images/hvm-ssd/ubuntu-jammy-22.04-amd64-server-*"
      Architecture: "x86_64"
  # -- End Stack Overflow Sourced Find AMI code
  DevVPC:
    Type: AWS::EC2::VPC
    Properties:
      CidrBlock: 10.123.0.0/16
      EnableDnsSupport: true
      EnableDnsHostnames: true
      Tags:
        - Key: Name
          Value: dev-vpc
  DevIGW:
    Type: AWS::EC2::InternetGateway
    Properties:
      Tags:
        - Key: Name
          Value: dev-igw
  IGWAttachment:
    Type: AWS::EC2::VPCGatewayAttachment
    Properties:
      InternetGatewayId: !Ref DevIGW
      VpcId: !Ref DevVPC
  DevPublicSN:
    Type: AWS::EC2::Subnet
    Properties:
      CidrBlock: 10.123.1.0/24
      VpcId: !Ref DevVPC
      MapPublicIpOnLaunch: True
      Tags:
        - Key: Name
          Value: dev-public
  DevPublicRT:
    Type: AWS::EC2::RouteTable
    Properties:
      VpcId: !Ref DevVPC
      Tags:
        - Key: Name
          Value: dev_public_rt
  IGWRoute:
    Type: AWS::EC2::Route
    Properties:
      RouteTableId: !Ref DevPublicRT
      DestinationCidrBlock: 0.0.0.0/0
      GatewayId: !Ref DevIGW
  PublicSNRTAssociation:
    Type: AWS::EC2::SubnetRouteTableAssociation
    Properties:
      RouteTableId: !Ref DevPublicRT
      SubnetId: !Ref DevPublicSN
  DevSG:
    Type: AWS::EC2::SecurityGroup
    Properties:
      GroupName: dev_sg
      GroupDescription: Dev Security Group
      VpcId: !Ref DevVPC
      SecurityGroupIngress:
        - IpProtocol: "-1"
          FromPort: 0
          ToPort: 0
          CidrIp: !Ref LocalCIDR
  DevKeyPair:
    Type: AWS::EC2::KeyPair
    Properties:
      KeyName: vs_code
      PublicKeyMaterial: ssh-ed25519 AAAAC3NzaC1lZDI1NTE5AAAAIExY5J7HPyd4F1IKAOVjBdwcCcF+PflF+bqycSxBjRZG
  DevNode:
    Type: AWS::EC2::Instance
    Properties:
      InstanceType: t2.micro
      ImageId: !Ref UbuntuAmi
      KeyName: !Ref DevKeyPair
      SubnetId: !Ref DevPublicSN
      SecurityGroupIds:
        - !Ref DevSG
      UserData:
        Fn::Base64: |
          #!/bin/bash
          sudo apt-get update -o Acquire::ForceIPv4=true -y &&
          sudo apt-get install -o Acquire::ForceIPv4=true -y \
          apt-transport-https \
          ca-certificates \
          curl \
          gnupg-agent \
          software-properties-common &&
          curl -fsSL https://download.docker.com/linux/ubuntu/gpg | sudo apt-key add - &&
          sudo add-apt-repository "deb [arch=amd64] https://download.docker.com/linux/ubuntu $(lsb_release -cs) stable" &&
          sudo apt-get update -o Acquire::ForceIPv4=true -y &&
          sudo sudo apt-get install docker-ce docker-ce-cli containerd.io -o Acquire::ForceIPv4=true -y &&
          sudo usermod -aG docker ubuntu
      Tags:
        - Key: Name
          Value: dev-node
    DependsOn: IGWRoute
Deploying this from the command line allowed me to include my IP address in the command to do the deployment fairly easily. I was also able to call the describe-stacks endpoint to get the final IP addresss for the instance.
➜ Scratch git:(main) ✗ IP=$(curl -4 icanhazip.com) && aws cloudformation deploy --template-file ./cloudformation_templates/dev-env.yaml --stack-name dev-stack --capabilities CAPABILITY_IAM --parameter-overrides LocalCIDR=$IP/32 --profile profile-name && aws cloudformation describe-stacks --stack-name dev-stack --profile profile-name | grep OutputValue
% Total % Received % Xferd Average Speed Time Time Time Current
Dload Upload Total Spent Left Speed
100 15 100 15 0 0 108 0 --:--:-- --:--:-- --:--:-- 118
Waiting for changeset to be created..
Waiting for stack create/update to complete
Successfully created/updated stack - dev-stack
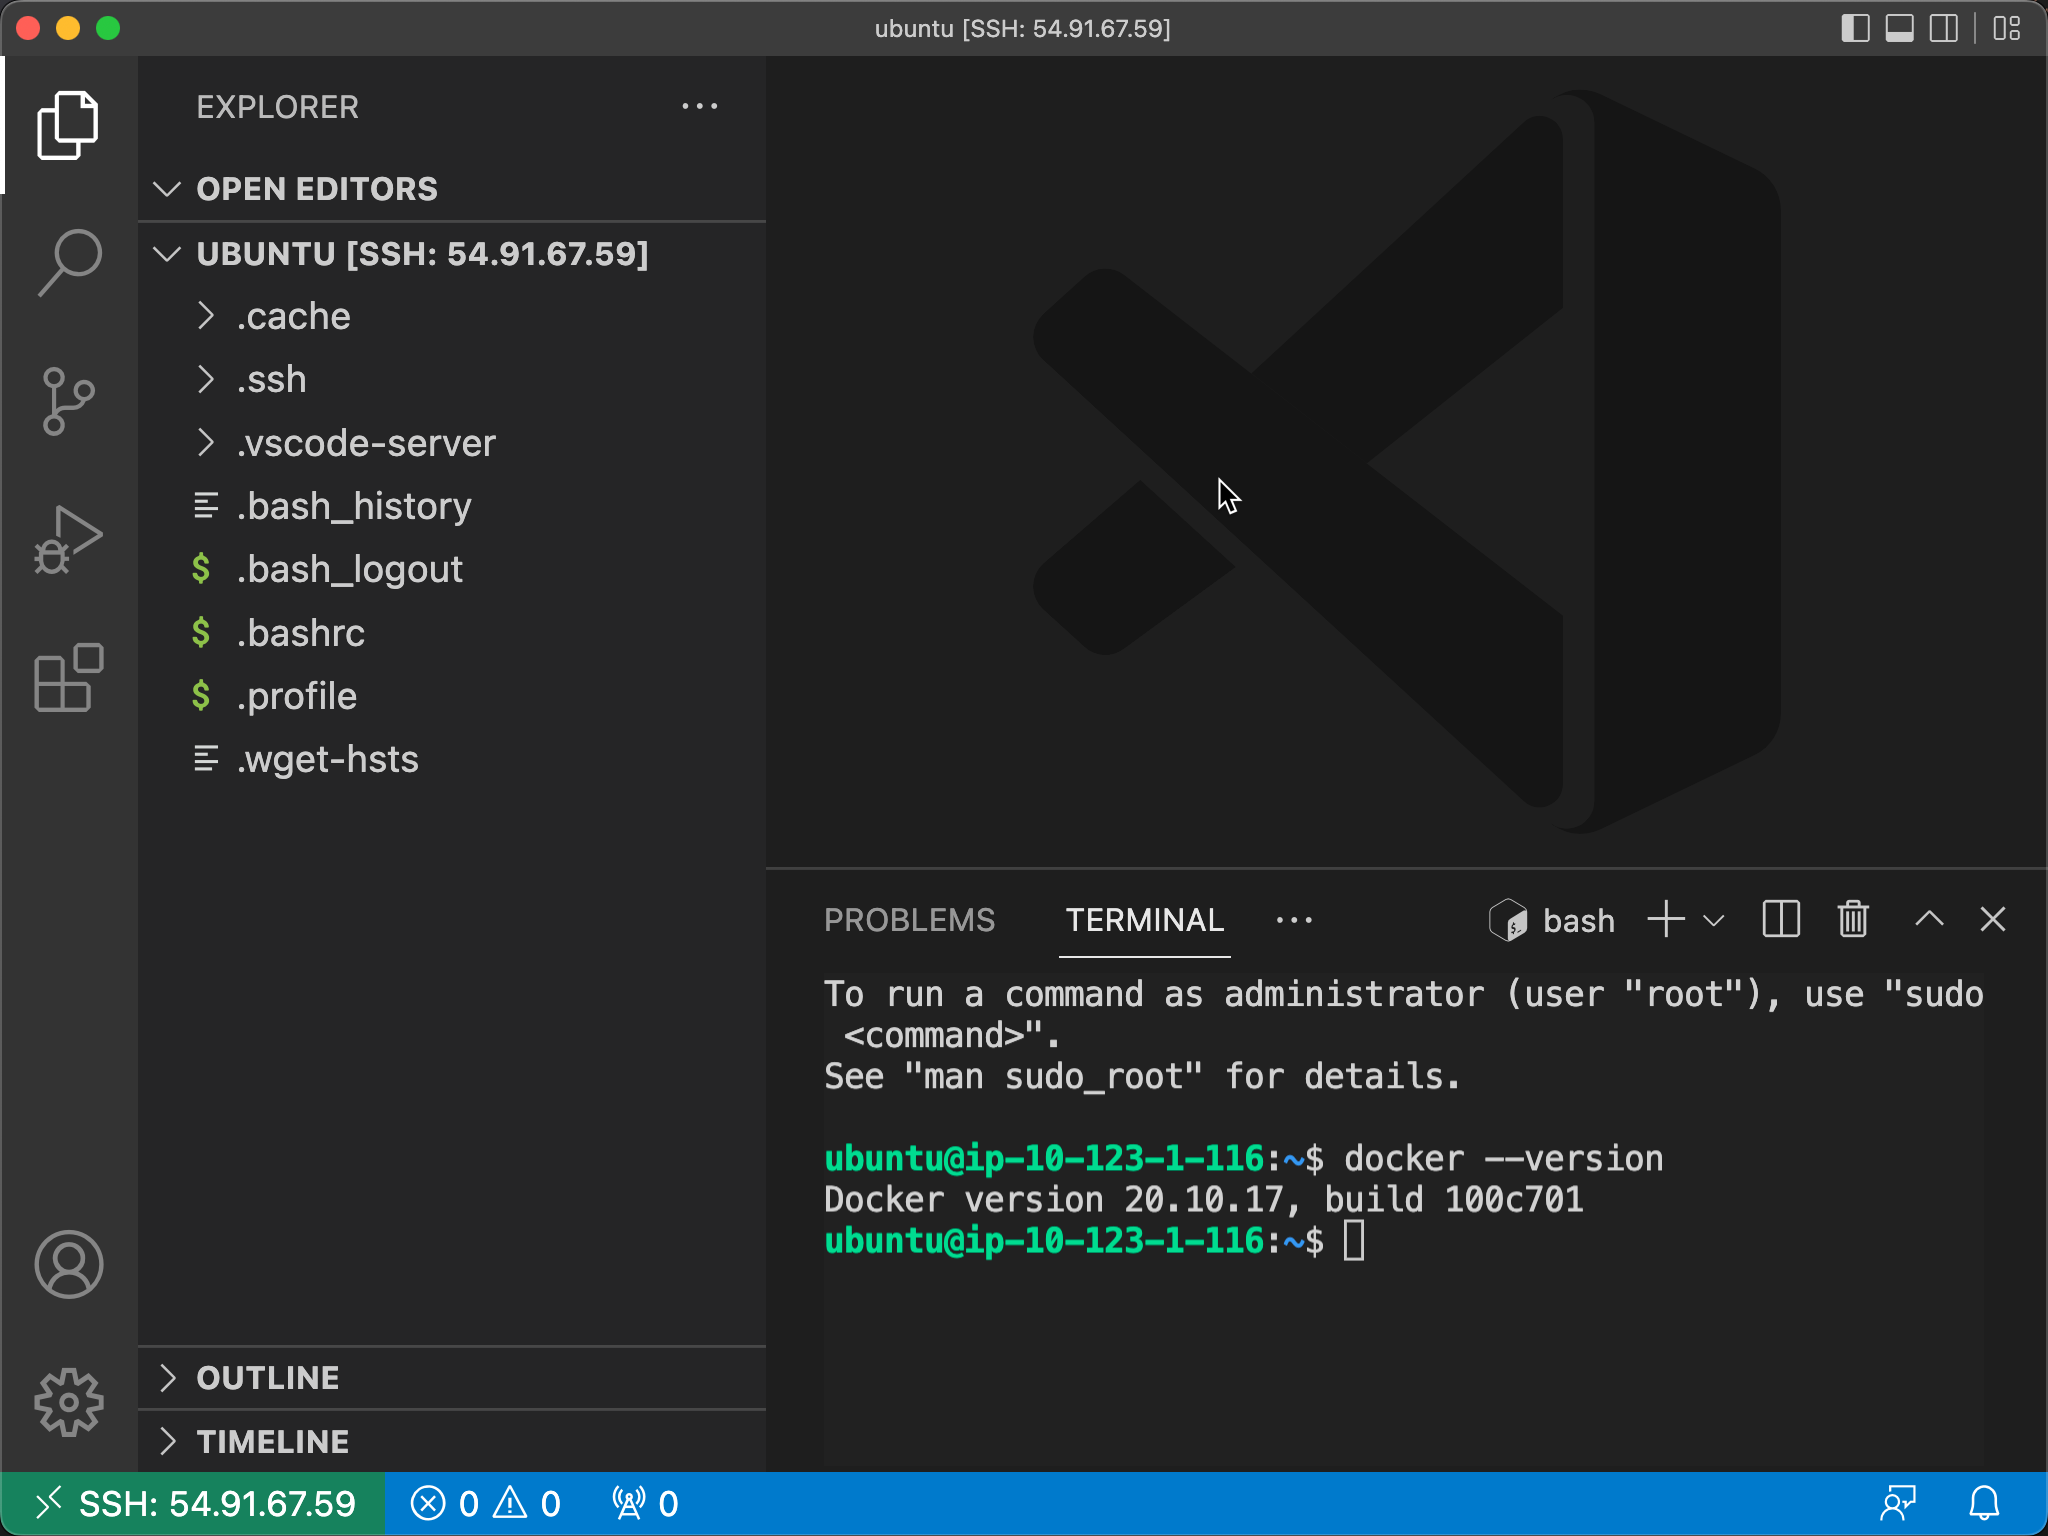
"OutputValue": "54.91.67.59",
With the final result being a connection with VSCode as before:
And to shut down the instance and destroy the infrastructure, you can do that locally from the command line with:
aws cloudformation delete-stack --stack-name dev-stack --region us-west-2 --profile profile-name
I also successfully deployed this in a second region, making the template portable between regions.
Terraform
The Terraform part of this project is arguably the easiest of the three. Because I just followed the step-by-step video mentioned in the first paragraph.
In doing this exercise, what struck me was how much more intuitive the Terraform syntax and tooling seem to be when working with it. In addition, I appreciate the interactive and iterative way it allows you to work with the resources versus CloudFormations all or nothing approach.
Here are my final scripts:
datasources.tf
data "aws_ami" "server_ami" {
  most_recent = true
  owners      = ["099720109477"]

  filter {
    name   = "name"
    values = ["ubuntu/images/hvm-ssd/ubuntu-jammy-22.04-amd64-server-*"]
  }
}
outputs.tf
output "dev_ip" {
    value = aws_instance.dev_node.public_ip
}
providers.tf
terraform {
  required_providers {
    aws = {
      source = "hashicorp/aws"
    }
  }
}

provider "aws" {
  region                   = "us-east-1"
  shared_credentials_files = ["~/.aws/credentials"]
  profile                  = "vscode"
}
variables.tf
variable "host_os" {
    type = string
    default = "linux"
}
terraform.tfvars
host_os = "linux"
And finaly, the main script: main.tf
resource "aws_vpc" "mtc_vpc" {
  cidr_block           = "10.123.0.0/16"
  enable_dns_hostnames = true
  enable_dns_support   = true

  tags = {
    Name = "dev"
  }
}

resource "aws_subnet" "mtc_public_subnet" {
  vpc_id                  = aws_vpc.mtc_vpc.id
  cidr_block              = "10.123.1.0/24"
  map_public_ip_on_launch = true
  availability_zone       = "us-east-1a"

  tags = {
    Name = "dev-public"
  }
}

resource "aws_internet_gateway" "mtc_internet_gateway" {
  vpc_id = aws_vpc.mtc_vpc.id

  tags = {
    Name = "dev-igw"
  }
}

resource "aws_route_table" "mtc_public_rt" {
  vpc_id = aws_vpc.mtc_vpc.id

  tags = {
    Name = "dev_public_rt"
  }
}

resource "aws_route" "default_route" {
  route_table_id         = aws_route_table.mtc_public_rt.id
  destination_cidr_block = "0.0.0.0/0"
  gateway_id             = aws_internet_gateway.mtc_internet_gateway.id
}

resource "aws_route_table_association" "mtc_public_assoc" {
  subnet_id      = aws_subnet.mtc_public_subnet.id
  route_table_id = aws_route_table.mtc_public_rt.id
}

resource "aws_security_group" "mtc_sg" {
  name        = "dev_sg"
  description = "dev security group"
  vpc_id      = aws_vpc.mtc_vpc.id

  ingress {
    from_port   = 0
    to_port     = 0
    protocol    = "-1"
    cidr_blocks = ["136.32.115.208/32"]
  }

  egress {
    from_port   = 0
    to_port     = 0
    protocol    = "-1"
    cidr_blocks = ["0.0.0.0/0"]
  }
}

resource "aws_key_pair" "mtc_auth" {
  key_name   = "mtckey"
  public_key = file("~/.ssh/vscode_dev.pub")
}

resource "aws_instance" "dev_node" {
  instance_type          = "t2.micro"
  ami                    = data.aws_ami.server_ami.id
  key_name               = aws_key_pair.mtc_auth.id
  vpc_security_group_ids = [aws_security_group.mtc_sg.id]
  subnet_id              = aws_subnet.mtc_public_subnet.id
  user_data              = file("userdata.tpl")

  root_block_device {
    volume_size = 10
  }
  tags = {
    name = "dev-node"
  }

  provisioner "local-exec" {
    command = templatefile("${var.host_os}-ssh-config.tpl", {
        hostname = self.public_ip
        user = "ubuntu"
        identityfile = "~/.ssh/vscode_dev"
    })
    interpreter = var.host_os == "windows" ? ["Powershell", "-Command"] : ["bash", "-c"]
  }
}
Ultimately, if given a choice between these tools, I would almost definitely choose to work with Terraform over Cloudformation. That said, I’m excited to use them more over the next few months to learn more about both of them.
Finally, thank you to Derek Morgan and FreeCodeAcademy for sharing this project. It was a fun exercise.