We use JSON to write policy documents in AWS. These documents are pretty flexible in that they are used to define the permissions that a principal is assigned, define boundaries for these permissions, and even as mentioned in my recent article, define boundaries for permissions that an account’s users may have.
Permissions Boundaries
Before we get too deep into how policies are interpreted, it is essential to cover, at a high level, how permissions boundaries are set up. These are policies that are similar to the service control policy. The primary purpose of a permissions boundary is to provide a fence around assigned user policies that prevent the user’s permissions from exceeding the permissions allowed in the boundary.
To set up a permissions boundary, we need to add a boundary to the user when creating the identity.
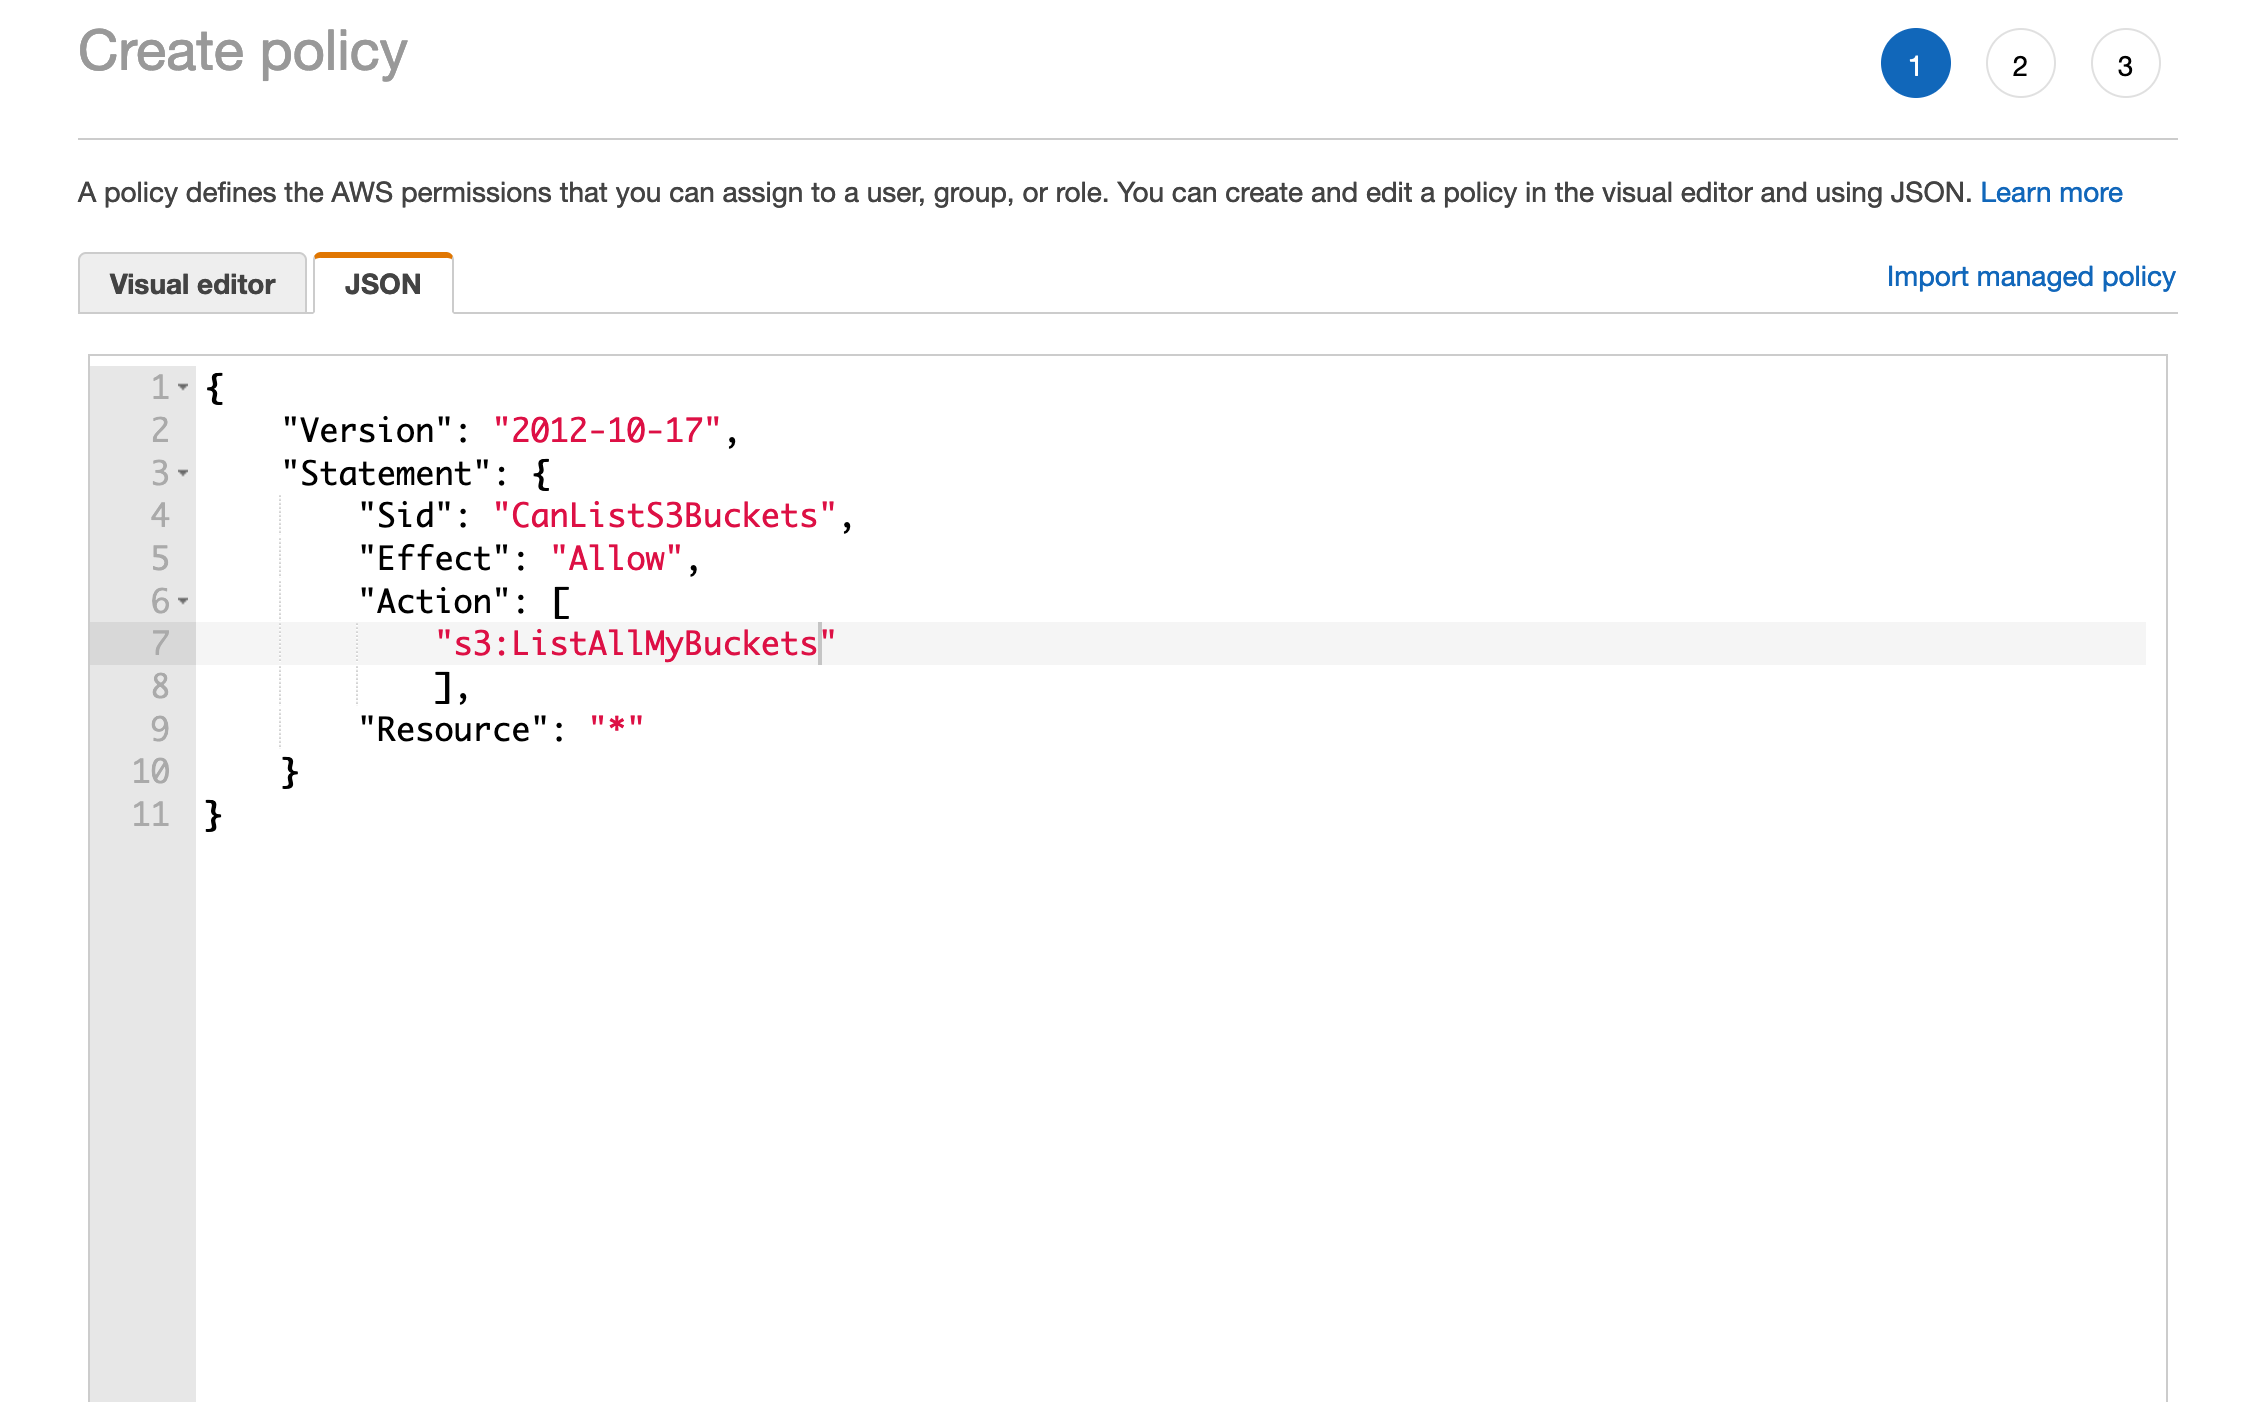
The first step is to create a policy - this is the same as creating any other managed policy and could be used as a standard permissions policy. But when applied as a Permissions Boundary, it will function as a gate limiting the user to the rights defined in this document. This policy will be created and saved as S3ListBucketsOnlyPolicy.
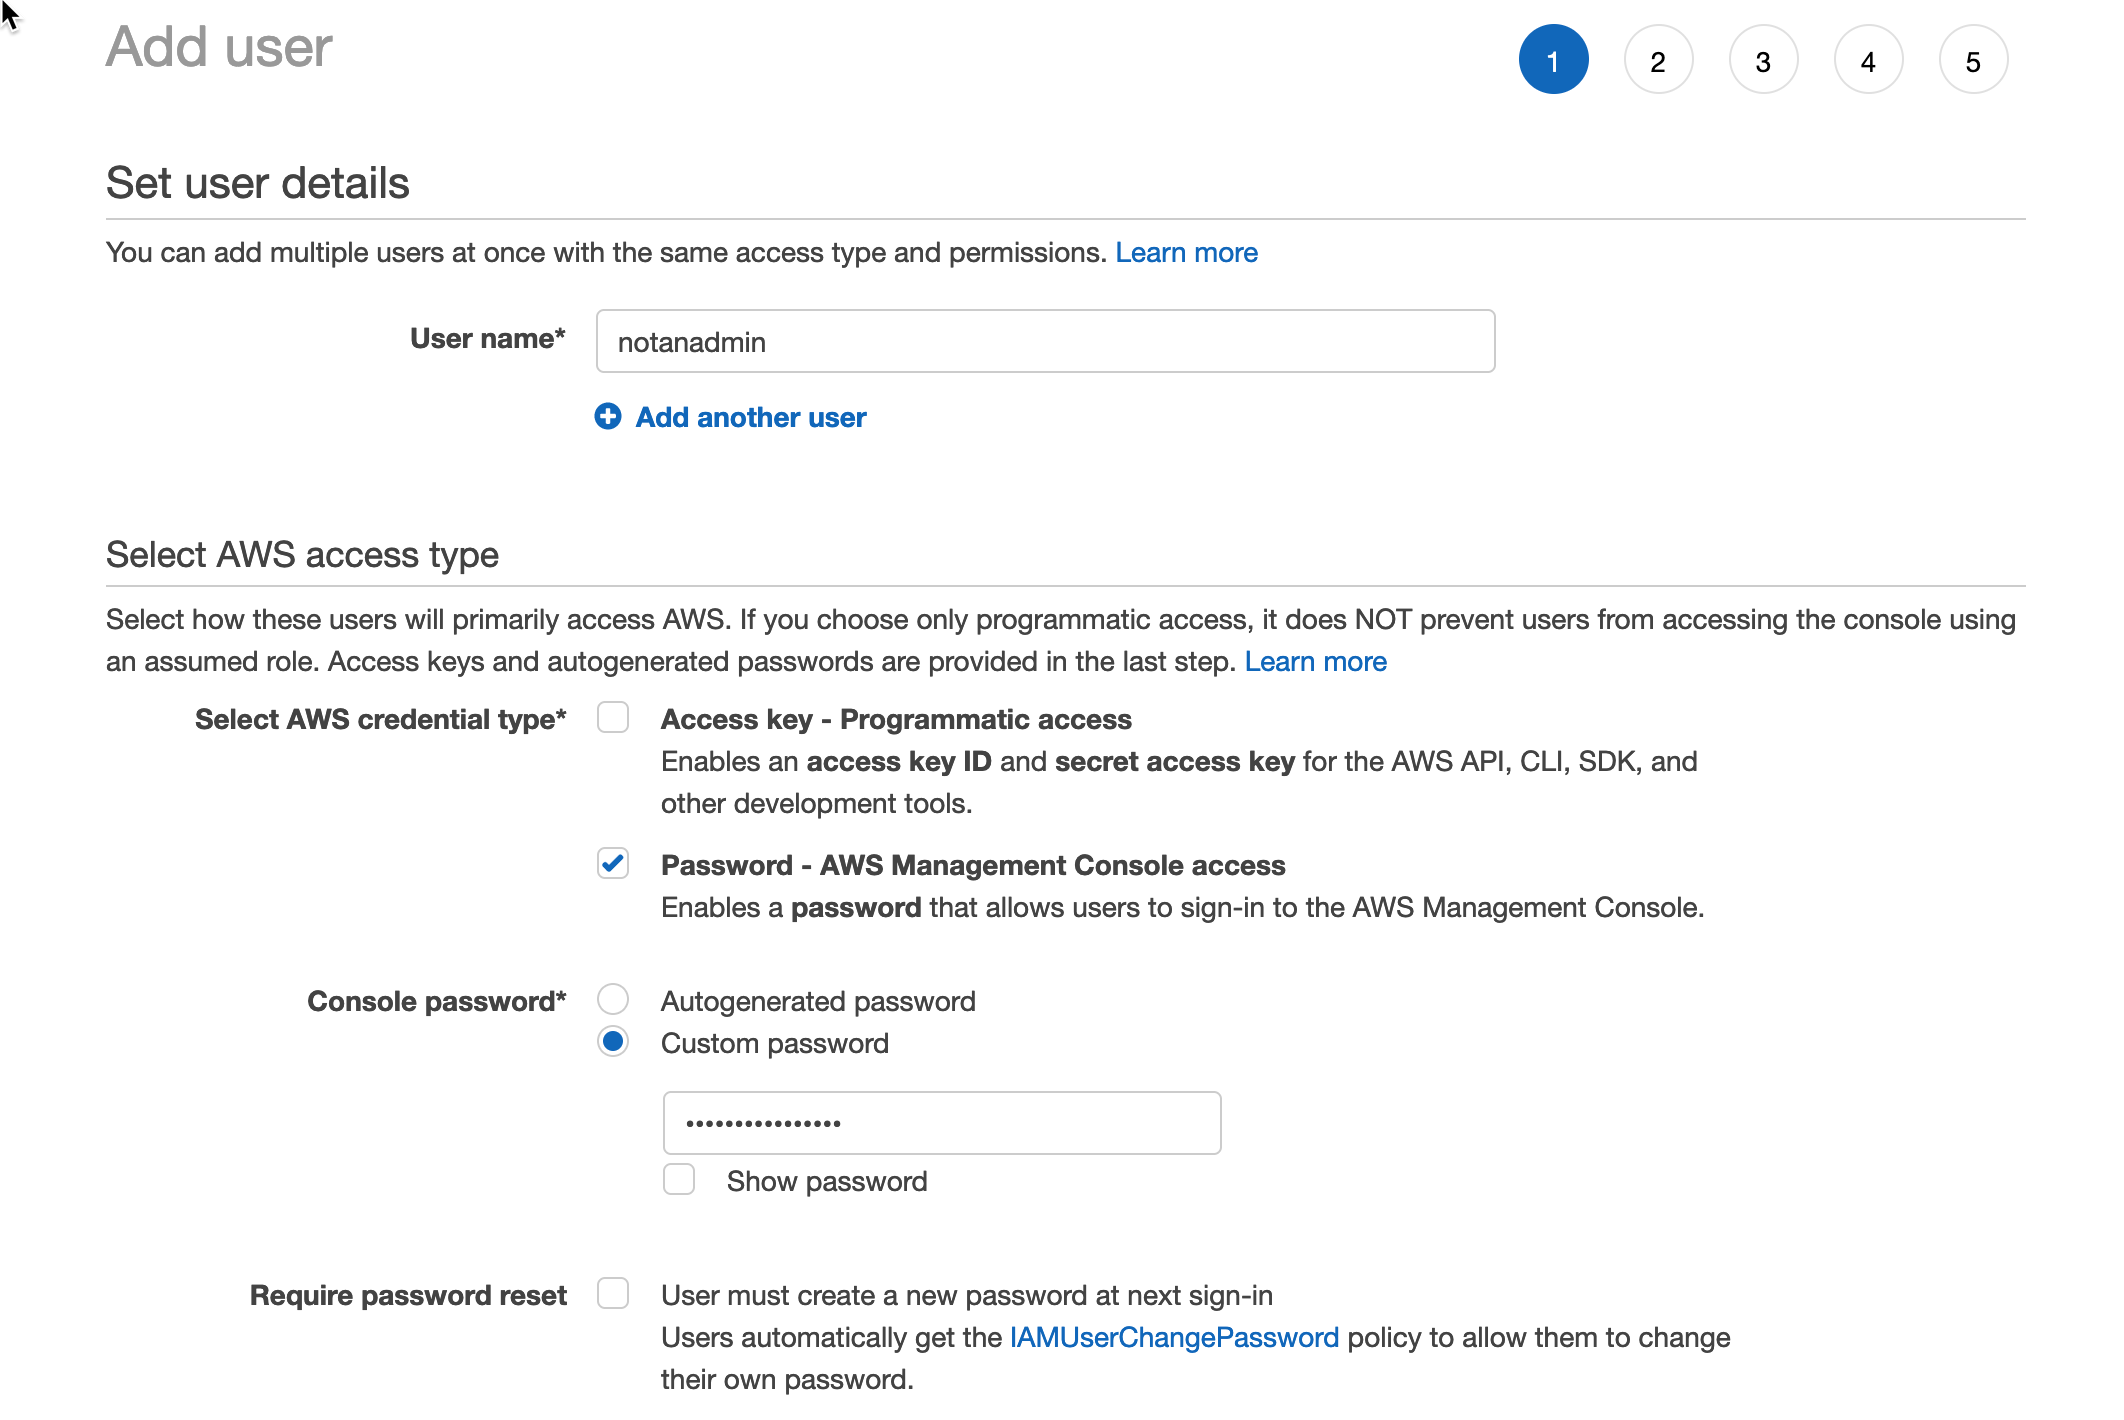
This step is the same as creating any other user account. We give the user a name (in this case, notanadmin).
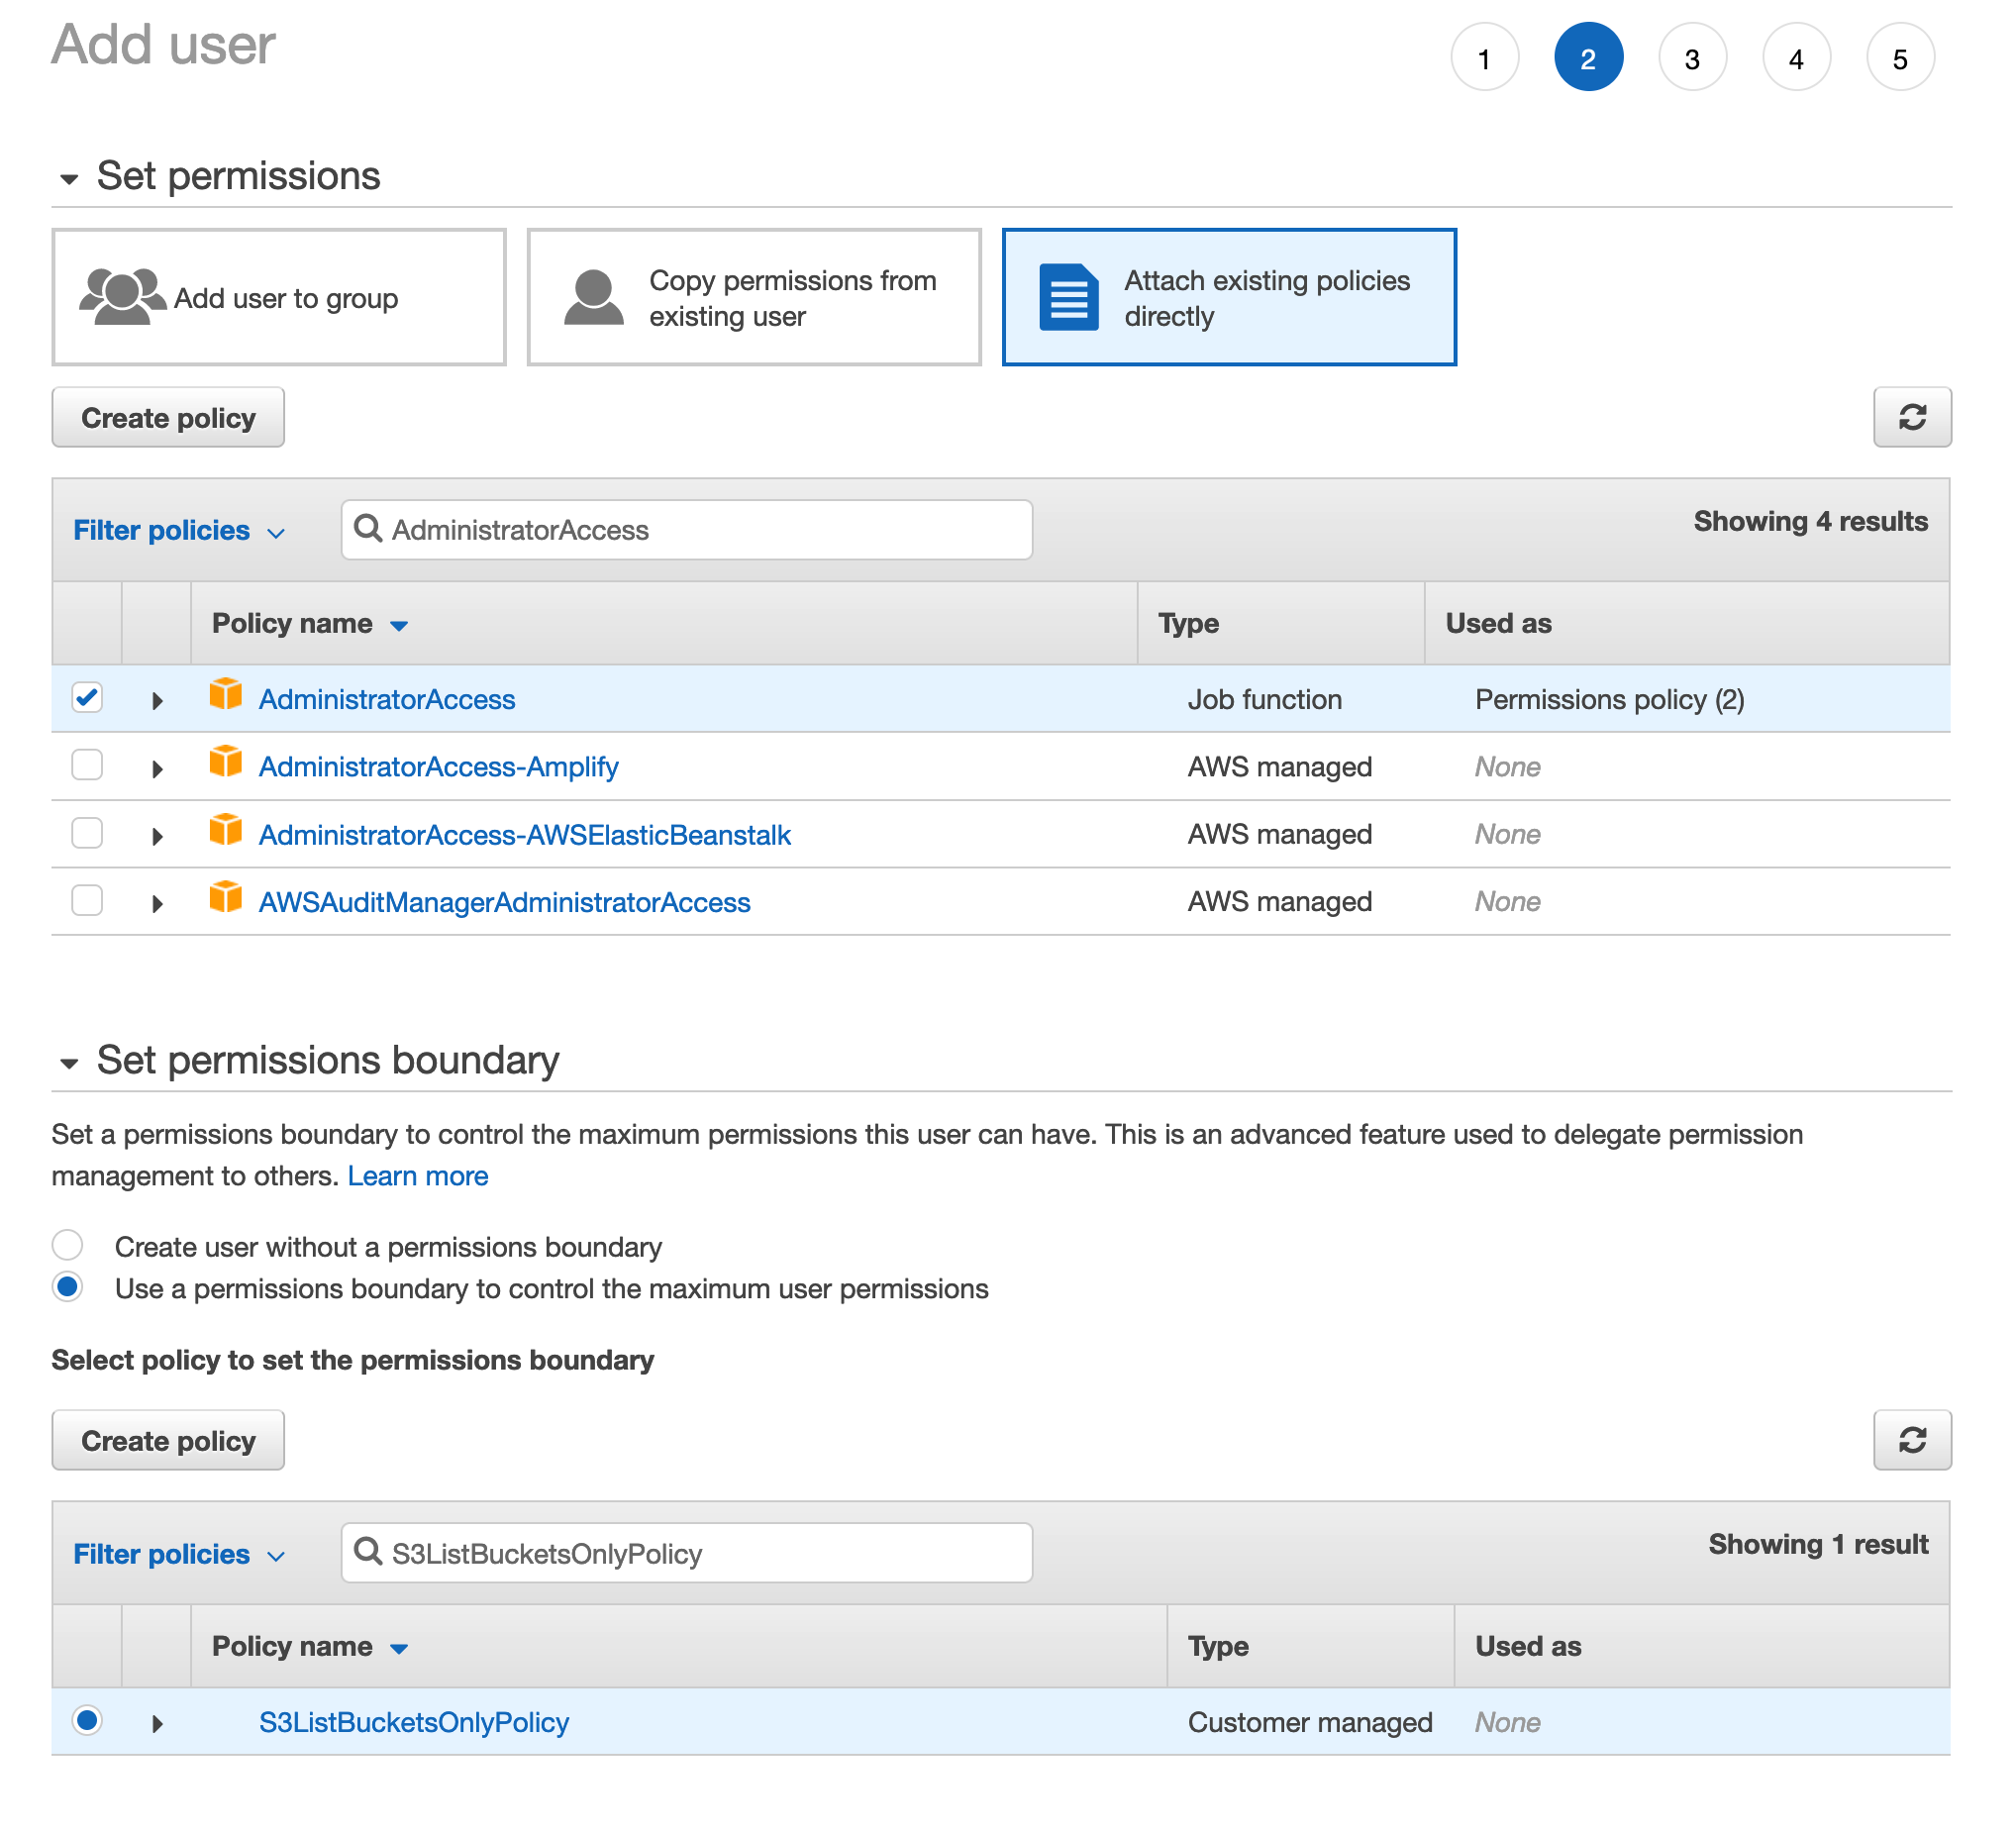
In this step, we assign the user, notanadmin, from the previous page, AdministratorAccess. This policy should give the user full permission over the account and allow the user to do anything he wants. But we also set a permissions boundary. It’s below the permissions settings for the user setup. In this case, we chose the S3ListBucketsOnlyPolicy. This boundary effectively limits the user to only being able to list the S3 buckets in the account - even though he is assigned the AdministratorAccess policy.
In the above example, we didn’t do this, but instead of AdministratorAccess, we could assign the user AmazonEC2FullAccess. Which has the following policy:
{
    "Version": "2012-10-17",
    "Statement": [
        {
            "Action": "ec2:*",
            "Effect": "Allow",
            "Resource": "*"
        },
        {
            "Effect": "Allow",
            "Action": "elasticloadbalancing:*",
            "Resource": "*"
        },
        {
            "Effect": "Allow",
            "Action": "cloudwatch:*",
            "Resource": "*"
        },
        {
            "Effect": "Allow",
            "Action": "autoscaling:*",
            "Resource": "*"
        },
        {
            "Effect": "Allow",
            "Action": "iam:CreateServiceLinkedRole",
            "Resource": "*",
            "Condition": {
                "StringEquals": {
                    "iam:AWSServiceName": [
                        "autoscaling.amazonaws.com",
                        "ec2scheduled.amazonaws.com",
                        "elasticloadbalancing.amazonaws.com",
                        "spot.amazonaws.com",
                        "spotfleet.amazonaws.com",
                        "transitgateway.amazonaws.com"
                    ]
                }
            }
        }
    ]
}
Assigning this policy would result in the user, notanadmin, having no rights in the account. Because the policy for AmazonEC2FullAccess provides no access to s3:ListAllBuckets and because the policy boundary limits access to just s3:ListAllBuckets, there is no intersection between the assigned policy and the boundary. Therefore, the user would have no permissions at all. It is essential to note that the policy boundary only limits access - it does not provide the user with any permissions.
Practical uses of Permissions Boundaries
One important use of permissions boundaries is to provide a way for an AWS full administrator to delegate user creation to another individual without having to trust that individual with full permissions to the AWS account.
The problem with creating an IAM administrator is that the administrator could easily escalate his permissions by doing one of two things:
- Modify the permissions of his IAM account and grant himself additional rights.
- Create another user with administrator privileges and use that user’s identity to log in.
Permission boundaries solve this by doing the following steps.
- The administrator user creates a customer-managed policy that allows the resources and actions that the most privileged regular user (User that the IAM Administrator can create) on the AWS account should get.
- The administrator user creates another customer-managed policy, used as a permissions boundary for the IAM Administrator. This policy has a condition that excludes access to the IAM user’s account. The second Statement in the policy will deny this user the ability to edit the Boundary policy and the IAM administrator policy (this policy). Finally, the last Statement will deny the user the ability to remove permission boundaries from any user.
- The next step is for the administrator to create another policy, to be used as the IAM administrator’s primary permissions policy. Then, the administrator assigns all permissions to IAM and any additional permissions which must have been allowed in the boundary in step two that the IAM administrator will need.
- The next step is to create the IAM administrator users. In this step, we attach the policy defined in step three as the permissions policy to the user and the policy in step two as the permissions boundary.
Setting up the IAM administrator user this way effectively gates off the account and provides only the permissions needed to do that job. The user can create and update any account on the system except his own. He can create new users so long as he includes the boundary policy, defined in step one, as the permissions boundary. This part prevents him from being able to create an administrator user he could use to escalate his permissions. He is also prevented from administering his account. Finally, he is prevented from tampering with the boundary policies themselves.
Policy Evaluation
Policies can be applied at any of the following levels:
- SCPs
- Resource Policies
- IAM Identity Boundaries
- Session Policies (Related to Roles)
- Identity Policies
- Multi-Account Access
Any explicit deny in any policy referencing a resource and action will cause the action to be denied. This is a full stop, and we don’t go any further.
If there are no explicit deny statements for the resource and action we move on:
- Check the Service Control Policies
- We only look at the account that contains the identity here (if the resource is in another account)
- If an action is allowed on the resource in the SCP, we move on. Otherwise, the action is stopped here.
- Resource Policies are checked next. If the action is allowed here, we stop processing rules and allow access.
- Permission boundaries for the identity are checked next. If the action on the resource is not allowed by the permission boundary, the decision is denied, and we stop processing further levels.
- Session policies are based on role assumptions where the session requested is limited beyond the role permission. In any case, if there is no session policy in use or that session policy allows the action, we move on to the identity policy. Otherwise, the action is denied, and we stop here.
- Finally, the Identity policy is checked, and if the action is allowed on the resource, we allow access; otherwise, it is denied.
The above section is focused on permissions in a single account environment. When talking about an identity from one account accessing resources in another, we layer on permissions at the account level to the previous flow.
The main takeaway for multiple account resource access is that both the account with the identity and the account with the resource must allow access. The access is denied if the identity’s account denies access to the other accounts’ resources. Likewise, if the resource account denies access to the resource for identity, then the access is denied. Only if both the identity account allows access to the resource and the resource account allows access to the resource does the action get allowed.
Setting up Cross Account Access to S3
There are three ways to set up cross-account access to S3 buckets.
- ACL
- Bucket Policy
- IAM Role
ACL
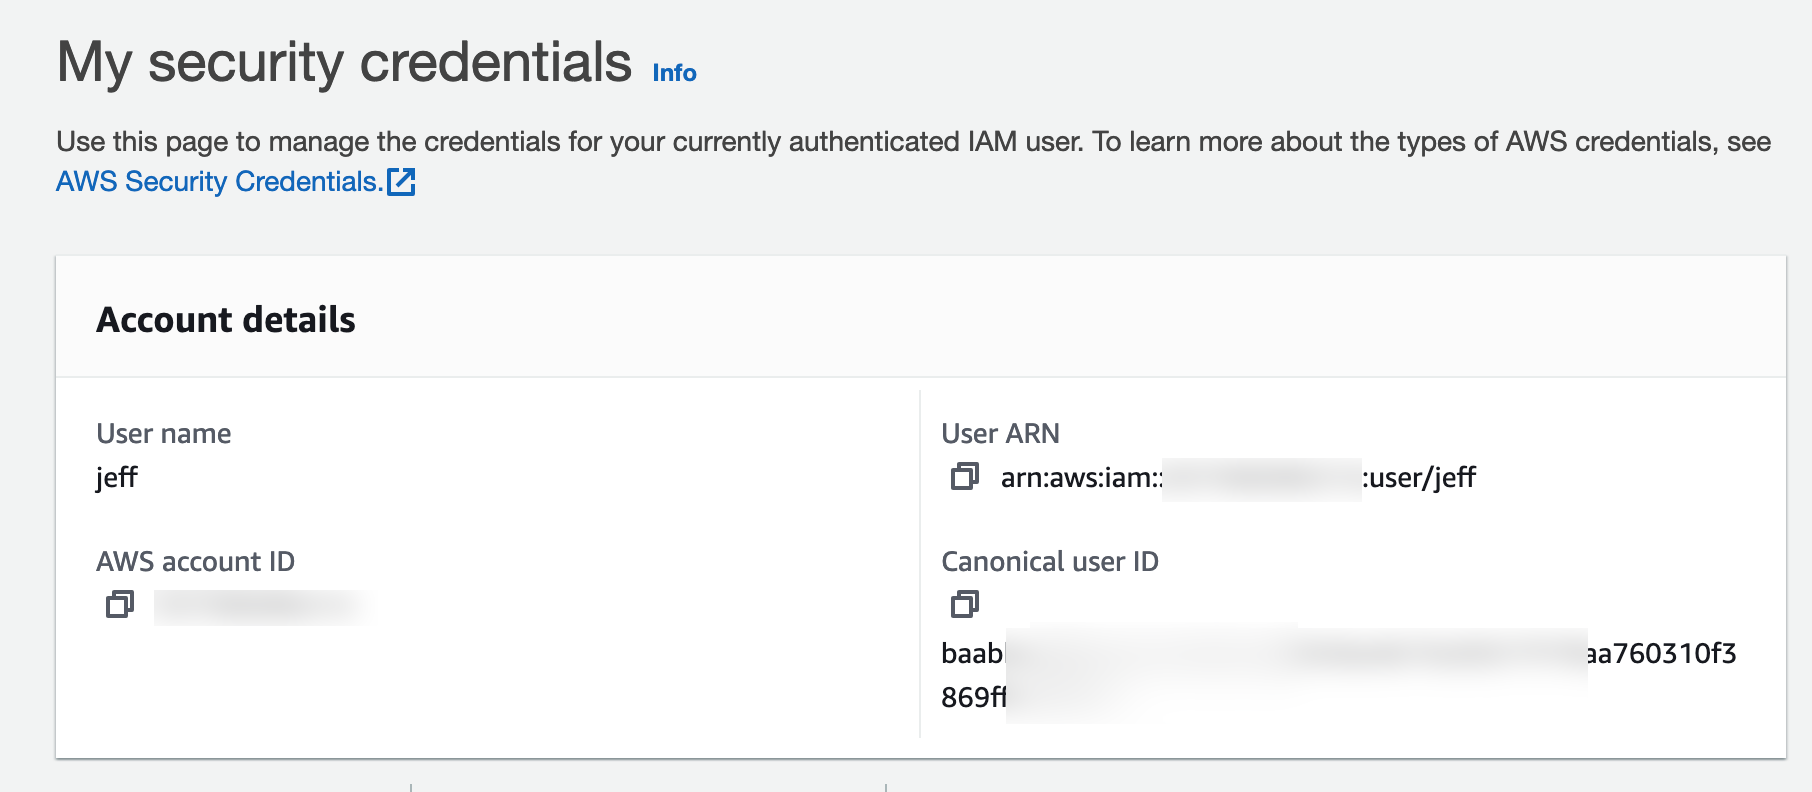
ACL (or access control list) is a legacy method to allow access to an S3 bucket from another account. This method uses the account Canonical ID. This can be obtained under the drop down menu on the right hand side of the screen in the consle (with the IAM Username and alias for the account) then clicking on Security Credentials.
To setup the access to the S3 bucket you would go to the Permissions tab of the bucket and update the ACL by adding a grantee of the Canonical ID.
To set up access to the S3 bucket, you would go to the Permissions tab and update the ACL by adding a grantee of the Canonical ID. Then you set the desired permissions. By default, any objects uploaded by a user in the account specified would be owned by the grantee account and not by the owner of the account that owns the bucket.
Bucket Policy
This is the newer method to allow access to an S3 bucket from another account. A resource policy is placed directly in the permissions of the bucket that specifies the permissions to grant the principal. The principal is the arn of an IAM user, including the account of that user.
{
    "Version": "2012-10-17",
    "Statement": [
        {
            "Effect": "Allow",
            "Principal":
            {"AWS": "arn:aws:iam::SOMEACCOUNTNUMBER:user/someuser"},
        "Action": [
            "s3:GetObject",
            "s3:PutObject",
            "s3:PutObjectAcl",
            "s3:ListBucket"
            ],
        "Resource": [
            "arn:aws:s3:::THISVERYBUCKET/*",
            "arn:aws:s3:::THISVERYBUCKET"
            ]
        }
    ]
}
Like ACL access, the account of the user uploading files to this bucket owns the object. This behavior can result in difficult-to-manage situations - where the account owner can’t delete objects in the bucket. We can mitigate this by setting the Object Ownership option under permissions to prefer bucket owner instead.
IAM Role
This method of sharing access to a bucket works differently than either ACL or Bucket access. In this method, the user accessing the bucket from another account assumes a role in the account that owns the bucket. To set this up, we set up an IAM role with an appropriate trust policy trusting the IAM user in the other account. In addition, this role has a permissions policy to allow the desired actions on the desired s3 bucket or buckets.
In this method, since the role belongs to the account that owns the bucket, the objects uploaded are owned by the owner of the bucket instead of the uploader.