
Introduction
As part of my preparation for the AWS Solution Architect Professional exam, I have found that developing my own “lab” projects help me to understand and retain AWS services when I have limited hands-on experience. To that end, I am documenting here the latest of these projects that I have completed. The project is a simple image watermark service, it will accept a PNG file that is uploaded to an input ‘folder’ in an S3 bucket and cause that image to be watermarked with the filename of the file and then stored, with the watermark, in an output ‘folder’ of the same bucket.
The project itself is trivial, but it is representative of other kinds of workloads that might need a flow like this. This could just as easily be an audio file uploaded that resulted in a transcription from Amazon Transcribe or an image recognition task submitted to Amazon Rekognition. The point of the exercise isn’t about the actual Python script that does the watermarking. It is a basic script that uses the PIL library to watermark a PNG. The important parts of the script are the script’s interactions with the Amazon Simple Queue Service, Amazon S3 Service, and Amazon SSM Parameter Store Service. All of this interaction is handled through the boto3 Python library.
Step by Step
Preparation
This solution will be regional so we must first choose a single region to deploy our solution. I am going to select us-east-2 (Ohio) because that is the region that is geographically closest to me. You may select another region and this should work equally well in any region if you are following along.
Create S3 Bucket
For the bucket name choose something that is globally unique. In my case, I will be choosing jgm-watermarking-project. I have also set the region to US East (Ohio) us-east-2. The rest of the settings on the bucket creation screen in the console are fine as set for the default. We won’t be creating public access to this bucket and SSE-S3 encryption, where S3 manages the encryption keys, is fine.
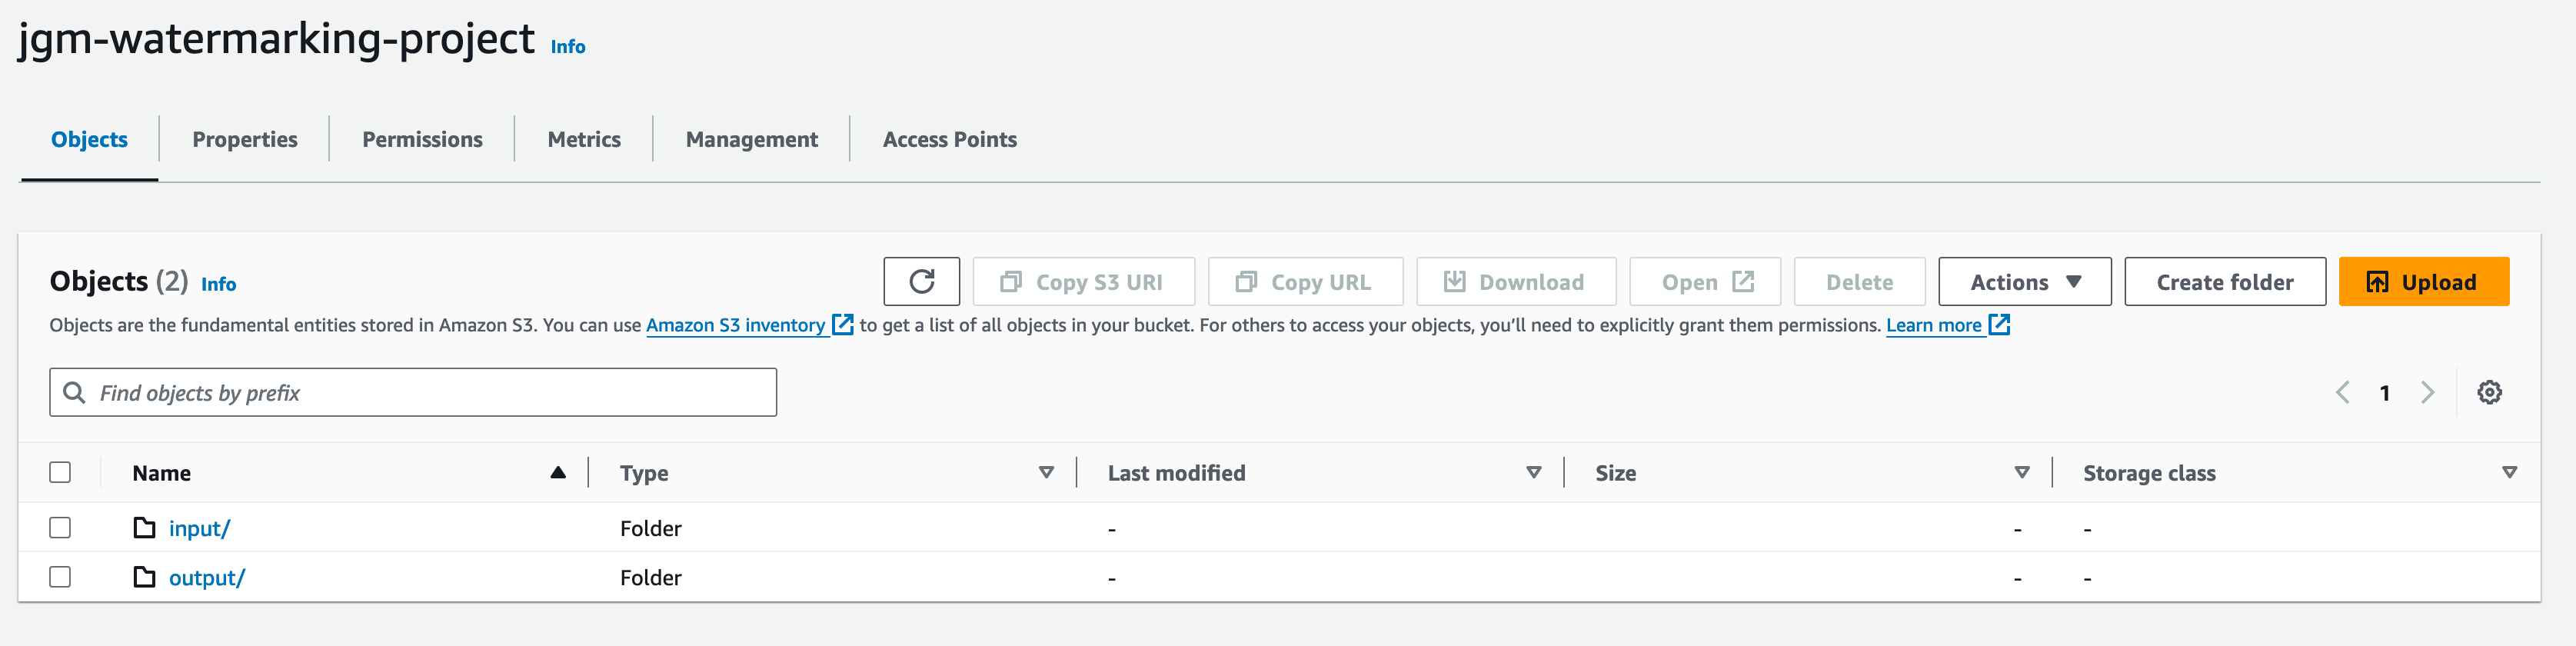
Once the bucket is created I am going to use the console to navigate into the bucket and create two folders (note: S3 doesn’t really have folders - folders are just prefixes and part of the object name. But the console refers to this as creating a folder and it is an easy way to understand the concept going forward so I won’t be pointing out the folder naming going forward here). The folders we will create will be called input and output respectively.
When this is complete the bucket will look like this:
SQS Queue and setup S3 Events
When an object is created in an S3 bucket, we can have an SQS message generated based on that action. So the next step is to create an SQS Queue for the bucket to notify.
The first step is to ensure you are using the same region you chose for the S3 bucket when you get to the SQS console.
For the SQS Queue, we will choose standard vs FIFO. FIFO is not necessary and has higher costs here so there is no reason to choose it; we can deal with messages getting processed more than once and out-of-order messages. For the queue name, I will use sqs-jgm-watermarking-project. For the policy, I chose to leave the default statement but add the following statement - this will allow our S3 bucket to publish messages to this queue. If you are following along, obviously replace the values with values appropriate to your account and environment.
    {
      "Sid": "Allow publish from S3 jgm-watermarking-project bucket",
      "Effect": "Allow",
      "Principal": {
        "Service": "s3.amazonaws.com"
      },
      "Action": "SQS:SendMessage",
      "Resource":
         "arn:aws:sqs:us-east-2:YOUR ACCOUNT ID:sqs-jgm-watermarking-project",
      "Condition": {
        "ArnEquals": {
          "aws:SourceArn": "arn:aws:s3:::jgm-watermarking-project"
        }
      }
    }
With the queue created, we can now go back to the S3 console to set up the action for S3 to publish to this topic when a new PNG file is uploaded to the input folder of our bucket.
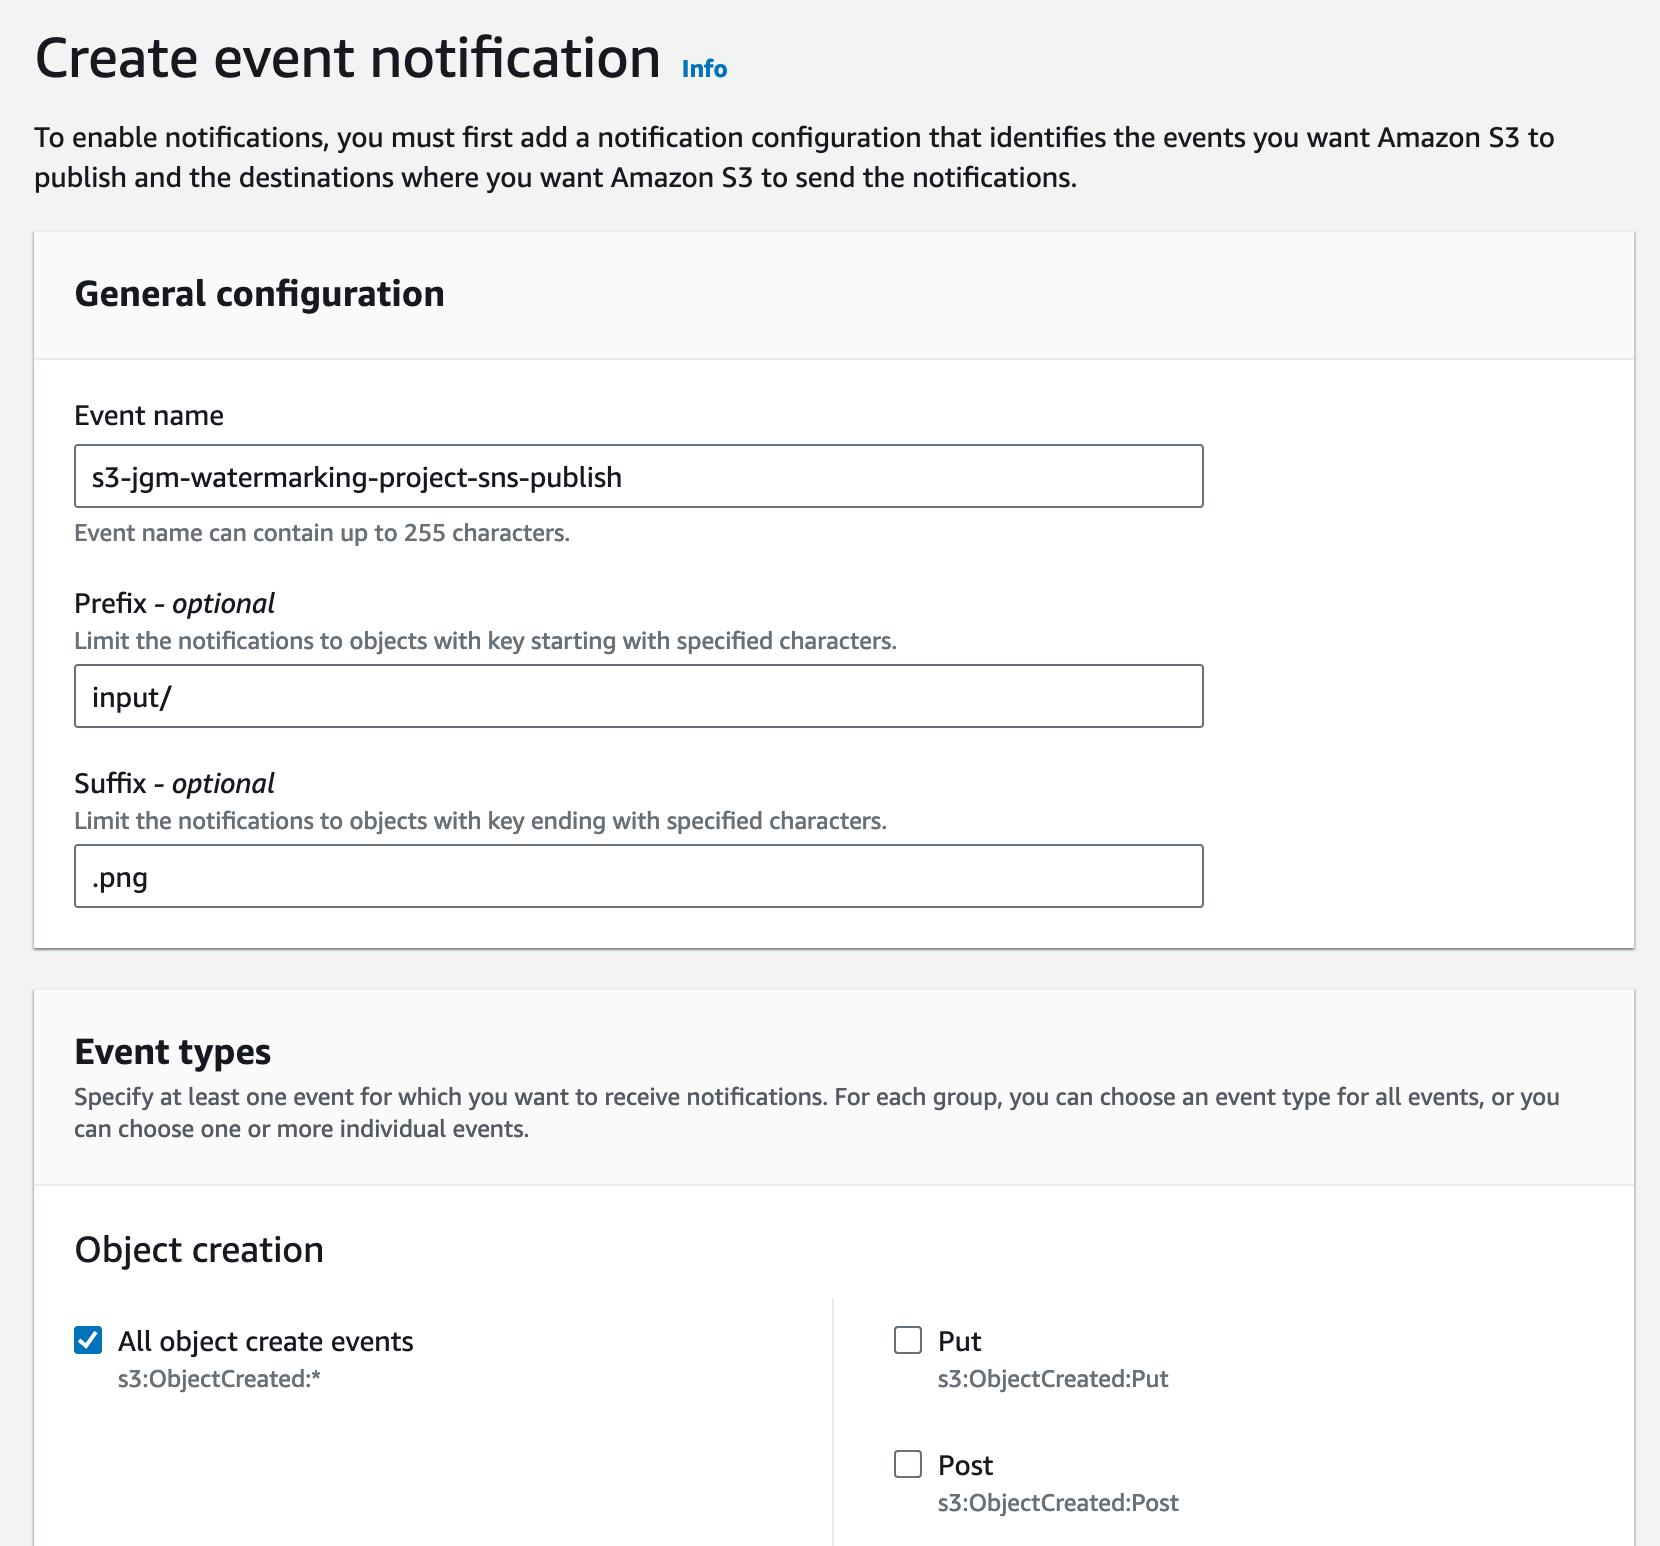
At the S3 console go to the properties tab, move down to Event Notifications, and select Create event Notification. I am going to choose the name s3-jgm-watermarking-project-sqs-message. I will indicate to use the input folder as the prefix and .png for the suffix. Then, I will choose All object create events as my event type.
 .
.
Finally, you will want to scroll down to the bottom of the screen and select SQS Queue - from here you can choose your new SQS queue.
Now move back to the S3 console where you should be able at the point where you can create the notification by clicking on Save Changes.
Setting Up Parameter Store
We want to allow our application to get the settings for our environment using the SMS Parameter Store. So our next stop is the SMS console, choose parameter store. If this is the first parameter you have created, in the region, you will need to click on Create parameter in the welcome screen. At this point, we will be creating three parameters.
| Description | Parameter Path |
|---|---|
| Queue URL | /watermarkimage/queue_url |
| Output Bucket | /watermarkimage/output_bucket |
| Output Path | /watermarkimage/output_path |
The parameter store is hierarchical, you can create a robust organization using slashes to indicate levels of the hierarchy. Here we we will just be sure to put all of the parameters for this project under a single namespace called watermarkimage to keep things organized.
To create the parameters simply type the full path to each parameter, one at a time, into the Name field. The description is optional, but I will use the description provided in the table above. For all of our parameters, these will be String parameters with text as the data type.
For each parameter put the value of the parameter in the value field. You may need to go back to the console for the SQS and S3 to find the bucket names and queue URL. If you followed along with me the output path should be output.
Setting up the Policy to Attach to a Testing User and our ECS Task Role
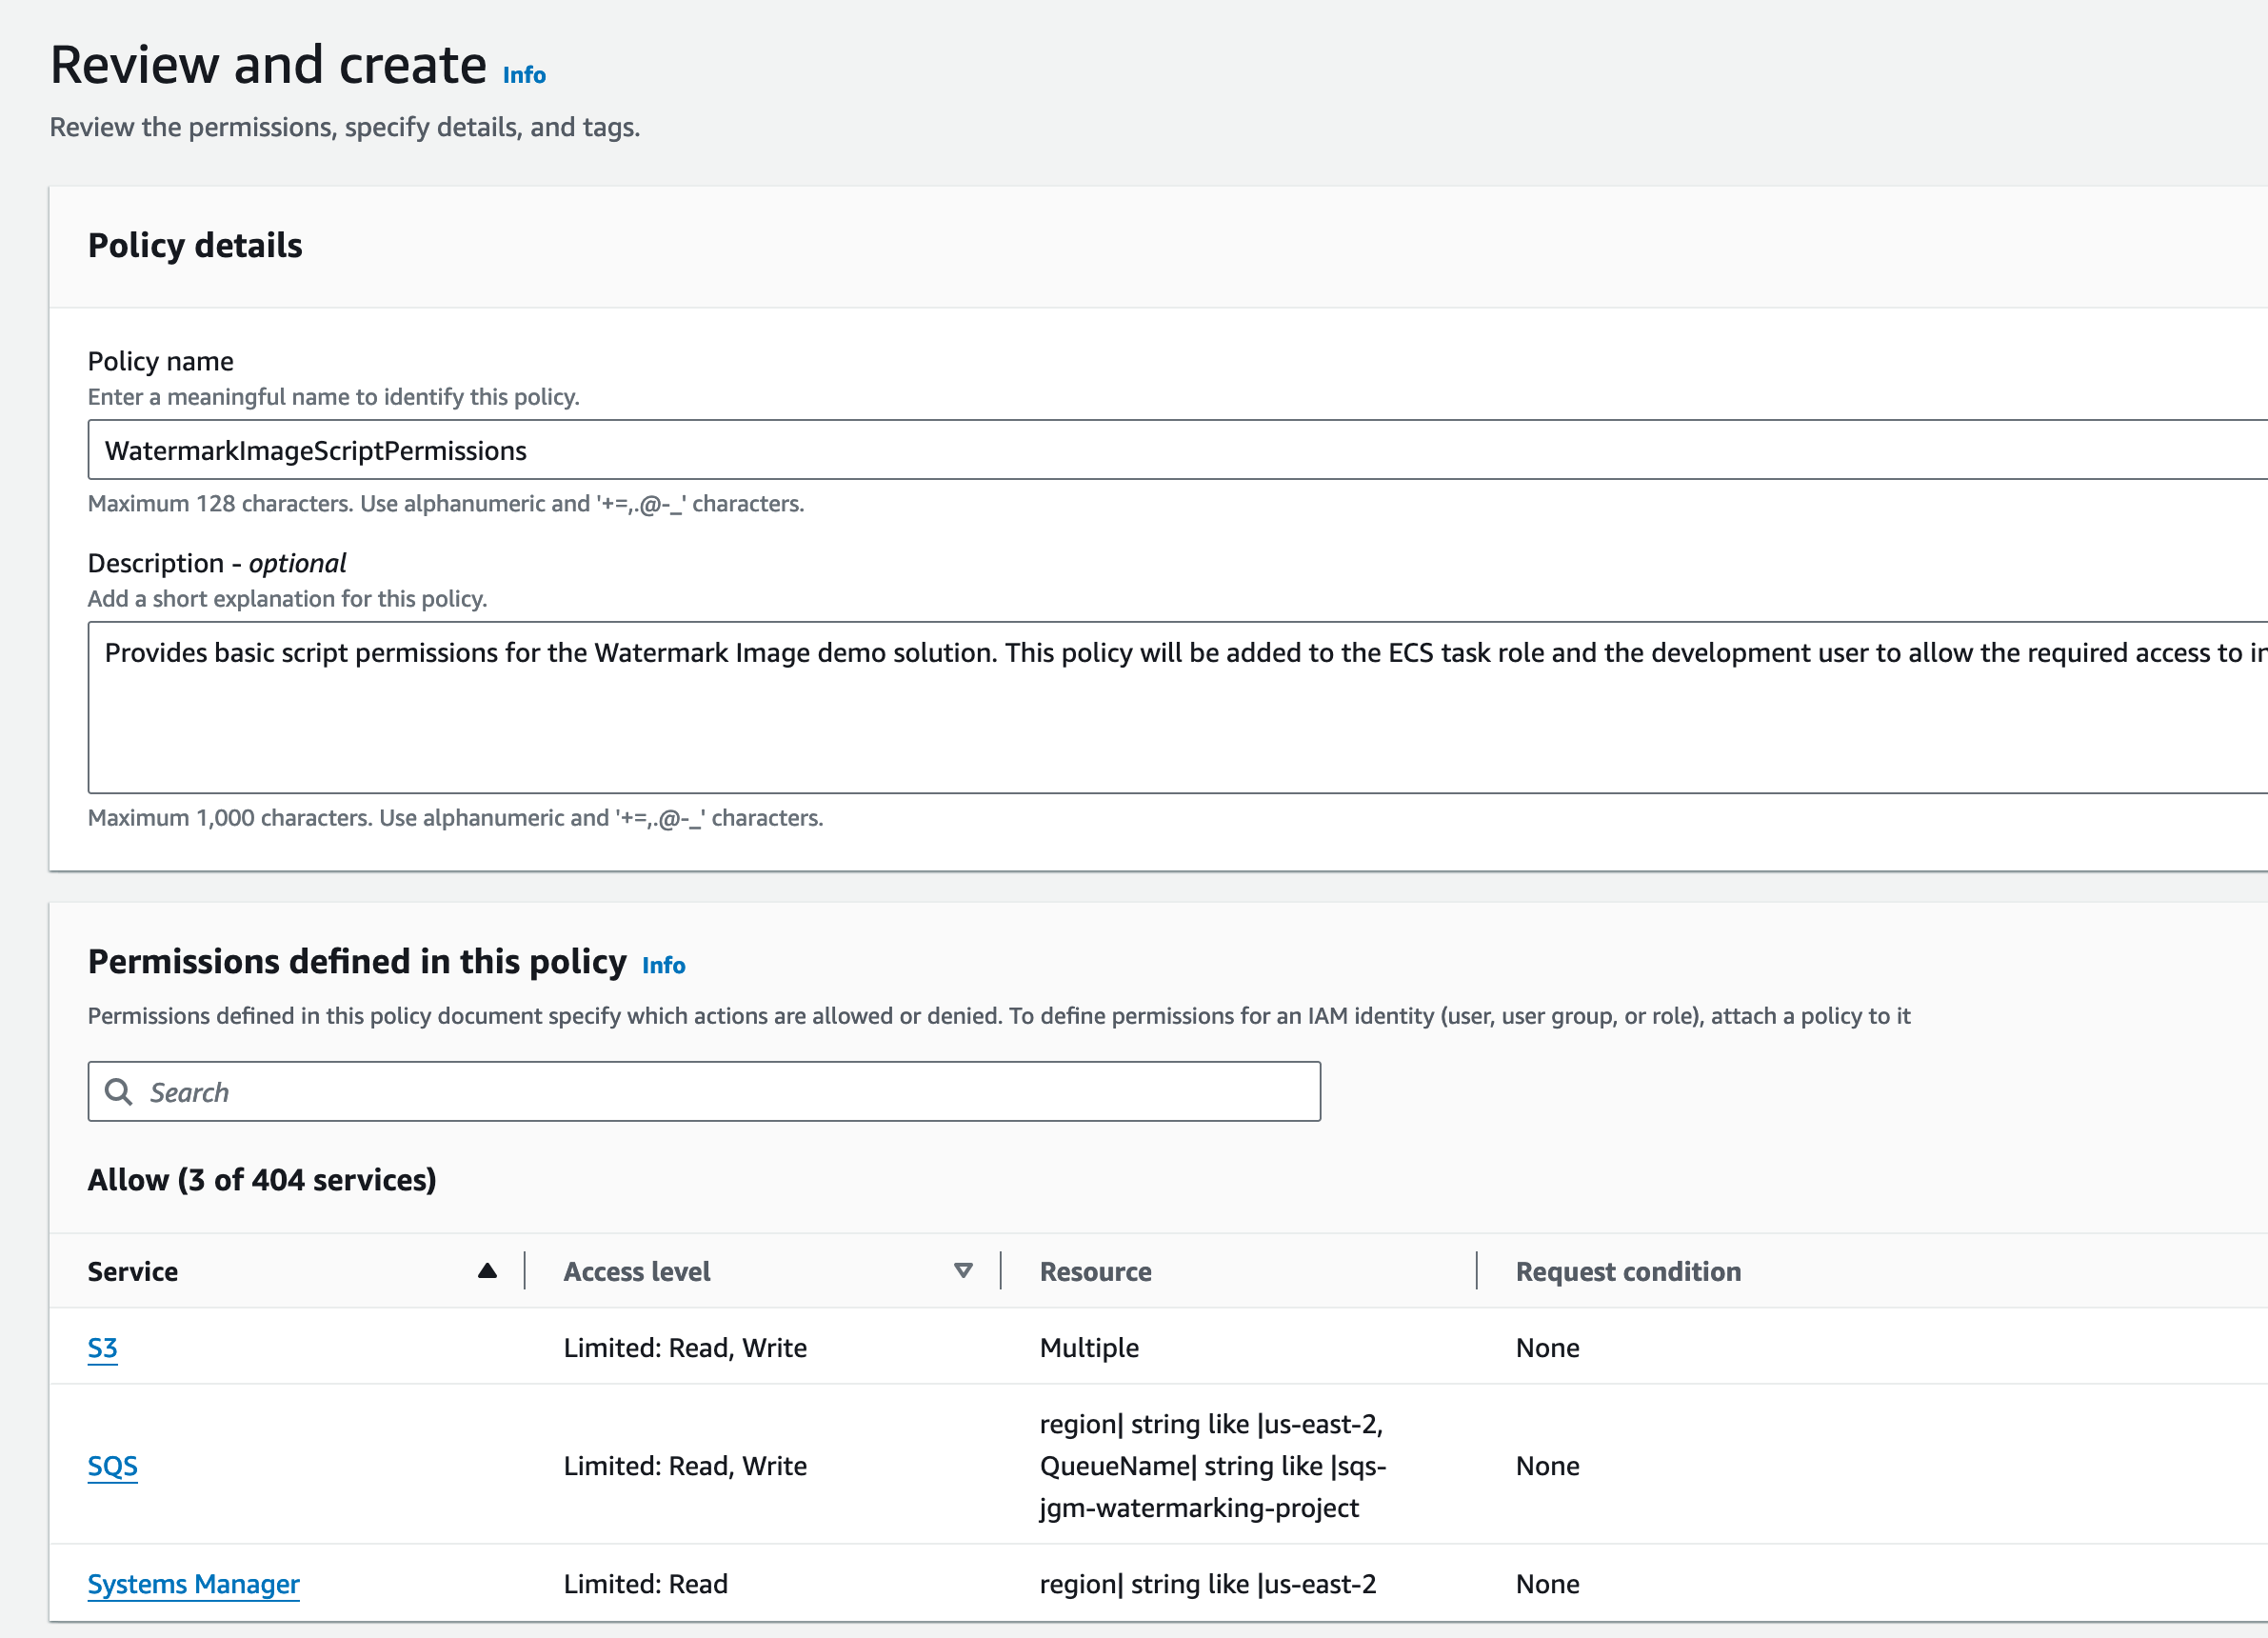
The next thing we need to do is create a policy and some principals, in IAM to access these resources we have created. We will do this by creating a policy first - this policy will grant access to the S3 - which will allow reads from the input folder in the bucket and writes to the output folder. It will also allow it to consume from the queue and update the queue. Finally, it will allow it to read the parameters in the watermarkimage namespace from the parameter store.
From there we will create a user with an API key for us to use for local testing. Later we will attach this policy to our ECS task role (and perhaps add more permissions for that).
First, go to the IAM console, click Policies and Create Policy and choose JSON - see below - obviously replace YOUR ACCOUNT ID with your actual account ID.
{
 "Version": "2012-10-17",
 "Statement": [
  {
   "Sid": "AllowRetrievalofInputObjects",
   "Effect": "Allow",
   "Action": [
    "s3:GetObject"
   ],
   "Resource": [
    "arn:aws:s3:::jgm-watermarking-project/input/*"
   ]
  },
  {
   "Sid": "AllowPutOffOutputObjects",
   "Effect": "Allow",
   "Action": [
    "s3:PutObject"
   ],
   "Resource": [
    "arn:aws:s3:::jgm-watermarking-project/output/*"
   ]
  },
  {
   "Sid": "AllowSQSReceiveAndDelete",
   "Effect": "Allow",
   "Action": [
    "sqs:ReceiveMessage",
    "sqs:DeleteMessage"
   ],
   "Resource": [
    "arn:aws:sqs:us-east-2:YOUR ACCOUNT ID:sqs-jgm-watermarking-project"
   ]
  },
  {
   "Sid": "AllowGetParameterForWatermarkimageNamespace",
   "Effect": "Allow",
   "Action": [
    "ssm:GetParameter"
   ],
   "Resource": [
    "arn:aws:ssm:us-east-2:YOUR ACCOUNT ID:parameter/watermarkimage/*"
   ]
  }
 ]
}
I’m going to call this policy WatermarkImageScriptPermissions. And provide a description that indicates that meaning.
Now just click on Create policy. For now, we will just move on with the development user. We will come back later to create the user for the ECS task.
Click on Users. Create User. For username, I will use watermark-dev-user. I won’t select the option to Provide user access to the AWS Management Console - as this user will be accessing the resources through boto3.
Click Next. Then choose, Attach policies directly. Search for the WatermarkImageScriptPermissions policy we created in the previous part, and select it. Click Next, and then click Create user.
Once we have that user click on the user. Click on Security Credentials. Under Access Keys click on Create access Key. Choose a use case, I chose Local code, but it really doesn’t matter - and then confirm the understanding for any alternative suggestions. Tag it, if you want, then click on Create access key.
Modify your local configuration for the AWS CLI to add the new profile and, for now, make it the default profile.
Python Code
Rather than paste the Python code here I will provide a GitHub repo for the code - but I will go through some of the AWS pieces here.
First, since we used the default profile, in our AWS CLI configuration for our user we don’t have to provide any credentials or special code for boto3 to access the services. So the first module I created was called parameters.py and it is a very simple module containing the parameter values from the SSM Parameter store.
import boto3

ssm = boto3.client('ssm')


QUEUE_URL = ssm.get_parameter(Name="/watermarkimage/queue_url")["Parameter"]["Value"]
OUTPUT_BUCKET = ssm.get_parameter(Name="/watermarkimage/output_bucket")["Parameter"]["Value"]
OUTPUT_PATH = ssm.get_parameter(Name="/watermarkimage/output_path")["Parameter"]["Value"]
The above will be imported into the main script code and used as constant values.
In the main script, I called watermark.py I also imported boto3 and used it in several places to interact with S3 and the SQS queue.
sqs = boto3.client('sqs')

while True:
    # Receive messae from SQS queue
    response = sqs.receive_message(
        QueueUrl=QUEUE_URL,
        AttributeNames = ['All'],
        MaxNumberOfMessages = 1,
        WaitTimeSeconds = 20
    )
    messages = response.get('Messages', [])
This gets us a list of messages that are in the queue and uses a 20-second long poll to avoid continuous polling when the queue is empty. AWS charges, in part, based on the number of SQS calls you make so choosing something sensible here makes sense.
    if messages:
        for message in messages:
            logger.info(f"Processing message: {message['MessageId']}")
            message_body = json.loads(message['Body'])
            for record in message_body['Records']:
                bucket_name = record['s3']['bucket']['name']
                object_key = unquote_plus(record['s3']['object']['key'])
This section begins the loop through the messages and reads each record in turn. This will get the required information to get the bucket and object so we can retrieve the input image. From here I move into the watermarking which I will mostly leave to the GitHub repo for reference. But below I do point out the S3 download and upload parts.
s3 = boto3.client('s3')
    file_byte_string = s3.get_object(
        Bucket=input_bucket,
        Key=input_key,
    )['Body'].read()
    original_image = Image.open(io.BytesIO(file_byte_string))
The above retrieves the image that was referenced in the queue.
s3.upload_fileobj(in_mem_file, OUTPUT_BUCKET, output_key)
Finally, toward the end of the function I upload the watermarked image to the output bucket.
And when we return to the main loop we need to delete the message from the SQS queue.
    sqs.delete_message(
        QueueUrl=QUEUE_URL,
        ReceiptHandle=message['ReceiptHandle']
    )
The code now works properly locally. The next step is to move it into a docker container so that we can use it on ECS.
Dockerizing the Script
The first step to creating a docker, assuming docker is installed (if it’s not go here: Install Docker Engine) is to build a DockerFile. The DockerFile starts with a base image and then you can add the files needed for your application. I started with a base image of python:3.11-slim, Linux-based, which should work for ECS.
then added my files to it and configured pip to install my requirements.txt once my files were copied. Finally, I set the entry point to call Python with my script name as the parameter.
FROM python:3.11-slim

WORKDIR /usr/src/app

COPY parameters.py .
COPY watermark.py .
COPY requirements.txt .
COPY Roboto/ Roboto/
RUN pip install --no-cache-dir -r requirements.txt

CMD ["python", "watermark.py"]
I’m on a Mac but I think this command is pretty universal for docker. I used:
docker build -t watermarking-app . while in the project folder - which builds the docker image.
You can confirm your image was created by running:
❯ docker image ls watermarking-app
REPOSITORY         TAG       IMAGE ID       CREATED         SIZE
watermarking-app   latest    f39c1dd48ba7   6 minutes ago   208MB
Finally you can test your container locally using:
❯ docker run -v ~/.aws:/root/.aws:ro watermarking-app
2024-02-17 18:45:55,098: INFO: No messages to process
2024-02-17 18:46:15,139: INFO: No messages to process
2024-02-17 18:46:35,186: INFO: No messages to process
2024-02-17 18:46:40,534: INFO: Processing message: ee4bd28d-00f1-4fb0-a40d-e094e376ad52
2024-02-17 18:46:46,906: INFO: Successfully watermarked and uploaded jgm-watermarking-project/input/image.png  to jgm-watermarking-project/output/image.png
2024-02-17 18:47:06,993: INFO: No messages to process
CI/CD and GitHub
Before we set up ECS we should consider setting up a CI/CD pipeline for this project. You could do this using AWS CodeCommit. But I will set it up with GitHub. I’m not going to take you through the process of setting up a GitHub account or repo, in this article, but I will set up the repo so that we can use it when setting up our CodeBuild service to build our image and push it to the Elastic Container Registry.
The Repo is at aws-lab-watermarking-ecs.
The next step is to set up code CodeBuild. Go to the CodeBuild console and choose Create project. I will call my project watermarking-build. For the source choose GitHub and connect with Oauth. You will need to authenticate with GitHub at this point. At this point choose Repository in my GitHub account (unless you are cloning mine instead - but that really doesn’t make sense for your own CI/CD pipeline) and find your repository.
Next, tick the box next to Rebuild every time a code change is pushed to this repository. Choose Single build. In the section Filter Group 1 choose Push, so the code gets rebuilt on a push webhook from GitHub.
For the environment section, you can probably leave things as default.
But you will need some permissions. You could create your own service role for CodeBuild, and in production that is probably what you would need to do. But for this lab - since I assume you are interacting with the console as an Administrator I would suggest just choosing New service role and taking the default.
Under the Buildspec section select Use a buildspec file and accept the default of buildspec.yml. We will create this later in this section.
I would turn on ClodWatch logs and just accept the default Group Name.
Finally, click on Create build project.
At this point, we are going to need to set up the Amazon Elastic Container Registry. Go to the Elastic Container Registry console and Create a repository. Choose Private for visibility. For the repository name, I chose watermarking-ecr, The other settings can be left as default. Note the URI from the ECR and go back to the CodeBuild console.
Navigate to your CodeBuild project and Project details. Click edit on the Environment section. Spin down the Additional configuration part of the interface and find the part that says Environment variables. Add three environment variables:
| Name | Value | Type |
|---|---|---|
| ECR_REPOSITORY_URI | {YOUR ECR URI} | Plaintext |
| AWS_DEFAULT_REGION | us-east-2 | Plaintext |
| IMAGE_TAG | latest | Plaintext |
Now let’s go back to our code editor and work on our Buildspec.yml file.
version: 0.2

phases:
  pre_build:
    commands:
      - echo Changing Directory into the aws_watermrk directory
      - echo Logging in to Amazon ECR...
      - ECR_LOGIN_PASSWORD=$(aws ecr get-login-password --region $AWS_DEFAULT_REGION)
      - echo $ECR_LOGIN_PASSWORD | docker login --username AWS --password-stdin $ECR_REPOSITORY_URI
  build:
    commands:
      - echo Build started
      - echo Building the Docker image...
      - docker build -t $ECR_REPOSITORY_URI:aws-watermark_latest .
  post_build:
    commands:
      - echo Build completed
      - echo Pushing the Docker image...
      - docker push $ECR_REPOSITORY_URI:aws-watermark_latest
Create your Buildspec.yml and paste the above. The Buildspec.yml instructs CodeBuild how to build your code and how to push your docker image to the ECR.
In this case, before we start our build we are asking ECR to give us the login password for Code Deploy to use and then logging into the ECR with that password.
Then we instruct Code Build to call the Docker build command, similar to the one we ran locally on the pulled code directory.
Finally, when the container is built we tell Docker to push the container to the ECR.
We have one more step we need to complete. We should give our Code Build role access to ECR. Again, I’m going to avoid complexity here - by simply giving the role all permissions on the ECR - you would be more restrictive in a production situation.
On the CodeBuild project find the ServiceRole and click on its ARN. Click on Add permissions, and Attach policies. I added AmazonEC2ContainerRegistryFullAccess and CloudWatchLogsFullAccess.
We should be ready to test this process now. Go ahead and add the buildspec.yml to your git repository locally and push the changes to GitHub. If you go over to CodeBuild quickly you should be able to monitor the build in progress.
If all went well, you should now see a docker image in your ECR console.
ECS Set Up
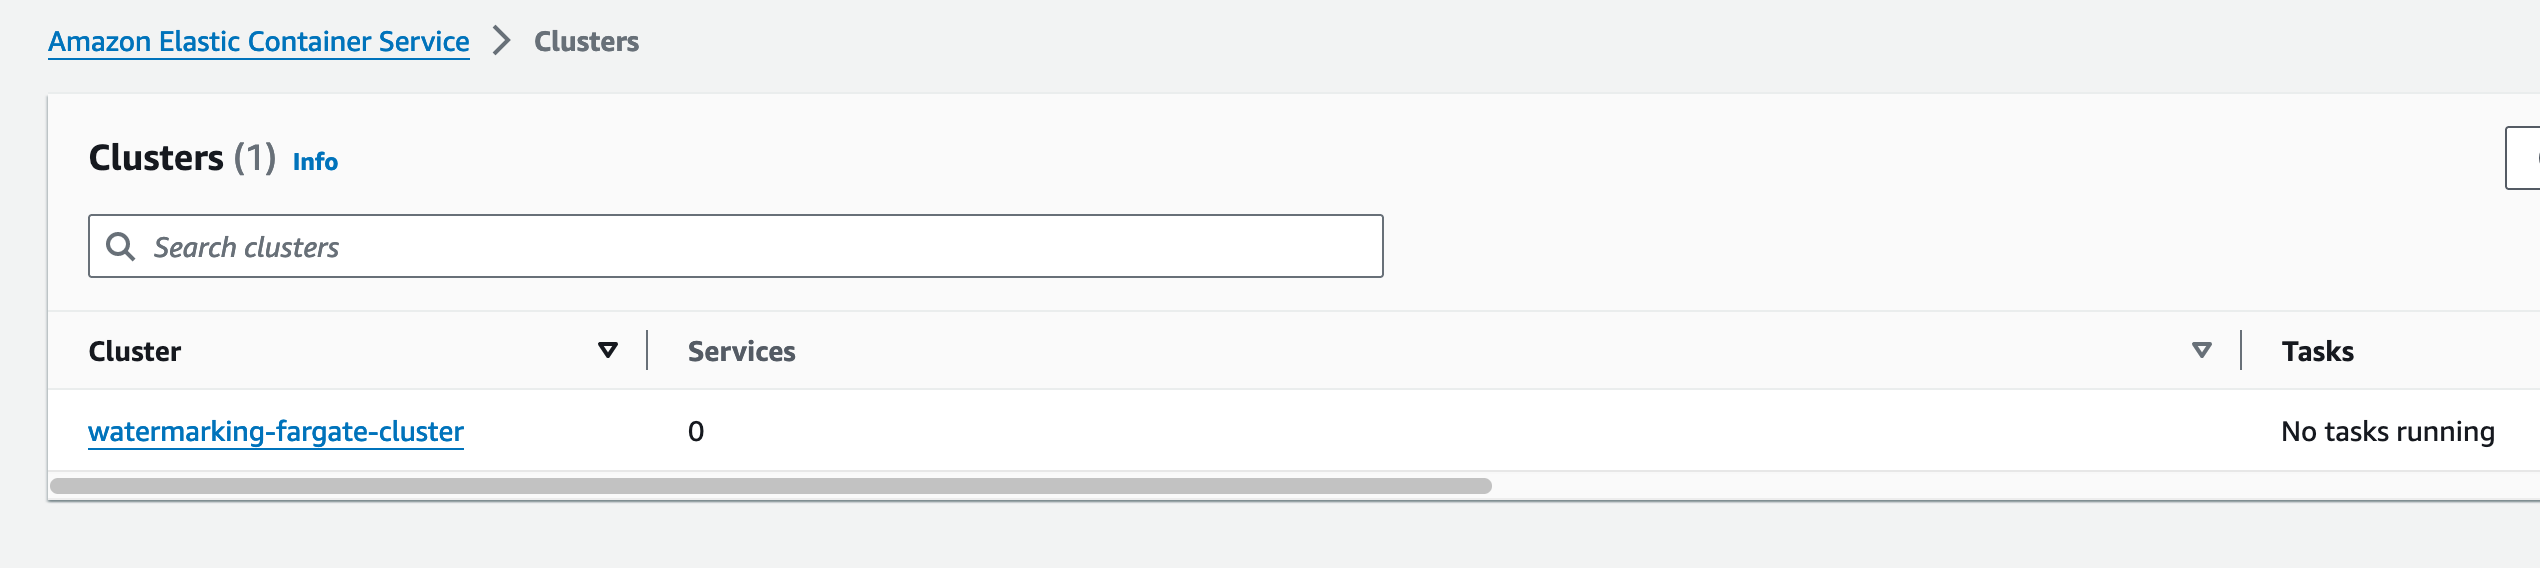
Our next task is to set up our ECS Fargate cluster and tasks. This will enable our pipeline from start to finish on AWS. Navigate to the ECS console. Click on Create Cluster. For the Cluster name, I am using watermarking-fargate-cluster. Make sure AWS Fargate is ticked. You can leave the rest as default. Click Create.
For me, this failed the first time, but the error provided a link to the CloudFormation template that it used to create it. I was able to just hit retry there and it created successfully. Back at the ECS console we now have a Fargate cluster.
Click on Task definitions, on the left side menu. Click on Create new task definition. I named my task definition watermarking-task. In the infrastructure section make sure AWS Fargate is checked and Amazon EC2 instances are unchecked. The defaults are probably fine, but I moved my CPU down to .5 vCPU and 1GB of memory. Make sure the Operating system and Architecture are set to Linux/X86_64.
For the task role select None for now. We will create a role later and add it to the task. For the Task Execution role just let the service Create a new Role.
Scrolling down to the container select a name; I used watermarking-container and provide the URL of your container from ECS.
We don’t need any port mappings so remove the default port 80 mapping. The rest of the settings are probably ok as is so just click on Create at the bottom of the page.
Now we need to go to to IAM and create a role for ECS. Go to Roles. Create Role. Choose Elastic Container Service from the Service or use case drop-down. Select Elastic Container Service Task. Click Next. Choose the WatermarkImageScriptPermissions policy we created earlier. Hit Next. Name the new role, I called mine WatarmerkImageTaskRole. Click on Create Role.
Go back to the ECS console. Go to your task. Click on Create new Revision. Modify the task role to the role we just created. Click on Create.
Now it’s time to create the Service. Click on Clusters. Then click on the Cluster you created. On the Services tab click on Create. Choose Launch type for compute configuration and make sure the Launch type is set to FARGATE and Platform version is set to latest.
In the Deployment configuration choose Task. For Family choose your task - set the revision to the one that says LATEST.
For Desired tasks leave it set to one for now.
Everything else can be left as default. Just click Create.
Once the container starts you should be able to test if your service is working.
Autoscaling
Our task is up and running now. We process any png file that is deposited into the input folder and deliver it to the output folder with the watermark. If you look at Cloudwatch logs you can see your script polling the Queue looking for messages and processing them as they arrive.
If this were a real service you would want to scale it so it would create additional containers and process the images based on the length of the queue. Since this is just our own toy project though - we are unlikely to get to the point where that makes sense. But we can simulate it.
To start we need to create a couple of CloudWatch alarms to use for scaling. Navigate to the CloudWatch console. Click on Alarms. All Alarms. Create Alarm. Click on Select metric. You should see a box with SQS, click on that. Next, click Queue Metrics. Select the metric that says ApproximateNumberOfMessagesVisible. Click on Select metric. Change the Period to one minute so we don’t need to wait too long for the scaling events to start. Choose Static. Choose Greater. Choose a fairly low number like ten, in reality, you might choose something different and do some analysis around the right numbers here - but our purpose is to make the scale-up sensitive so we can watch it happen. Click Next.
For the next screen, remove the notification. Then click Next.
For the alarm name, I chose, watermark-autoscale-up-alarm. Click Next. Finally, click Create Alarm.
Follow the same procedure as above, except instead of greater choose Lower. Then set the threshold to one. I called this one watermark-autoscale-down-alarm.
Next, go back to ECS console. Go to your cluster. Go to Tasks. Click on Stop all tasks.
Go to the Services tab. Click on Create. This time we will choose Launch Type again, FARGATE, and LATEST. But in Deployment configuration choose service. For the service name, I chose watermarking-ecs-service. For desired tasks, this time I chose 0 (zero). Then scroll down and hit Create. Wait for the service to be created.
Click on the service. Click on update service. Scroll down to Service auto scaling. Make sure the Use service auto scaling is ticked. Set the minimum and maximum tasks. I chose 0 and 3 respectively. Click on Add scaling policies.
For each type choose Step Scaling. For policy names, I chose watermarking-service-scale-up-policy and watermarking-service-scale-down-policy. Select the option to, Use an existing alarm. Choose Add for the scale-up policy. Choose Remove for the scale-down policy. Set the value to one for both of the policies and the type to tasks. Set the cooldown to one minute (60 seconds).
When you have configured both scaling policies. Click on Update.
Final Exercise of the Project
We have done it. We have created a cloud-native, decoupled, auto-scaling, containerized service. It is a toy - but the same concepts can be used to deploy a more complex service. Your imagination is the only limit.
The only thing left to do is to exercise the solution - to see it in action. To do that the simplest way is probably to just upload a bunch of objects to the S3 bucket. And while it might be possible to do this quickly enough manually - it is much easier to script it.
To that end, I have added a script to the GitHub repository. The script is called stresser.py. It will upload the same image over and over again constantly - creating unique filenames for each upload. This should cause you to be able to see your service scale out. When you stop the script, and the queue empties you should see the service scale down until it reaches zero running tasks.
For the script to work, however, we need to modify our user and give it one more permission.
Go to the IAM console. Click on users. Click on the developer user, in my case watermark-dev-user. Click on add permissions. Click on Create inline policy. Choose JSON. Modify this as necessary to match your bucket information.
{
 "Version": "2012-10-17",
 "Statement": [
        {
            "Sid": "AllowPutOfInputObjects",
            "Effect": "Allow",
            "Action": [
                "s3:PutObject"
            ],
            "Resource": [
                "arn:aws:s3:::jgm-watermarking-project/input/*"
            ]
        }
 ]
}
Click Next. For the Policy name I used, AllowWatermarkingDevUserToPutInputObjects. Click on Create policy.
Now run the stresser.py script for a few minutes. Be careful not to run it very long it will produce a lot of uploads. Fairly quickly you should see your tasks scale up to your maximum task limit. Wait for the queue to empty and they should scale back down to zero tasks. If you go look in your S3 output folder you should see all of the processed images (they are the same image - but they should all be uniquely watermarked).
Final Thoughts
There is always more to do in these kinds of labs/exercises. One thought I had was implementing a Dead Letter Queue (DLQ) with some sort of notification. That would be simple to add. Additionally, the code could certainly use some tuning, it currently wouldn’t work with any filetype that didn’t have an alpha channel - so that would be considered a bug.
But my goal with this was to learn how to effectively use ECS, at least to the level of getting my own code running on the service and that goal was achieved. My other goal with this posting is to share my learnings. This has two benefits - if someone sees this and it is helpful, that is great! If no one ever sees it though, documenting the process is a good exercise for ensuring you know how to do what you are trying to do and not just going through the motions. The documentation here was just as important to my exercise as the actual implementation.
I didn’t include tear-down instructions here - but it is fairly simple to do - just work backward and remove anything you created. Make sure you reconfigure your local profiles the way you had them before you started as well. If you choose not to delete the resources - because we set it to scale to zero the costs should be next to zero even if your free tier year has expired.
I will, however, give you a tip to delete all of the files littering your bucket.
Cleaning up the Bucket once the stresser.py Script has had its way with it
Since we don’t want to make more changes to our development user at this point we will just use Amazon’s built-in CloudShell terminal. In the console in the top right-hand of the screen, you will see this icon:
![]()
Click that and a terminal will appear. This terminal runs with the security credentials associated with your console user so, if you were able to do the rest of this - it should have permissions to do this. Modify as needed for your environment.
[cloudshell-user@ip-10-130-5-164 ~]$ aws s3  rm --recursive s3://jgm-watermarking-project/output > /dev/null
[cloudshell-user@ip-10-130-5-164 ~]$ aws s3  rm --recursive s3://jgm-watermarking-project/input > /dev/null
[cloudshell-user@ip-10-130-5-164 ~]$ aws s3api put-object --bucket jgm-watermarking-project --key input/
{
    "ETag": "\"REDACTED\"",
    "ServerSideEncryption": "AES256"
}
[cloudshell-user@ip-10-130-5-164 ~]$ aws s3api put-object --bucket jgm-watermarking-project --key output/
{
    "ETag": "\"REDACTED\"",
    "ServerSideEncryption": "AES256"
}
[cloudshell-user@ip-10-130-5-164 ~]$ aws s3 ls jgm-watermarking-project
                           PRE input/
                           PRE output/
[cloudshell-user@ip-10-130-5-164 ~]$
This should delete all of the images in the bucket, but in the process, the prefixes get destroyed. So the last two commands recreate them.
Ok - That’s it. If you read this far thank you! I’d love to hear from you please feel free to use the contact information on this page.